If accessing this page from the Forma extension and you wish to view in a browser, please click HERE

To use the FenestraPro extension in Autodesk Forma, you must first have access to Forma (an online modeling tool). To add Forma to your Autodesk ‘Products and Services’, you may need to contact Autodesk to have it added to your subscription package (free Trials are available).
For release notes for the current version of the FenestraPro Envelope Analysis extension in Forma, please see HERE
Summary of how to use the FenestraPro Forma Extension. Each of these are explained in more detail below.
- Install the extension
- Select the model proposal (if there are multiple models, one at a time can be analyzed)
- Select an Energy Code from the list (if list is provided for that region)
- Select whether to Use Code Benchmark Properties or Use Modelled Properties for calculations
- Set the Window to Wall ratio for the overall model
- Window to Wall ratios per Facade may also be set using the Apply by Facade option (if required)
- Define Construction types for elements (if required, when using modelled properties)
- Review Results and Charts for the overall model and per Facade
Video for FenestraPro Extension Version 1.8

Install the Extension
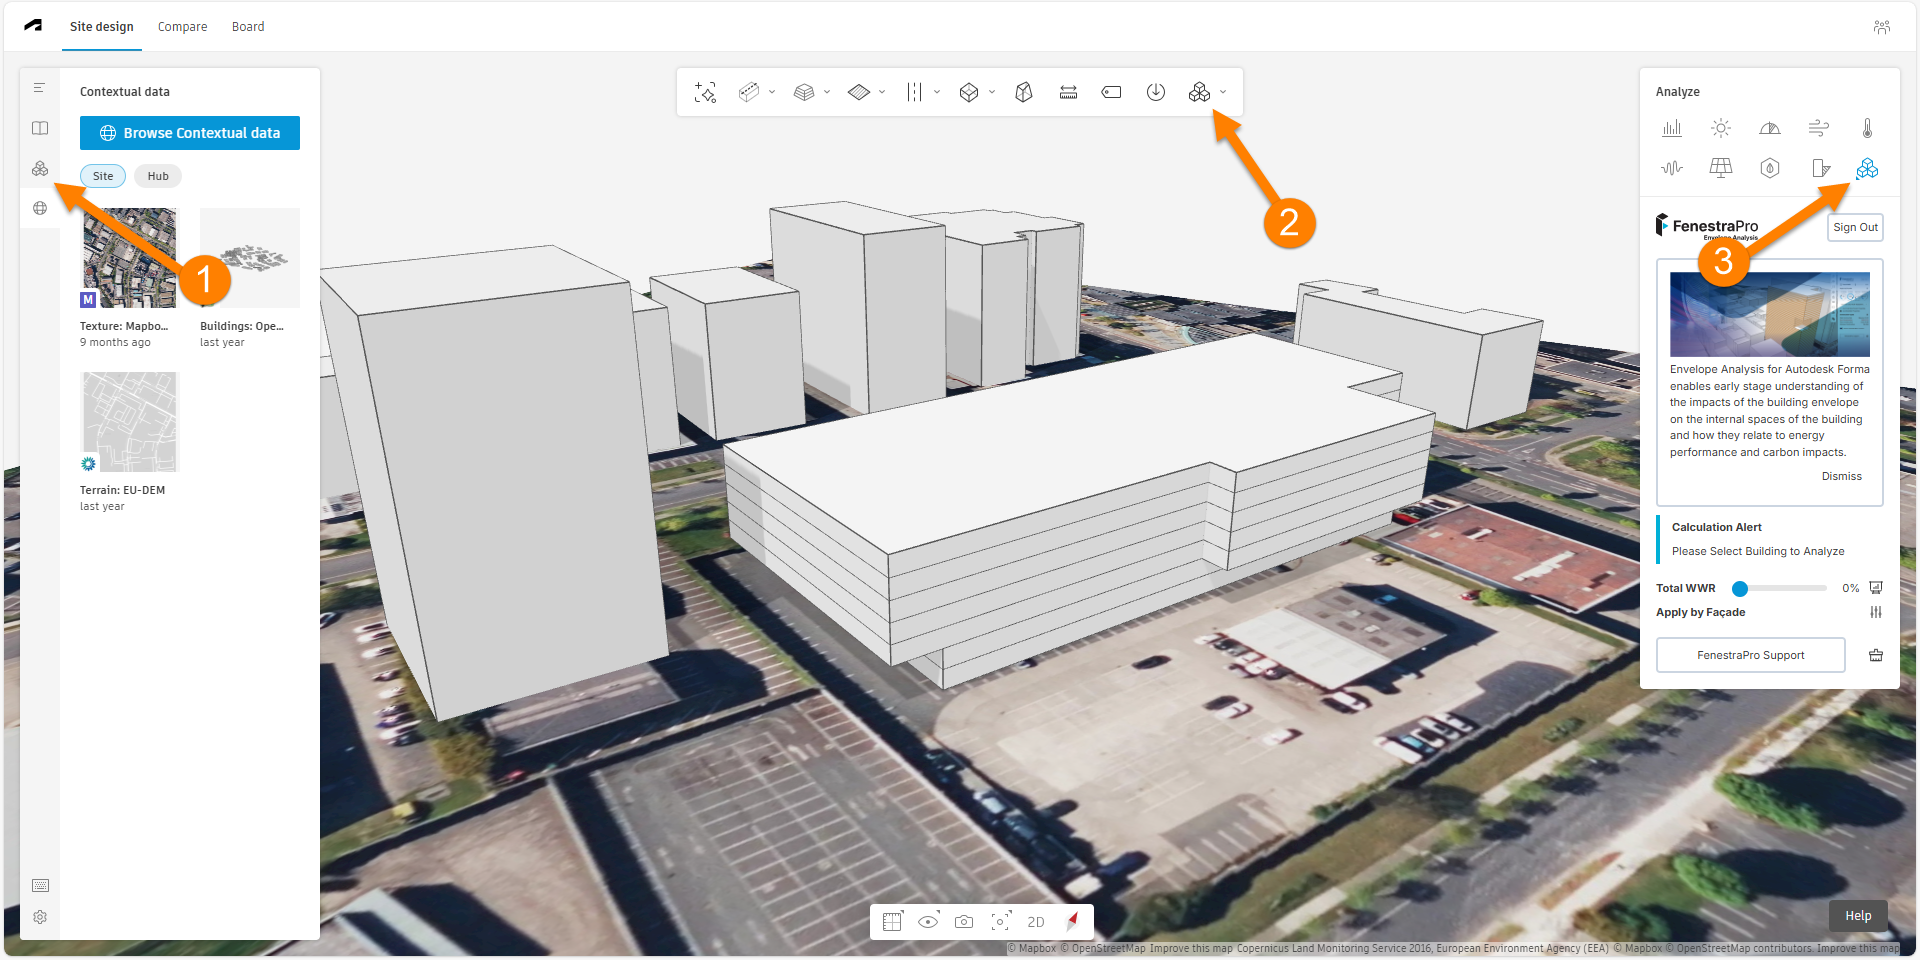
Go to Autodesk Forma online and open a project. It is currently recommended to use the Chrome Browser as other browsers may not be fully compatible. If you have view access only, you may need to join a project in your hub to get editing permission (please check if the project is locked or contact the project owner for access). Click on the ‘Extensions‘ icon. There are several ways to access this: (1) either on the left hand side toolbar, (2) on the main building modeler toolbar or (3) in the analyses options on the upper right of the screen.
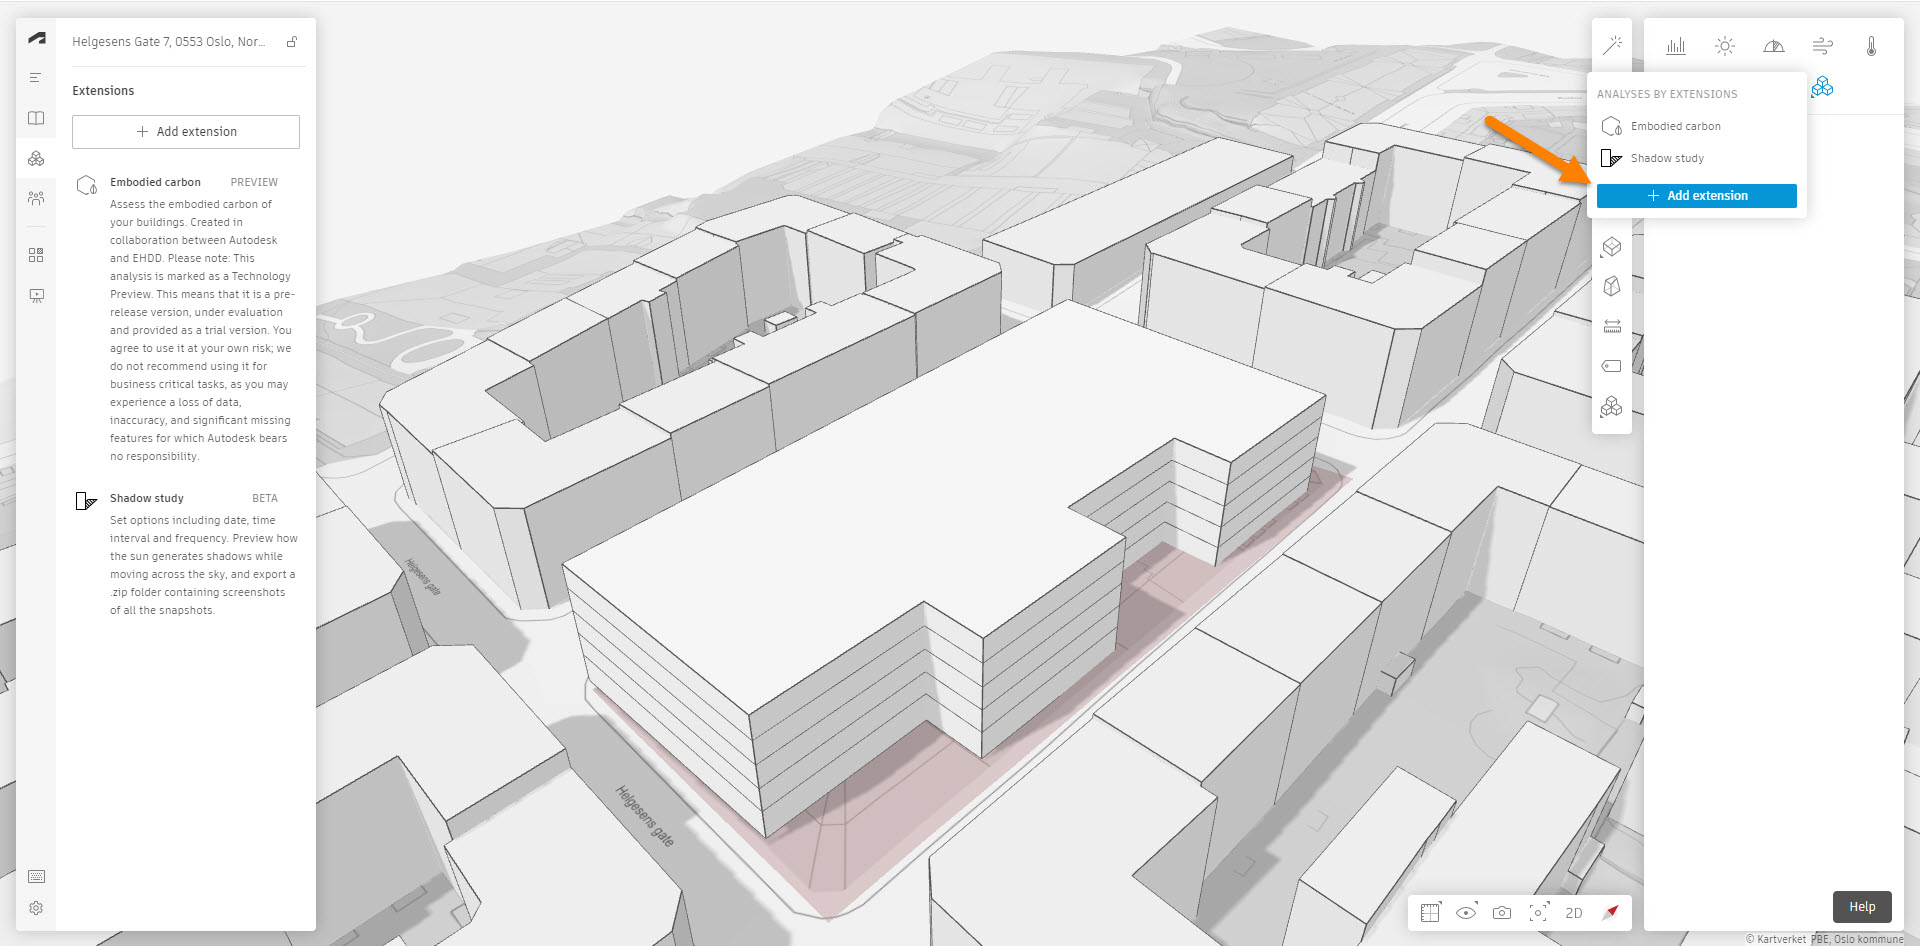
Then click on ‘Add Extension‘.
Find the FenestraPro extension in the Autodesk App Store and click on the Add button. Agree to the terms of use and then close this window. Refresh your browser to update your Forma screen with the new extension.
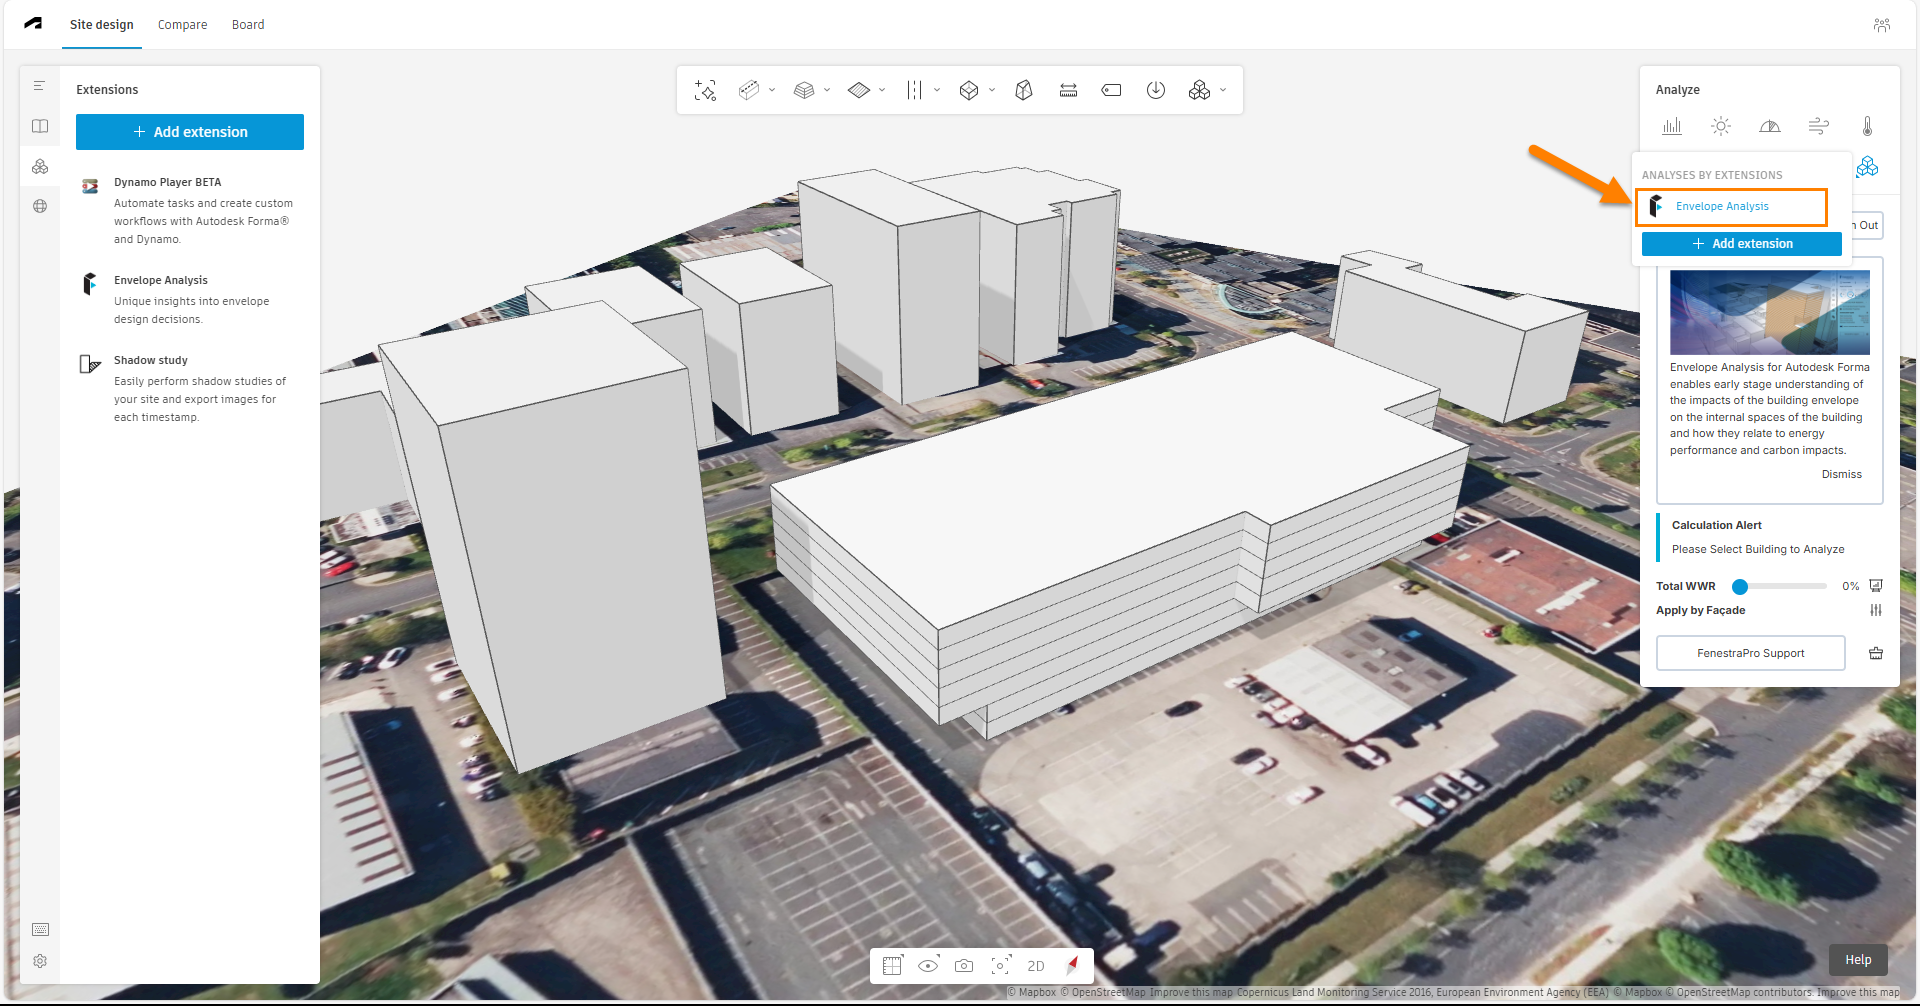
When you hover over the extension option now (‘Analyses by Extension‘), the FenestraPro extension should be listed (among others). Click on the extension to load it into Forma and it will display in the panel below.
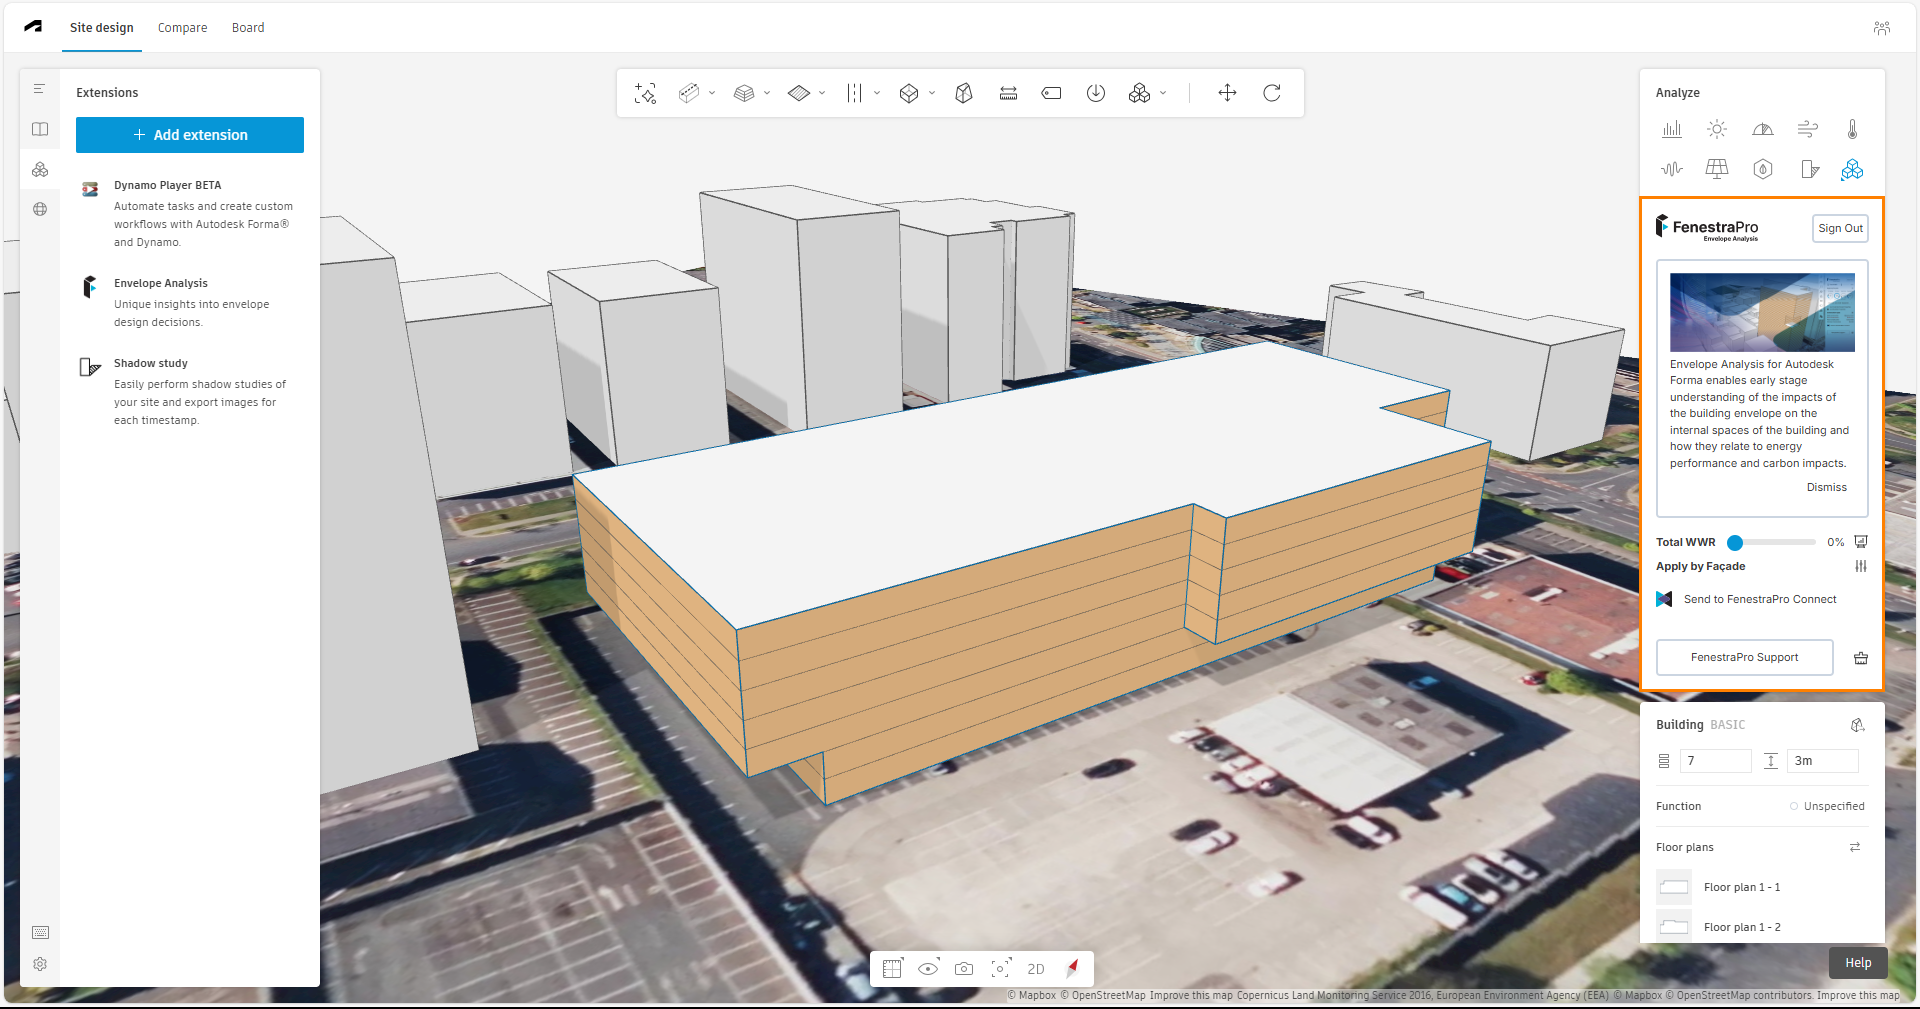
When the extension loads, there is an information panel. You may review this and close the panel if you wish, using ‘dismiss‘. There are also buttons to link to this Support Page.
Creating an Account
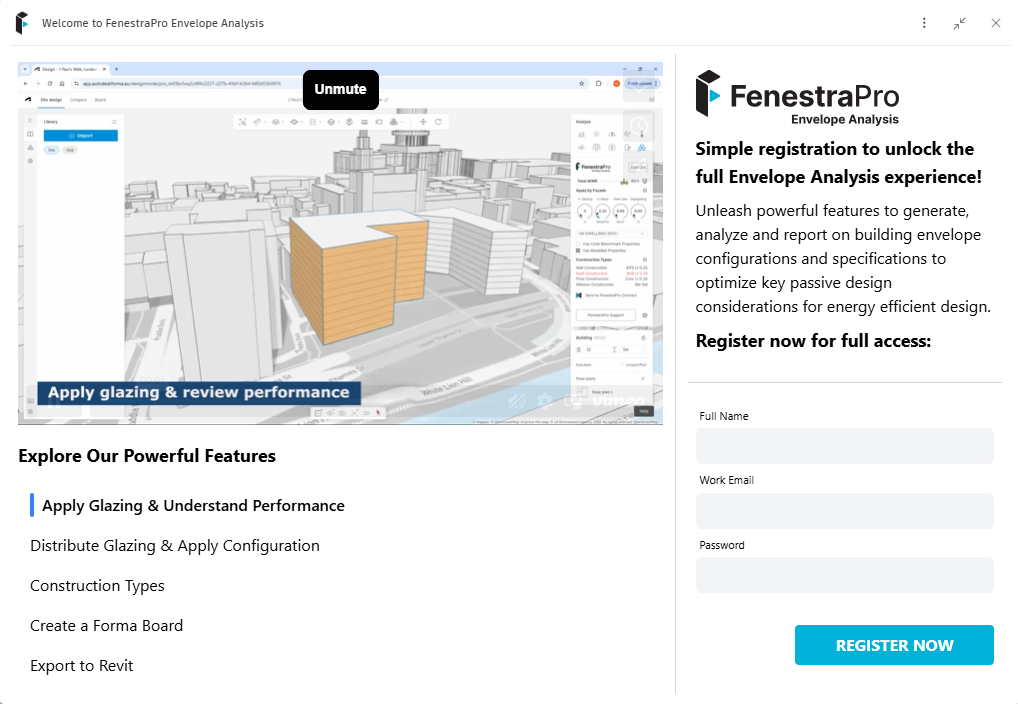
If you are not already registered, you may create an account. This ensures that you will have access to all features for a limited time (30 days). Options will then be displayed for subscription options.
Registering allow you to use Facacde controls, create custom constructions and configure windows.
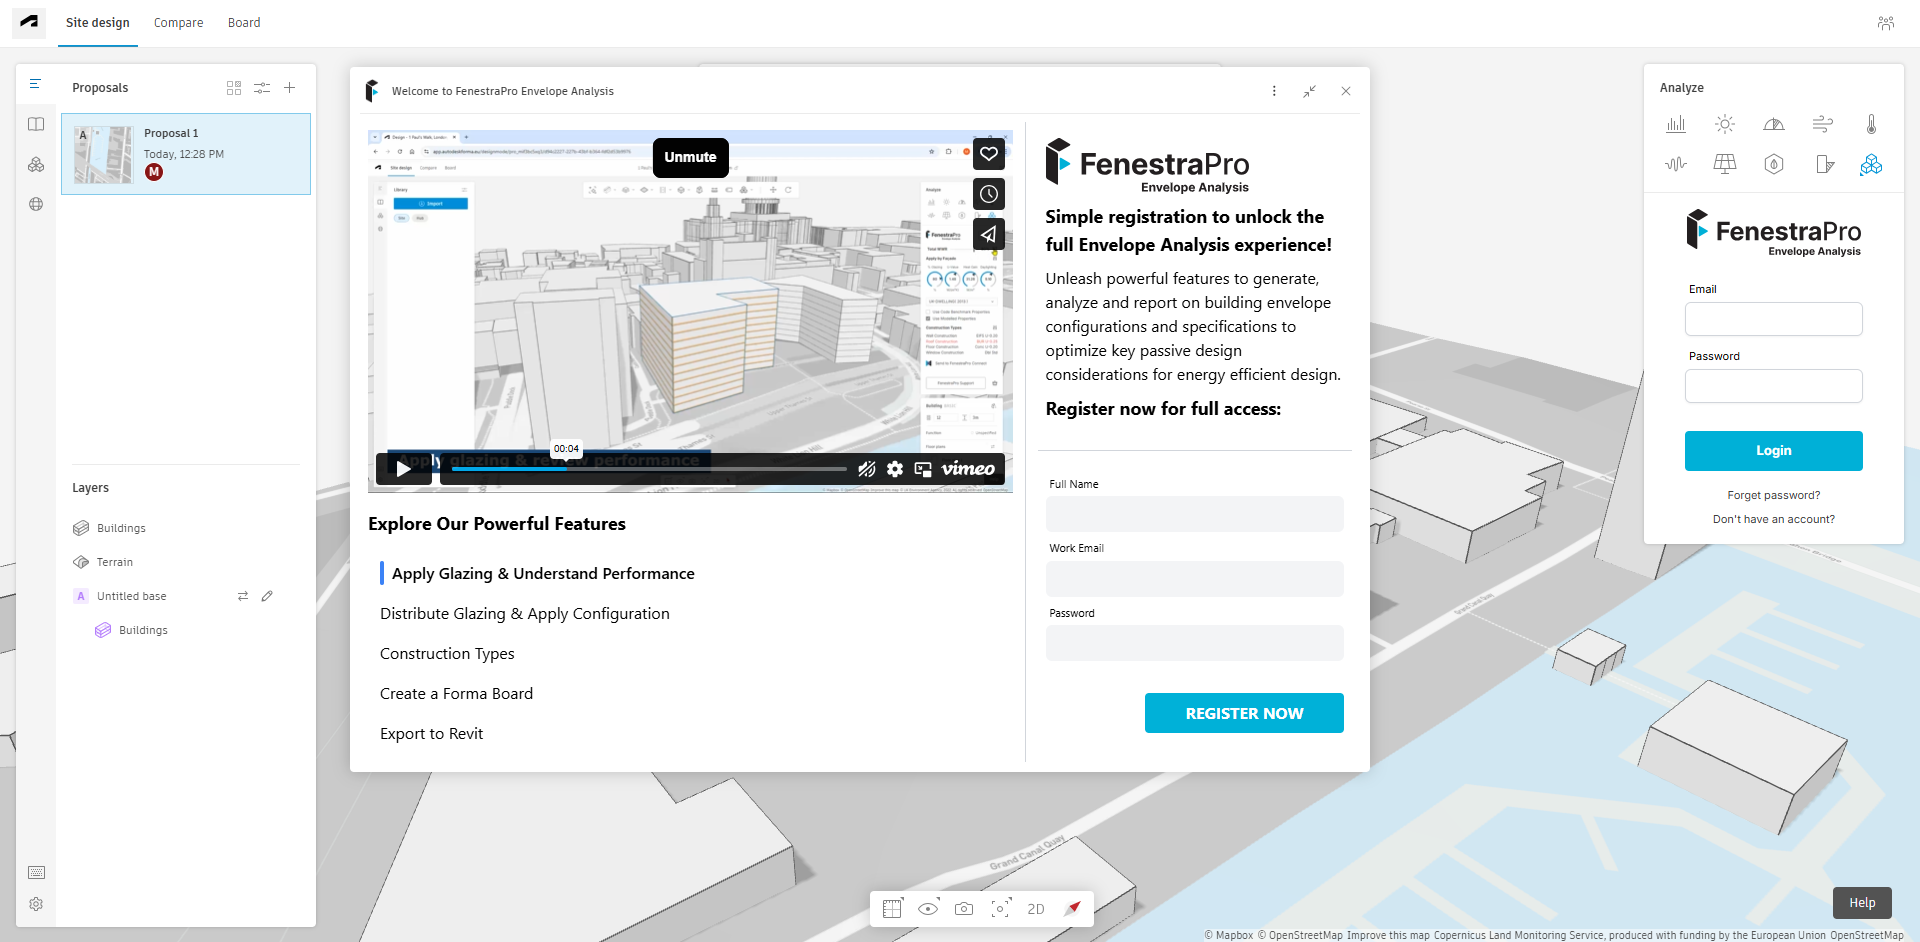
You must first have access to Autodesk Forma in your browser (this can be arranged with Autodesk by adding it to your ‘Products and Services’). Once in Forma, you can add the FenestraPro Envelope Analysis extension using the ‘Extensions’ area in Forma (see the guidelines above for installing). Once the FenestraPro Extension is opened in Forma, you will see the option to register for an account.
The following explains what you will see in the Forma application (once you have installed our extension):
Click on the ‘Register Now’ button and fill in the details to create an account. Registration is free and you can continue using projects as before if you have used the extension already.
Then Sign into your Account. In future, this will ensure that your settings will be saved and any future features which require user storage will continue uninterrupted. If you forget your password, click on ‘Forget Password?‘ enter your email address that you used to create the account and a temporary code will be emailed to you. Enter this code in Forma when prompted along with a new password. Then sign-in with your new password. Note: Please make sure if you are copying and pasting the code that is sent to you, that you do not copy or enter any additional spaces at the end of the code, since this may cause an error.
If you do not have an account, you may register one by clicking ‘Don’t have an account?‘ Simply enter your full name, email address and create a password. You will then have a 30 Day fully functional access to the extension.

Subscription options (as of June 2025)
Certain features in FenestraPro for Forma are free (Overall Glazing Percentage, Code selections and updated Results with Shade Geometry).
When you register for an account, full funcionality is provide for a limited time. This will ensure that your current model settings saved. If you leave the application, close out of Forma or return to the model, the last settings and results will be regenerated. When the 30 Day period of full functionality expires, a paid license subscription is available (as outlined below).
The application also has features which are restricted to a subscription license:
- Define WWR for each Facade separately
- Highlight and Identify Facades
- Generate Window Configurations
- Review Facade Charts & save as Insights to Forma Boards
- Change Construction Types
- Create Custom Constructions
- Export to Revit (using Connect to convert geometry to Revit elements)
When your Trial period has expired and some features are clicked, an advisory window will display to provide options for subscription. Note: specific features may change or be updated/improved in future releases.
Select the Model
It is important to select the entire building that was modeled in Forma before using the extension. Please select the geometry by clicking on the roof area (not the walls or floor). When first starting to analyze a project, please do not set the WWR yet (before selecting the project) as this will initiate the calculations but if no geometry has been selected, you will just see the spinning circle which will not complete (in this case simply refresh your browser).
The model should be created using the ‘Basic Building‘ tool in Forma rather than the Line Building/House or 3D Sketching tool (which may produce separate volumes). Selecting an individual story or including the site context/surroundings should be avoided. Selecting only parts of the building will not produce expected results and the calculations may not complete. The model should be carefully created and modifying floor level outlines separately may create issues (where model surfaces do not exist exactly on the same plane). It may be good practice to select all levels in Forma when adjusting the footprint/outline. Imported geometry is not currently supported (.obj files etc) as they do not have floor levels etc. These can be used as footprints from which to model the project in Forma. Work is ongoing to explore whether imported geometry can be supported.
You may need to hover over a corner or roof edge to assist in selecting the entire proposed design. If you are not able to select the proposal, check the ‘lock buildings’ padlock setting in Forma on the left hand side (this will disable user selection unless the padlock icon is open).
It is best to finalize your design before using the extension, rather than starting analysis and then adjusting the building height/shape etc. If the model is modified while the already extension has launched, refresh your browser to reset and select the entire model again (otherwise results for the original design will still be displayed). Then allow the application to calculate the overall results again. Then adjust the glazing percentage that you wish to apply. Note: the less storeys that the building has, the faster it will be to process calculations. You can select the roof of a building and push or pull in Forma to adjust the height or use the inputs on the right hand side panel to define storeys and storey heights.
Note: The Dials and Energy Code suggestions will not display until the model has some Glazing Percentage applied.
Note: When modeling in Forma, please check your proposal carefully to avoid lines off axis or misaligned walls etc. This can affect the success of the application and ability to analyze the model. When modifying floor plans, lines can sometimes jump/snap to another gridline so that the walls do not align exactly. This can cause issues when analyzing later.
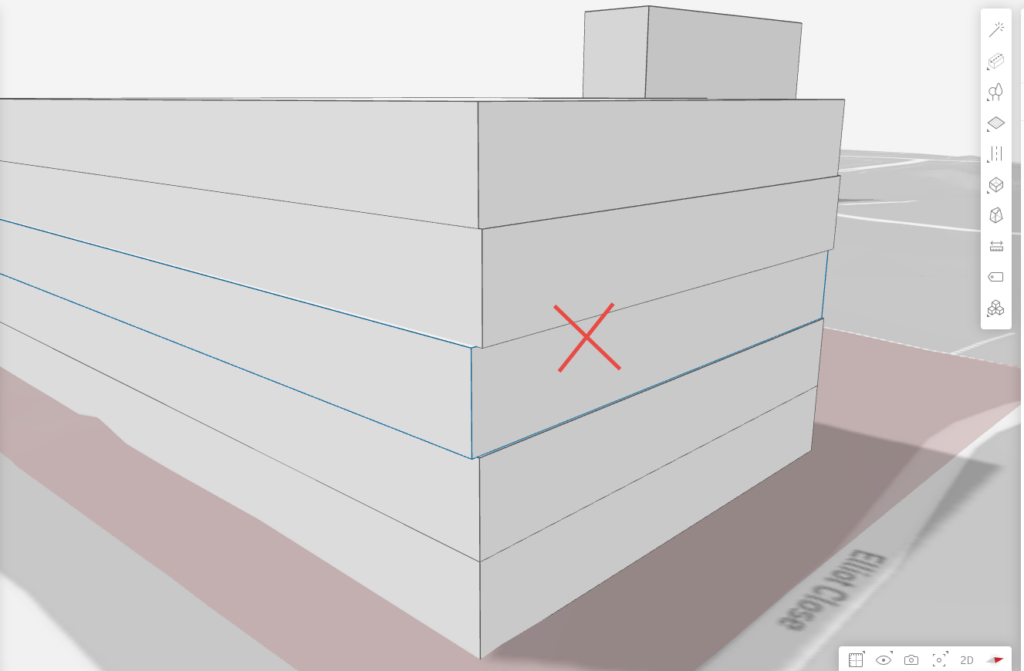
Gaps between geometry can currently also cause issues (these surfaces may not be included in the Facade), please see the image below. Please ensure that gaps are not left between spaces when creating the model (adjacent spaces must physically touch each other). This issue is to be addressed soon.
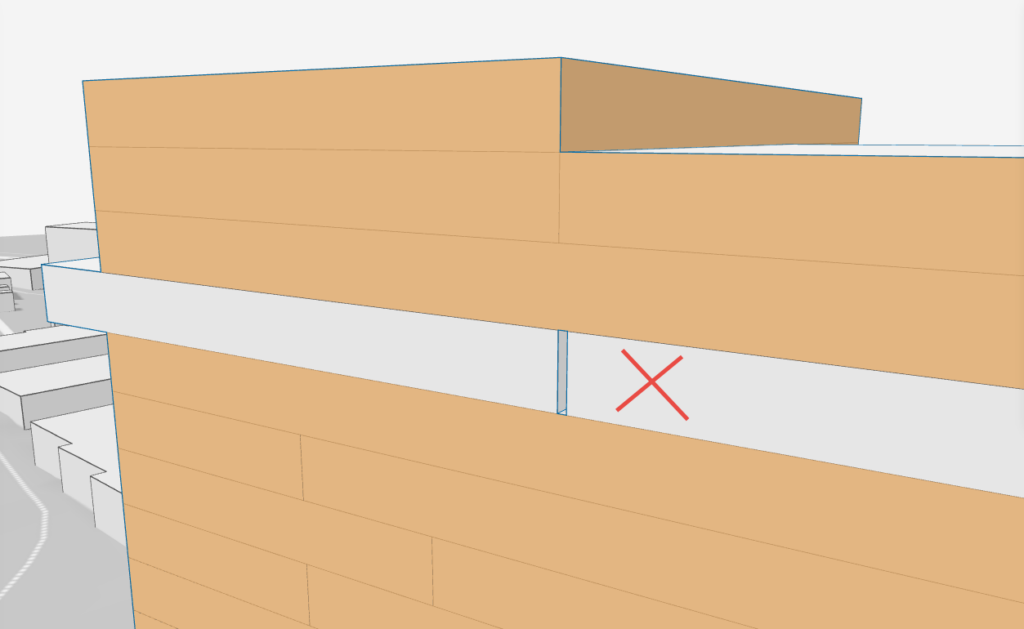
If you are using multiple proposals and switch between them while the FenestraPro extension is open, you may see ghost surfaces relating to a previous model version. Simply select the current active model on screen and it will be analyzed. You may also need to coordinate with other project members who may have editing permissions to change the model while your session is active. Attempting to analyze a model version which has been updated in another project member’s session may not be successful (refresh your browser window to update to the current model condition). More complex models will take longer to process, please be patient (spaces and surfaces need to be identified and Facades assigned). If results do not display in a reasonable time, please refresh your browser and select the model again.
You may have different proposals in Forma (design options). If the geometry is largely the same in each proposal but only surroundings or shade devices differ, then the settings made in FenestraPro will apply to all proposals. If the geometry changes in each proposal, then settings may be applied in FenestraPro separately to each proposal since the number of Facades and configurations may differ.
Please Note: The application does not currently support some project designs such as slanted walls, curves, organic shapes using 3D Sketch or designs where there are large open spaces between geometry (or separate buildings as one model). Support for these model conditions is currently in development. If you need advice on your project, please use the feedback form HERE or contact us by email support@fenestrapro.com.
User Interface
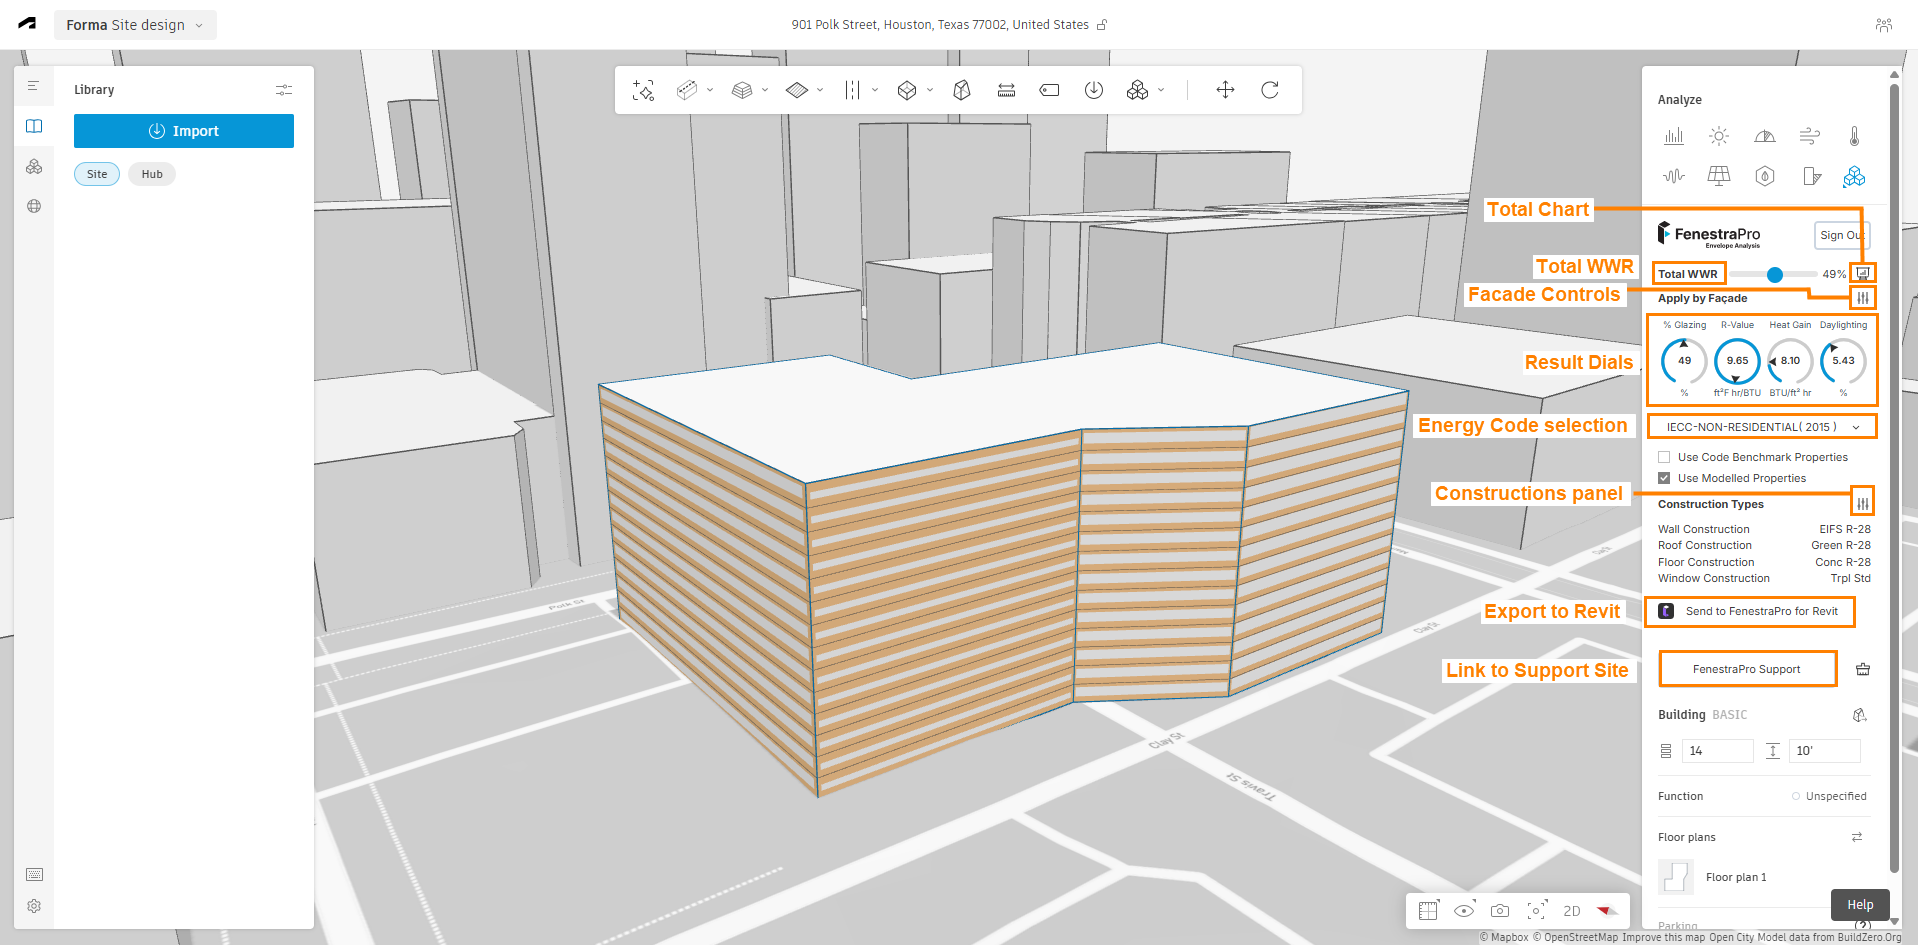
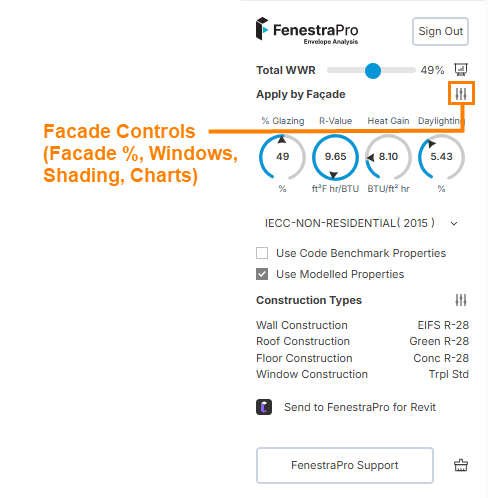
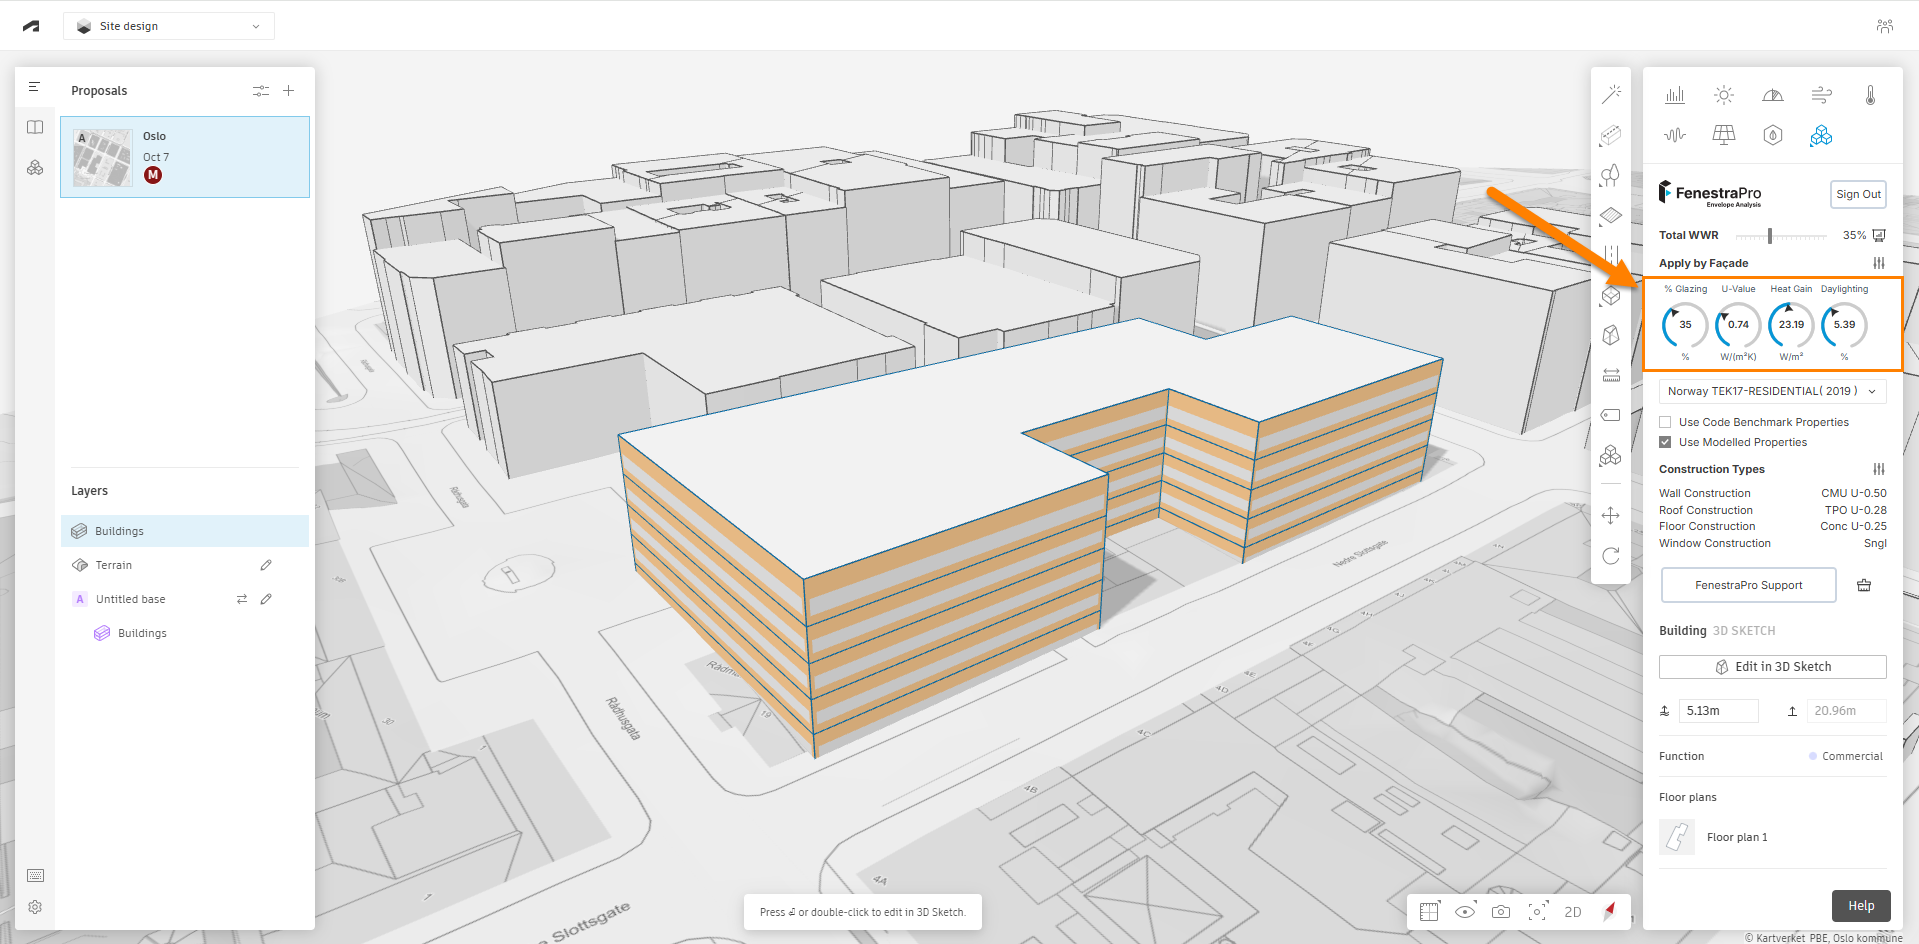
Th main features in the extension are outlined in the image below.
Please Note: The application works best in MS Windows Light mode. Dark Mode may need to be adjusted to view all Charts, Settings and values. This can easily be done by going to your computer Settings, ‘Personalisation’ – ‘Colours’ and ‘Default App Mode’. Ensure that this is set to Light (instead of Dark).
Metrics /Results
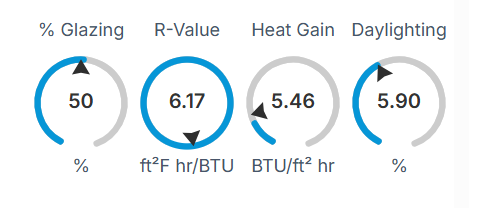
% Glazing
This is the current percentage of the total Facade areas that are glazed. Thi willa djust as individual Facades have their percentage adjusted or if windows are configured on areas.
U-value / R-value
The dial displays the current overall Facade Performance (wall and glazing) based on the current construction types used and their U-values/R-values. The Facade Charts also display Facade Performance for each selected Facade.
Heat Gain
The Heat Gain value will display the heat from the sun being collected and contained per unit floor area of space (metres or feet) in the perimeter zone. This is expressed as W/m2 or BTU/ft2 hr. If there are spaces/rooms defined, the Heat Gain will typically be higher than an open plan arrangement where the heat is dispersed. Rooms/Spaces can be defined in the Forma model by adding lines on a Floor Plan. To obtain the Heat Gain result, FenestraPro uses standard factors sourced from the CIBSE Environmental Design Guide, such as Solar Transmittance of the glazing, perimeter zone depth, shading factor, Facade length etc. Meteonorm is used to obtain certified gloal solar radiation data for project locations.
A perimeter zone of 6 metres / 19.6 feet is taken as space depths.
Daylighting
Design Daylight Factor is calculated as a percentage per Unit Floor Area within the Perimeter Zone for each Façade/Surface. The perimeter zone is an area inside the envelope of the builidng with a typical depth of 6 metres / ~20 feet. Daylight and Heat Gain are measured in this area.
This is a ratio of illuminance indoors on a horizontal work-plane to the horizontal illuminance outdoors under an overcast sky. It is a good measure for quickly comparing daylight penetration. Most guidelines recommend a value of 2 – 5% to achieve a ‘cheerfully lit’ condition and to avoid a room being both underlit or glare.
Daylight Factors can be compared to published guidance for your region. Guidelines usually recommend that a certain value be achieved for a certain percentage of critical task zones.

Window to Wall Ratio
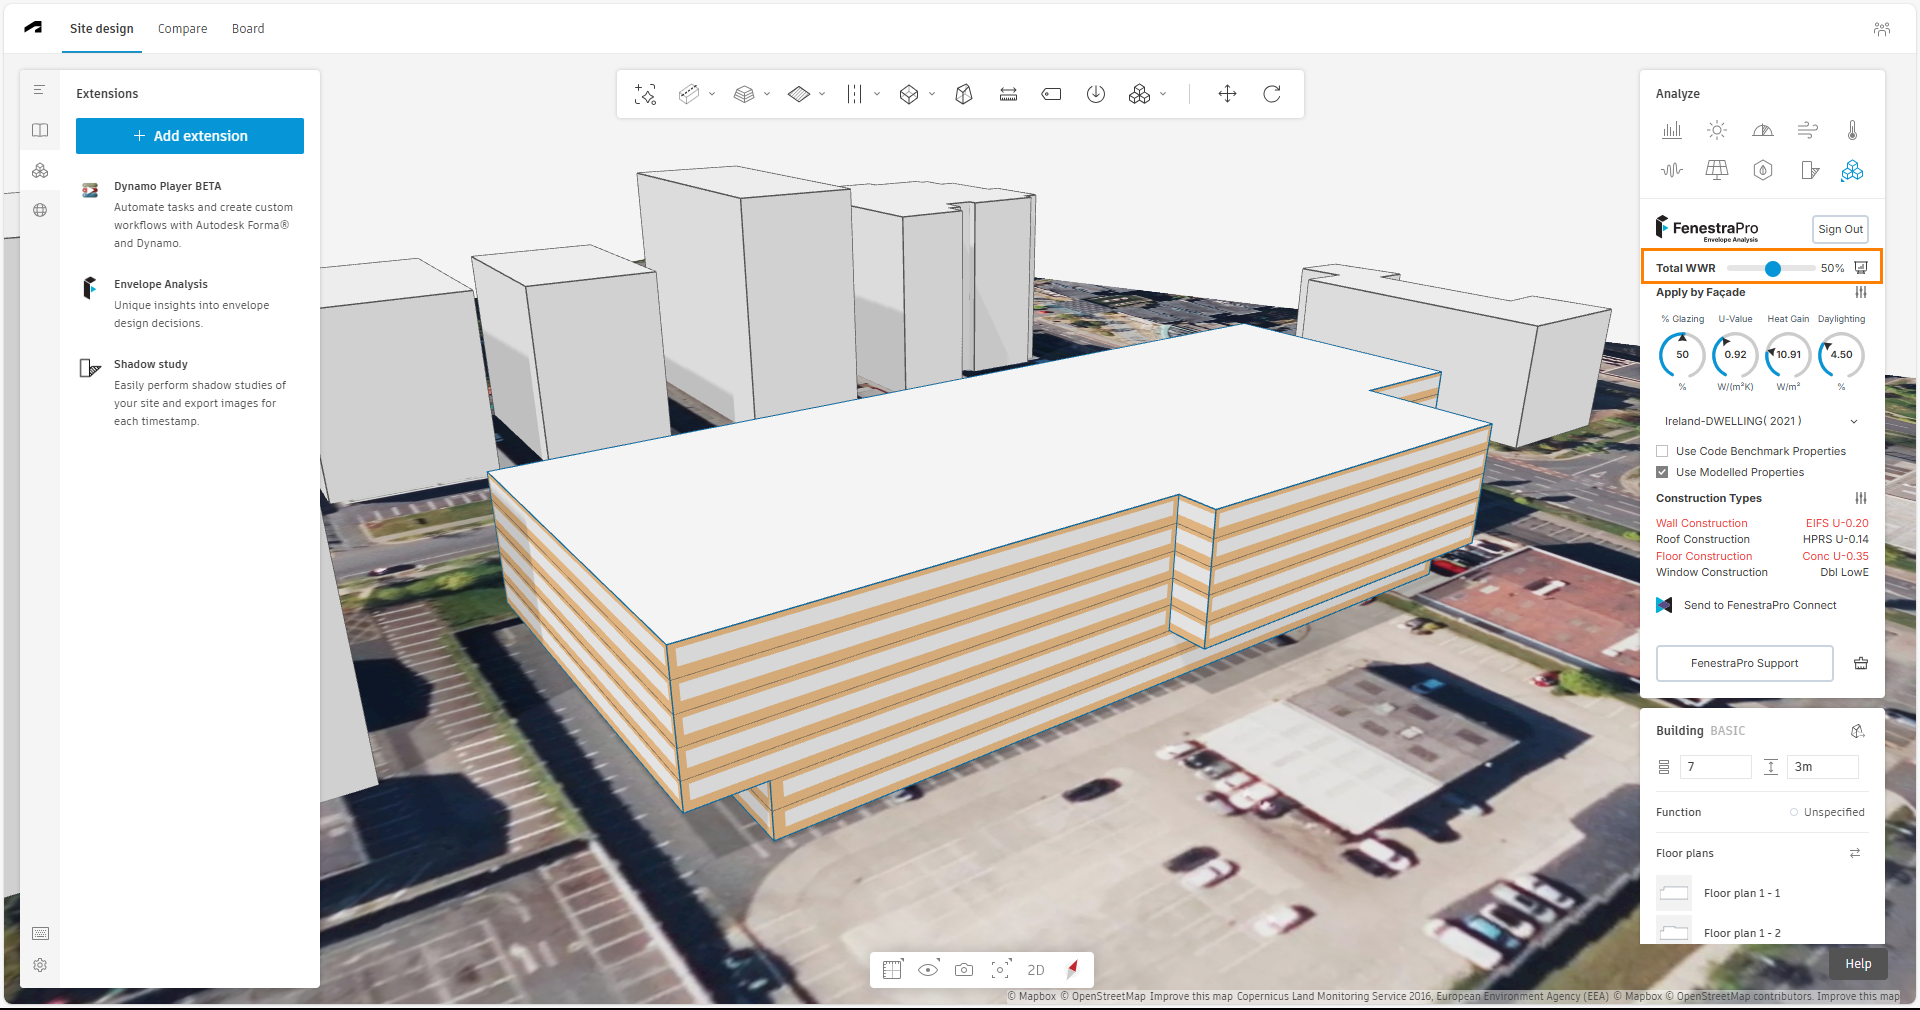
Next, select a Window to Wall ratio to apply to the Forma model. This will be the percentage glazing for the project. The percentage shown is the glazed area compared to the opaque wall area. Use the slider provided to adjust the glazing percentage that you wish to apply. Once this is done, calculations will be performed. Please allow this to complete. Results will then display depending on the amount of glazing applied. Note: the less storeys the building has, the faster it will be to process the calculations.

Apply by Facade
First ensure that the model proposal has been selected in Forma and the extension has calculated initial results and areas. You may use the tab key on your keyboard to help select the entire model. Opening the Façades List before this is done will not display any information.
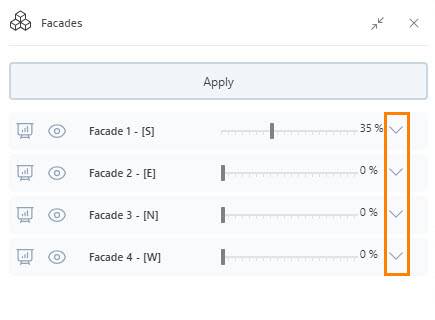
You may open controls for the Façades List which will allow you to set glazing percentages separately for individual Facades.
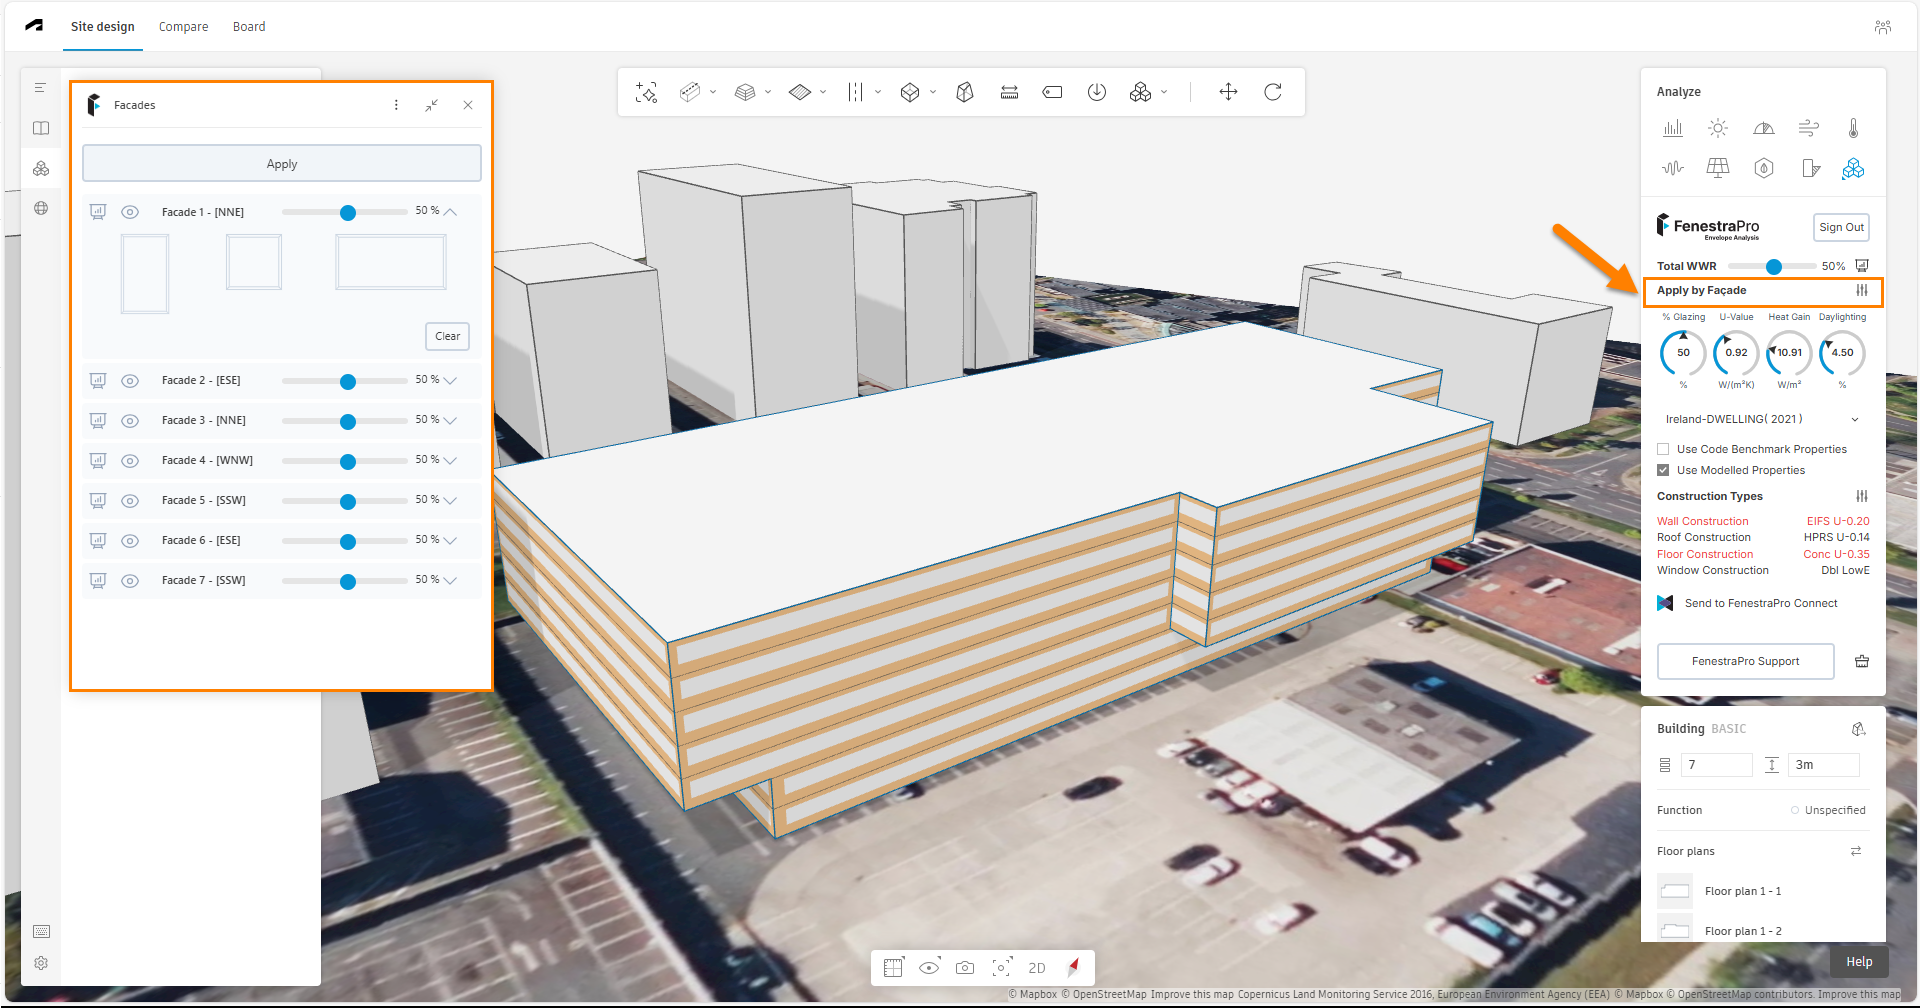
Click on the icon for slider controls beside ‘Apply by Façade’ to open a panel, listing all Façades on the model. You can set the Total Window to Wall (WWR) ratio first and then adjust values for individual Façades, or open the Façades List first and set separate glazing percentages here (the Total WWR for the overall model will then update).
Depending on the design, there may be multiple model planes facing one orientation. There may be several South facing facades for example. Use the sliders to adjust the window to wall ratio for that Façade. A Façade can be set to any percentage in increments of 5 (from 5% to 95%). A Façade may also be set to zero percent. Any adjustments must then be applied using the Apply button to update the Overall Percentage setting for the model.
Important Note: If any changes are made to the project (surroundings are adjusted, the model geometry is changed, shades are added etc) and then settings are adjusted in the extension (percentage glazing, code type, construction types etc), the application may not refresh correctly, since the updates/changes will first need to be recalculated. If any changes are made to the model or project, the model should be re-selected or the browser refreshed FIRST to recalculate results with the updates included. Then you may make changes to the existing settings in the extension.
Highlighting a Facade
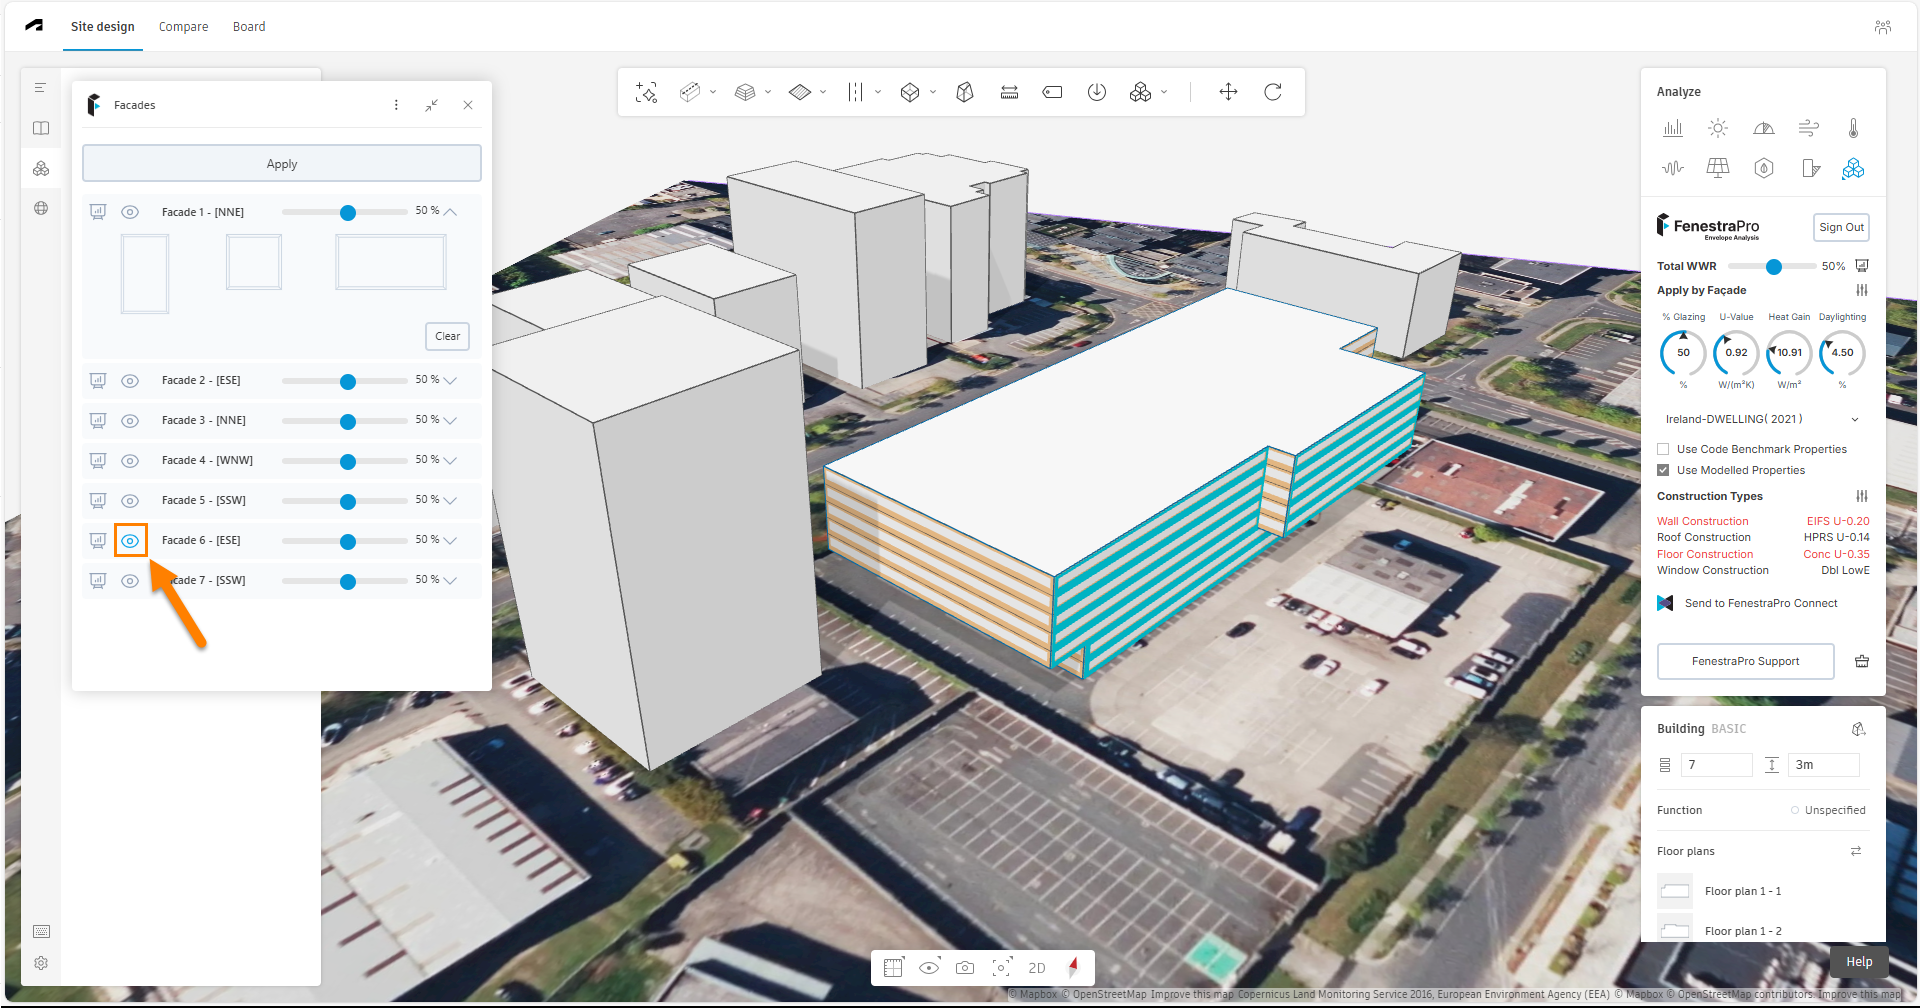
You may highlight the Façade which you wish to adjust using the eye icon in the Facade. Click on the eye icon and the relevant Facade will highlight for a few seconds on the model. The project will also rotate to display and highlight this area for easy identification.
Then use the ‘Apply Here’ button to update the Total WWR (window to wall ratio) for the model. Results for Solar Load and Heat Gain will also update in the dials. The glazing zones displayed on the model will also update to reflect the current percentages.
You may also minimize the Façades panel (to view more of the Forma screen), by using the icon at the top right of the panel. Façade settings will be preserved when the panel is maximized again. If the Façades panel is left open and the Total WWR is adjusted, this setting will override the Façades List. Glazing zones will also update on the model.
Values set for individual Facades will persist when the panel is closed and reopened or if you close your browser window or switch to another model. If you have not yet set any individual values in the Facades panel, once you set the overall percentage Window to Wall ratio slider, all sliders in the Facades will reset to this overall setting. Once the individual Facade sliders are adjusted, the application will remember these individual values instead.
If the Total WWR slider is subsequently adjusted after the individual Façade settings are defined, this overall percentage value will reset all Facades to this percentage (the Facades panel must be closed and reopened to allow the update to happen). If the Façade percentages are defined and applied (after the Total WWR is set), the Façade settings will then override the overall percentage (the overall percentage will update to display the average of the Facade settings). If the project browser is refreshed, the latest percentage setting will be saved and loaded when the model is selected again.
If you select an Energy Code and check the ‘Use Code benchmark properties’ setting, the selected Code will also be remembered even if you close your browser, switch to a different project and back again to this project or open a different Forma extension and later reopen FenestraPro again. Note: the selected Code is not saved if you check the ‘Use Modelled Properties’ setting.
Configure Windows
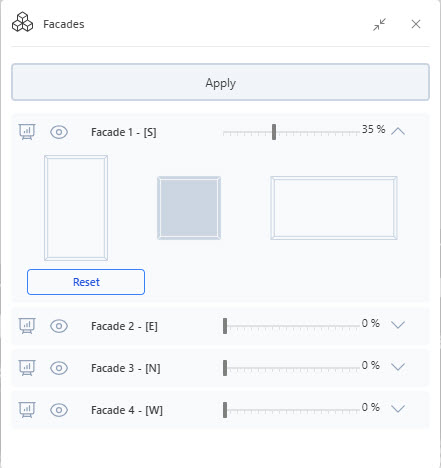
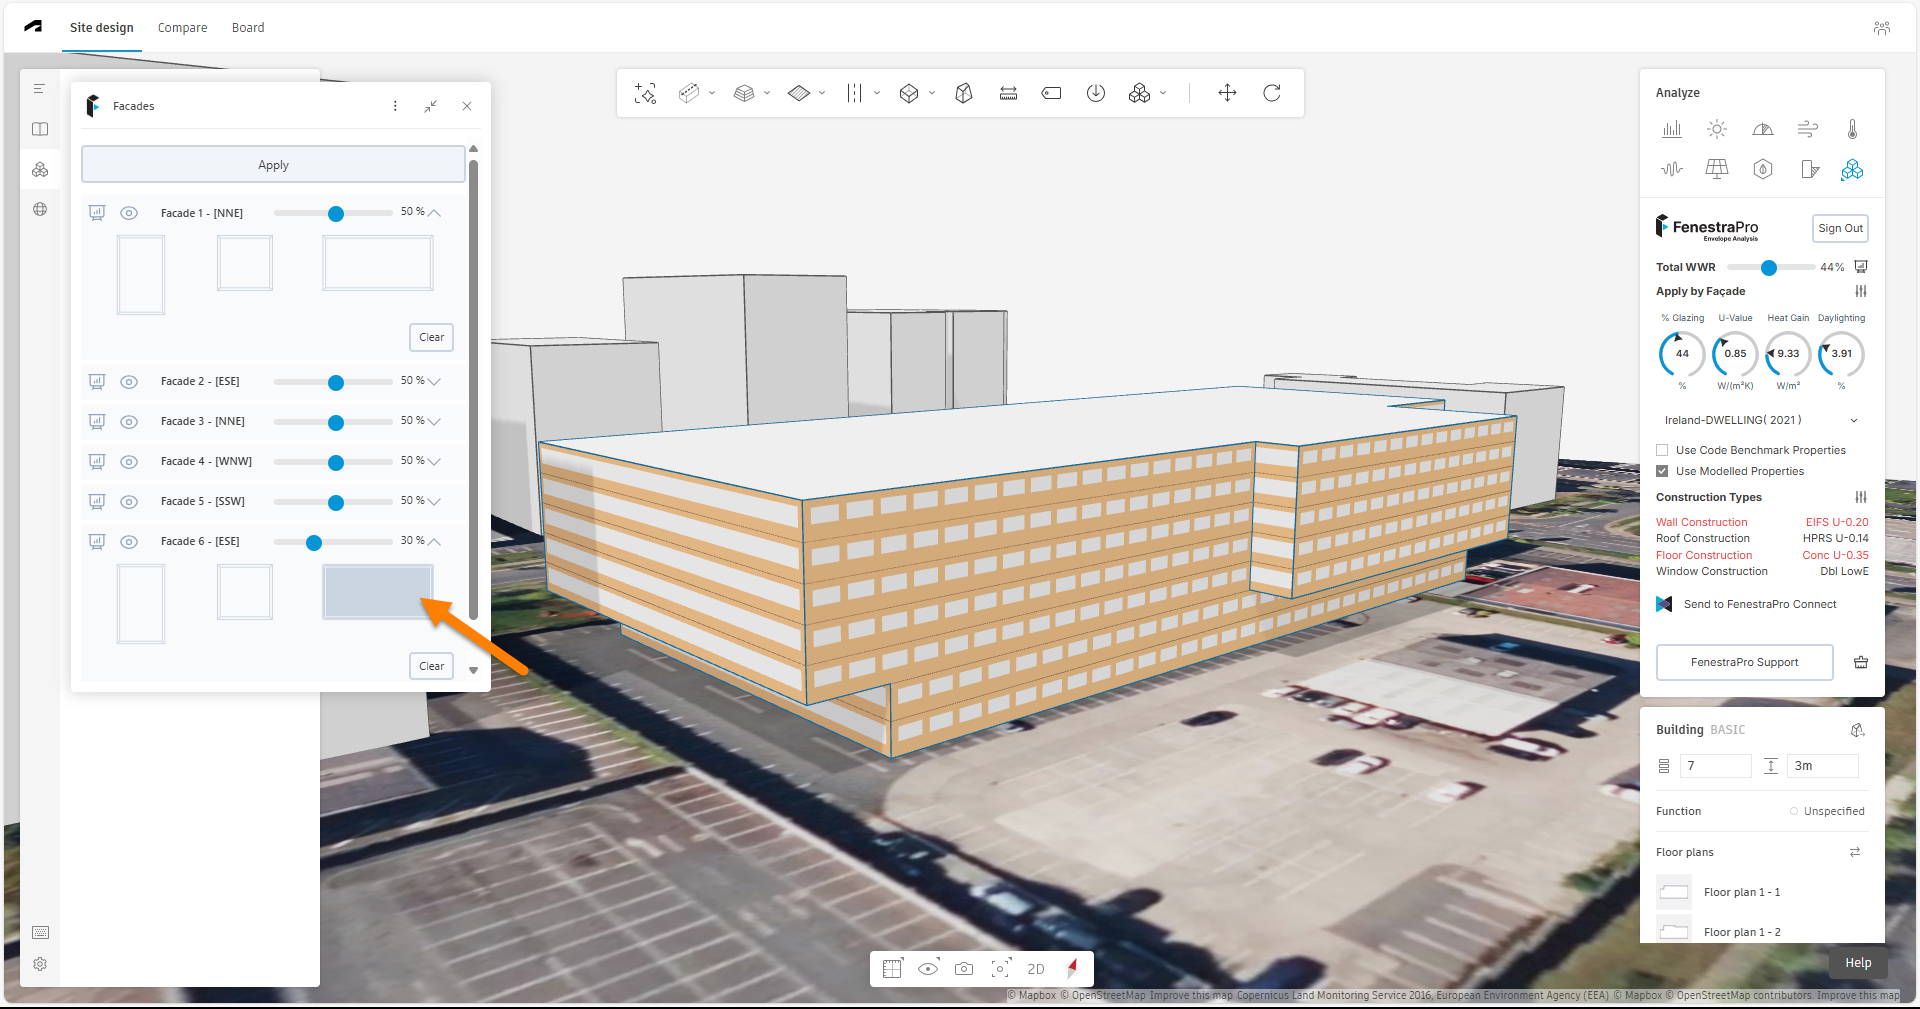
Under the Façade Settings, there are pull-down options to select window sizes to replace notional glazing (rectangular glazed areas). Click on the arrows provided for each Facade to get additional settings to apply windows for the percentage value in the slider.
Selecting a window type will highlight that option and show which is currently active. Then ‘Apply’ this window type to the Façade to review these windows on the Surfaces. The overall WWR will update as well as the Chart areas for glazing and walls. You may switch to another window type and apply that (this will trigger a recalculation).
The metric window type options are 2.1m x 1.5m vertical, 1.2m x 1.2m square and 2.4m x 1.2m horizontal. These equate to approximately 7ft x 4ft vertical, 4ft x 4 ft square, 8ft x 4ft horizontal.
Please Note: Windows in imperial projects are representations only and are currently converted from metric. They will not be exact imperial dimensions (therefore total areas of glazing may not be exact multiples).
You may set options for multiple Facades and ‘Apply’ all when ready.
If you wish to remove windows but switch back to notional glazed areas, a ‘Clear’ button is provided. This will remove any windows and use the percentage setting in the slider to create notional glazing instead. (Once you have clicked on this button, it will disappear). Then click on ‘Apply’ to update the model.
Note: there may be occasions where you will not be able to achieve the target glazing value with the selected window. For example, you may enter 90% glazing but the actual glazing area for windows applied will be less than this (since the windows currently available are a fixed dimension). The slider will then display the actual maximum glazing possible after recalculations are complete. You will more likely be able to achieve higher percentages with notional glazing instead, since the windows are a fixed size. If you do not have any glazing percentage set for that Facade but try to apply windows, this will not be successful (glazing percentage must first be defined).
Also Please Note: if windows are placed on the project and you subsequently adjust the Total WWR for the building, the windows will be removed and notional glazing will be applied instead.
If you have already apply windows and then change the model floorplans or internal wall positions, you will need to reload the model to reconfigure glazing with the new model condition. It may be necessary to set the glazing to zero and begin again if the model geometry has been adjusted.
Reset the Model
A button to remove previous settings on the model is also provided – this may be used if you have already applied windows but then change the geometry of the model (the existing window percentages will not automatically update and you will need to re-apply).
Click on the brush icon to get an option to reset the model. Hovering over this icon will reveal the tooltip that this process will ‘Reset the Model’. Note: care should be taken since this will clear all settings that you have made for this model to date.
Once you click on this icon, you will get a chance to confirm or cancel your decision. Select No to return to the main panel and continue working on your model or select Yes to delete all existing settings and begin afresh.
You should then refresh your browser window (usually by using a circular arrow to the left of the search bar) and re-select the Forma model to start analysis again (all previous settings are removed, such as Glazing Percentages, Window settings, Code selections, Construction types, results etc).

Charts
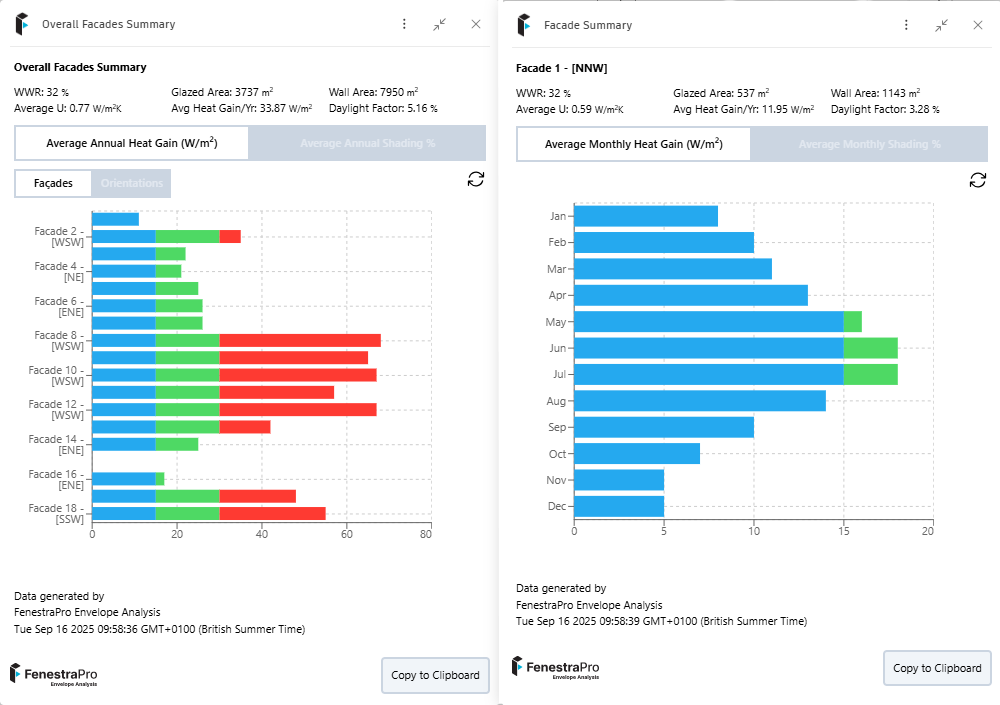
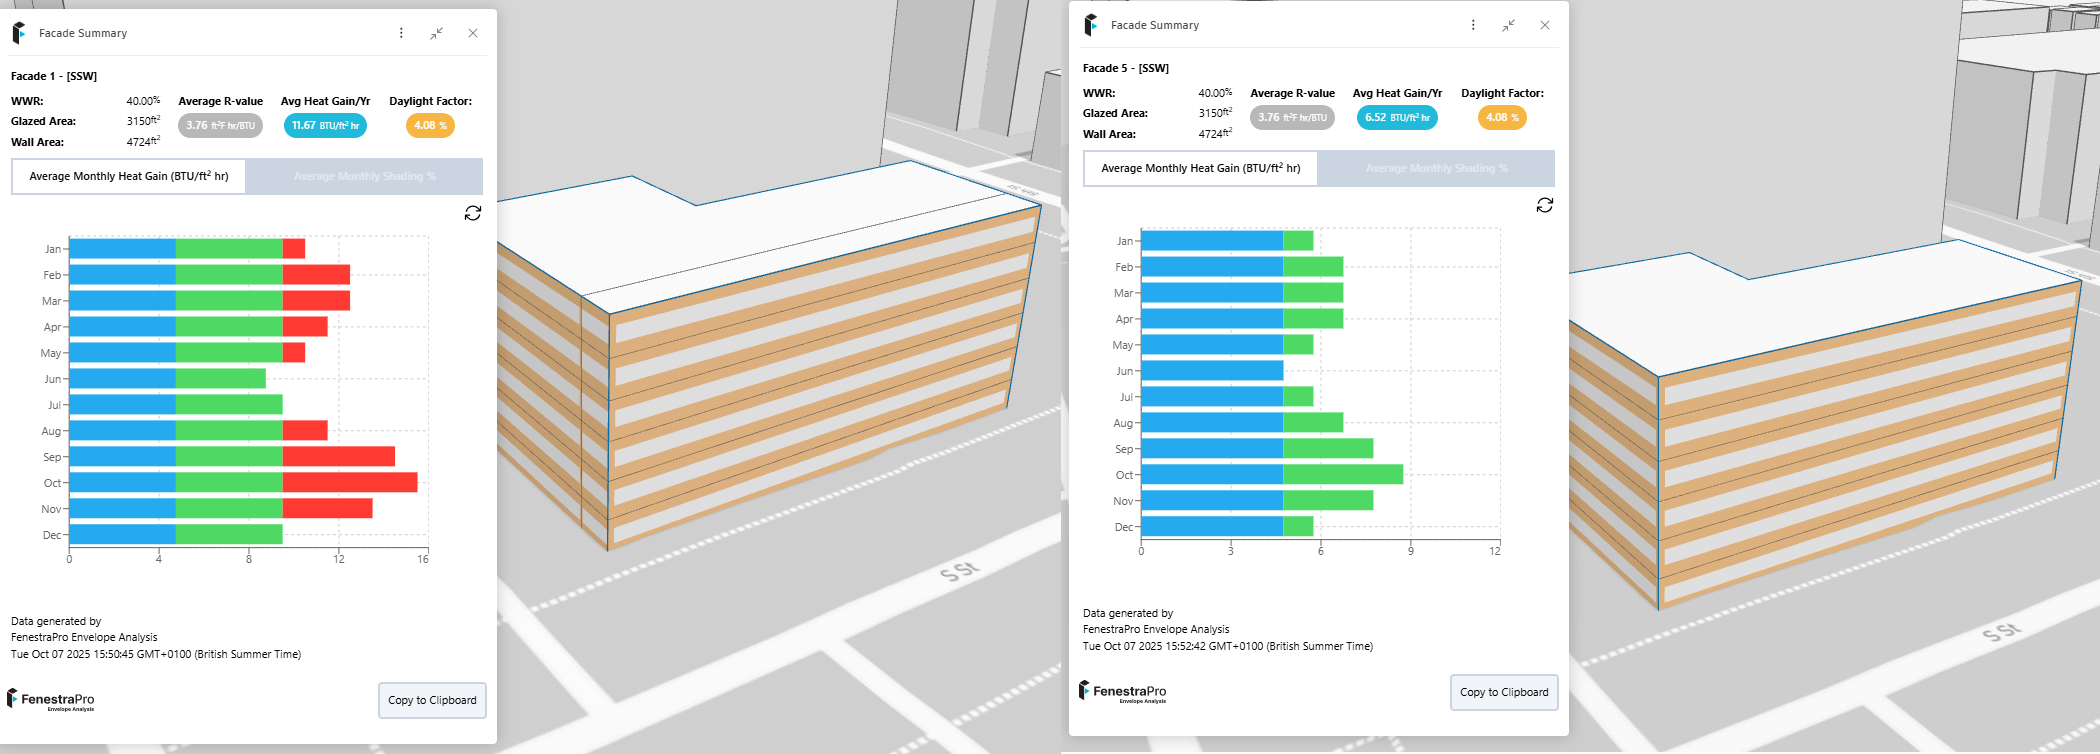
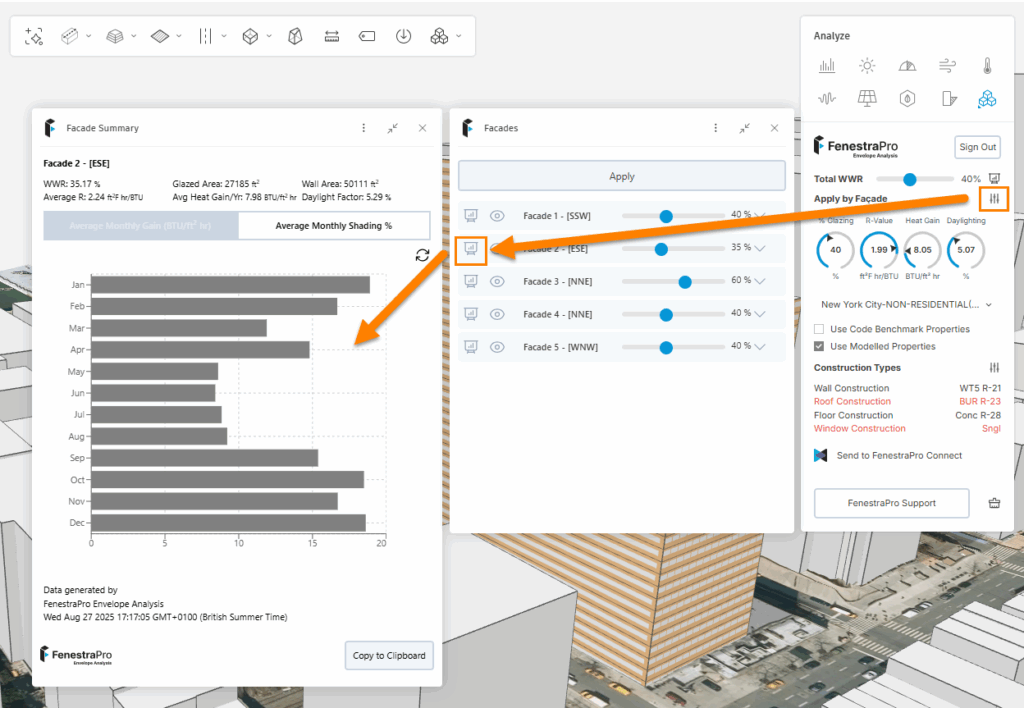
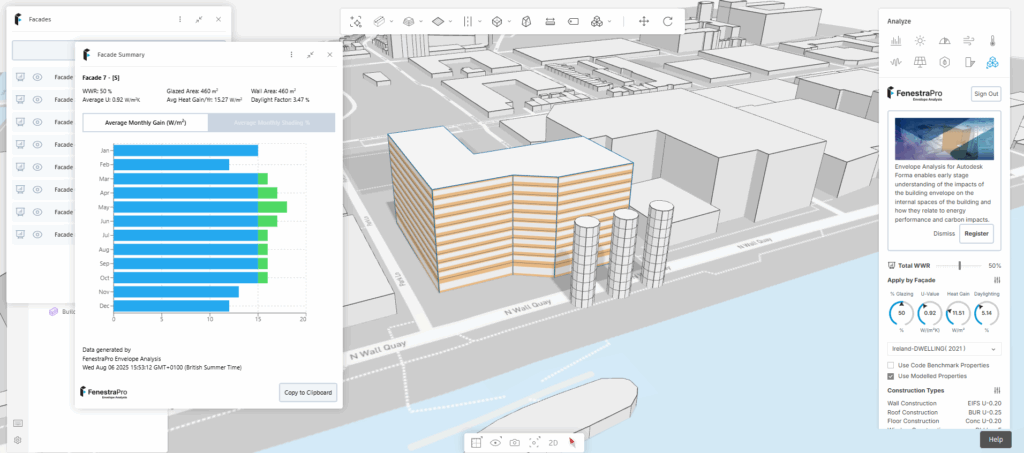
Charts display for each Façade when opened from the Facades List (‘Apply by Facade’). Simply click on the icon beside the Facade name and a new panel will open to display monthly Heat Gain values for that Façade as well as the Window to Wall ratio (WWR ), Glazed and Wall areas, Average U-value or R-value and Daylight Factor. Multiple Chart windows may be opened for different Facades. With more glazing on a Facade, the U-value for metric models can be expected to be higher (the R-value for imperial models can be expected to be lower) both indicating a building envelope that allows more heat loss. This will also depend on the glass performance.
There is also a Refresh button to update the Chart, if it is left open and you update the Construction Types (see image above).
Note: When Glazing Percentages or Window Configurations change for Facades or Total WWR, the Charts will automatically update. Where adjusting Construction Types change the Heat Gain or U-value for the overall chart or Facade Chart, the Refresh button is required to update the Chart.
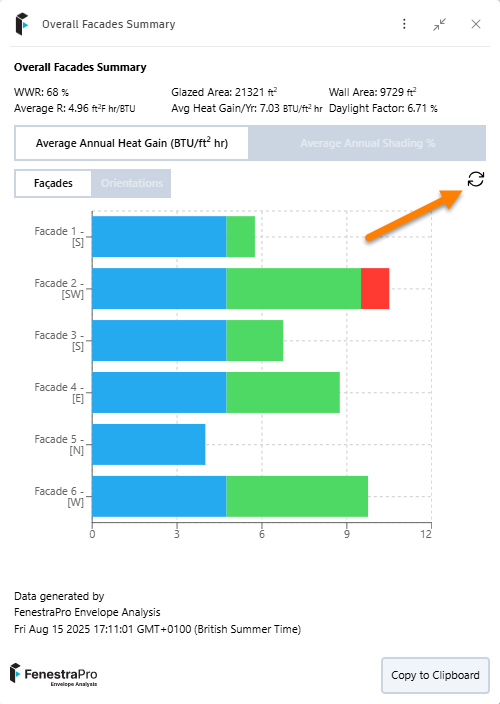
The ranges currently in use indicate blue for values less than 15 W/m2 K (<4.75 BTU/ft2 hr), green for values between 15 – 30 W/m2 K (4.75 – 9.5 BTU/ft2 hr) and red for values above 30 W/m2 K (>9.5 BTU/ft2 hr) . The chart below describes the color coding used for Heat Gain values.
Please Note: This Chart is a snapshot in time and does not dynamically update if the overall percentage glazing on the model is then modified. Each Chart opened has a timestamp for the user’s location (not the project location). If changes are made to settings and subsequent Charts are opened, the timestamp will indicate the sequence. To update the Chart, close the Chart panel, modify the Façade settings, Apply these settings and when new values are displayed in the dials, open a new Chart for that Facade. Closing the Facades panel will also close any open Charts. The settings in the Facades List will persist even if there is a subsequent change in the overall WWR setting (the Charts will reflect the Facade settings). This is to be improved soon.
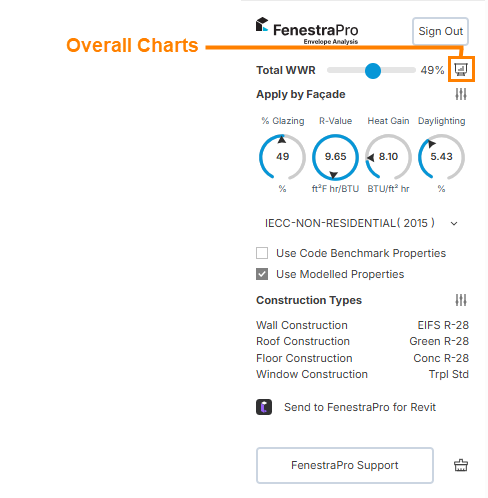
Overall Charts
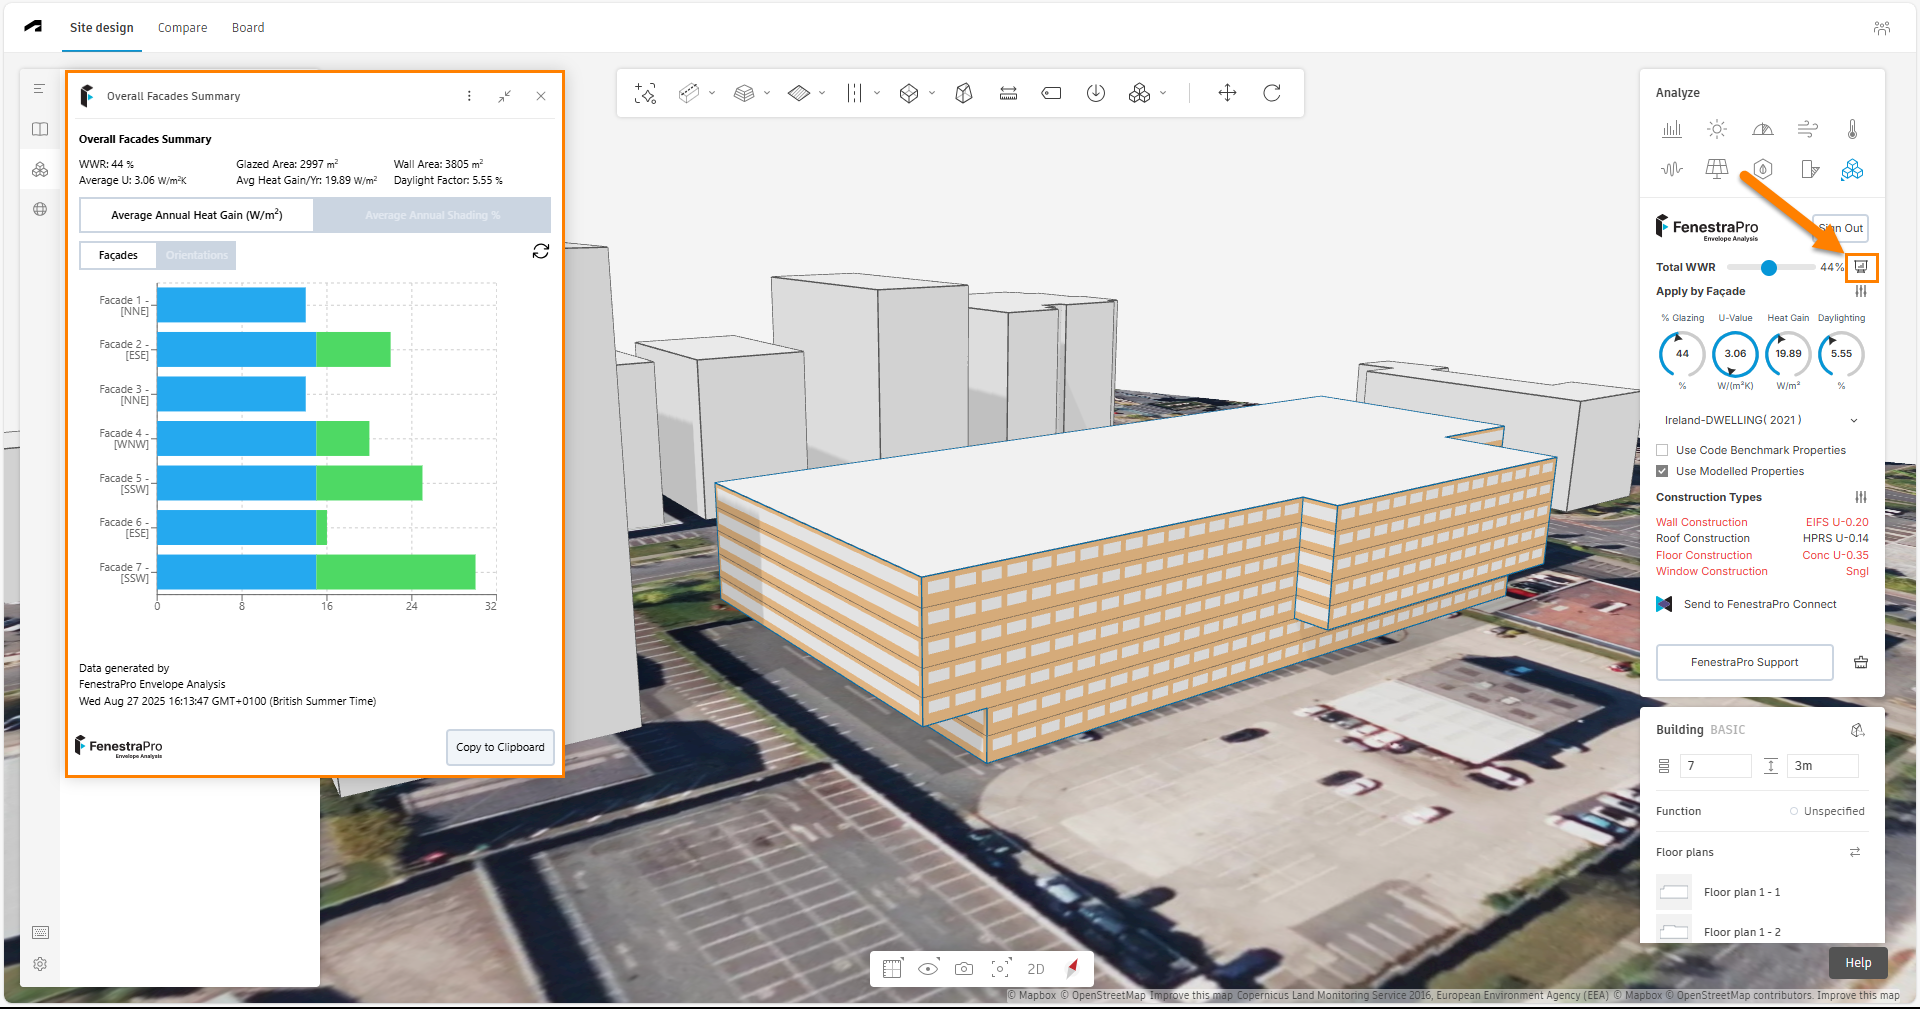
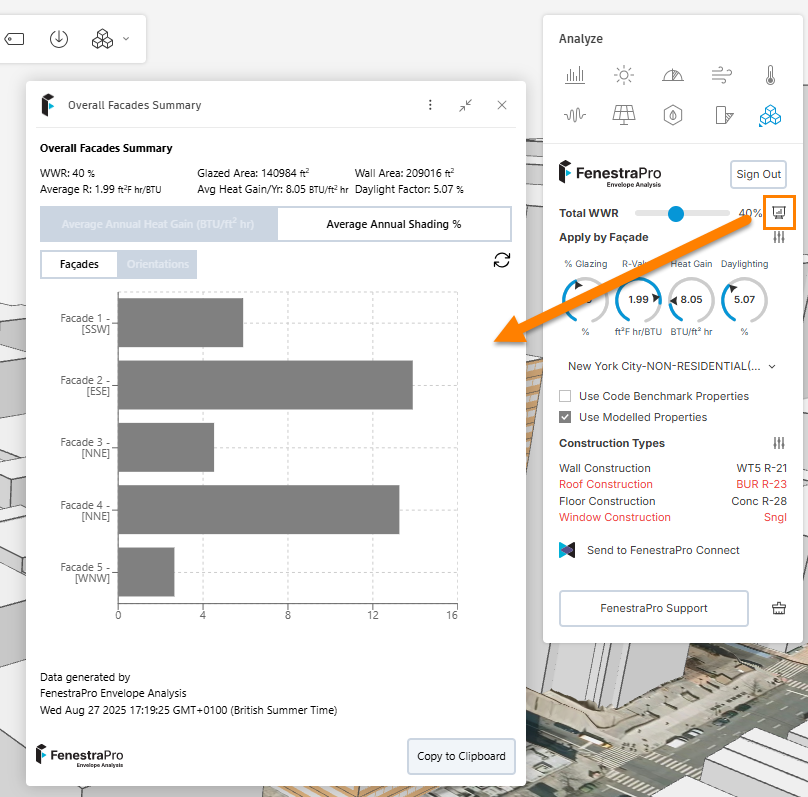
An icon beside the Total WWR slider will open the overall building Chart summary. This will display data for Total Window to Wall ratio, Overall Glazed Area, Overall Solid Wall Areas (non-glazed), Average U-value or R-value for the model, Average Annual Heat Gain and Overall Daylight Factor.
Existing Facades are listed by number and orientation. For reference, the Chart is timestamped for the user’s location (not the project location).
There is a Refresh button to update the Chart, if it is left open and you update the glazing percentages or window configurations etc, clikc on this to update the results.
The Overall Chart has tab options to review the Average Annual Heat Gain or Average Annual Shading %.
For each of these options, there are 2 additional tabs to review:
- Results for each Facade
- Results per Orientation (grouped)

It is not recommended to have multiple projects open in browser tabs at the same time (since results and settings for each user are stored for the last user session and are not yet differentiated per project). Projects may also have multiple members and contributors who have access to modify the Forma project or settings in the FenestraPro extension.
Note: Dragging the mouse across two open windows should be avoided when using the extension (e.g. Facades List and Charts). This may cause a halftone or blue filter over one window. If this occurs, close and reopen the windows again. This issue is being investigated.
Copy to Clipboard
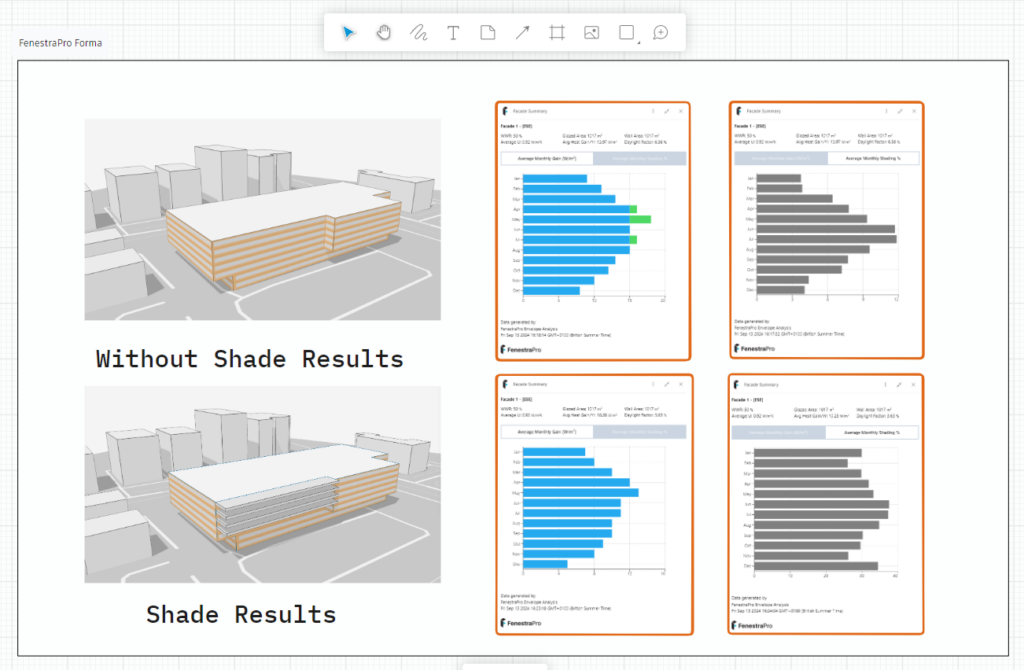
Both Overall and Facade Charts also have a copy function to take a screenshot of the active Chart and copy to clipboard. This can be then pasted into a document or pasted into a Forma Board. This can be useful for comparing results of previous model iterations with different model conditions such as glass types, shading devices, Heat Gain or Daylighting results etc. You may wish to paste multiple images to an interim application for temporary storage and then paste images to prepare a Forma Board for the project which can be made available to other project members. (When returning from the Forma Board to Site Design, the project will need to be reloaded into the FenestraPro extension (previous settings for the project are saved). You can also use the Forma Compare area to look at analyses for different project versions/proposals.

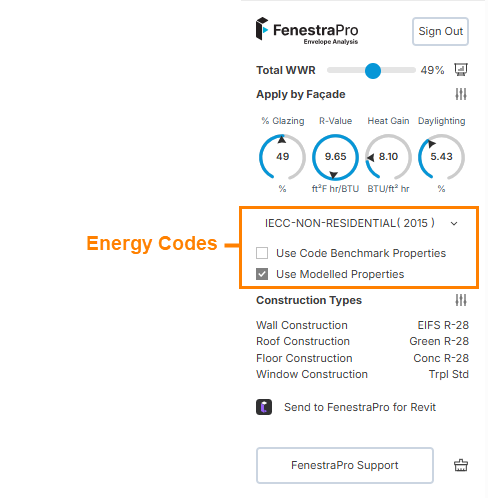
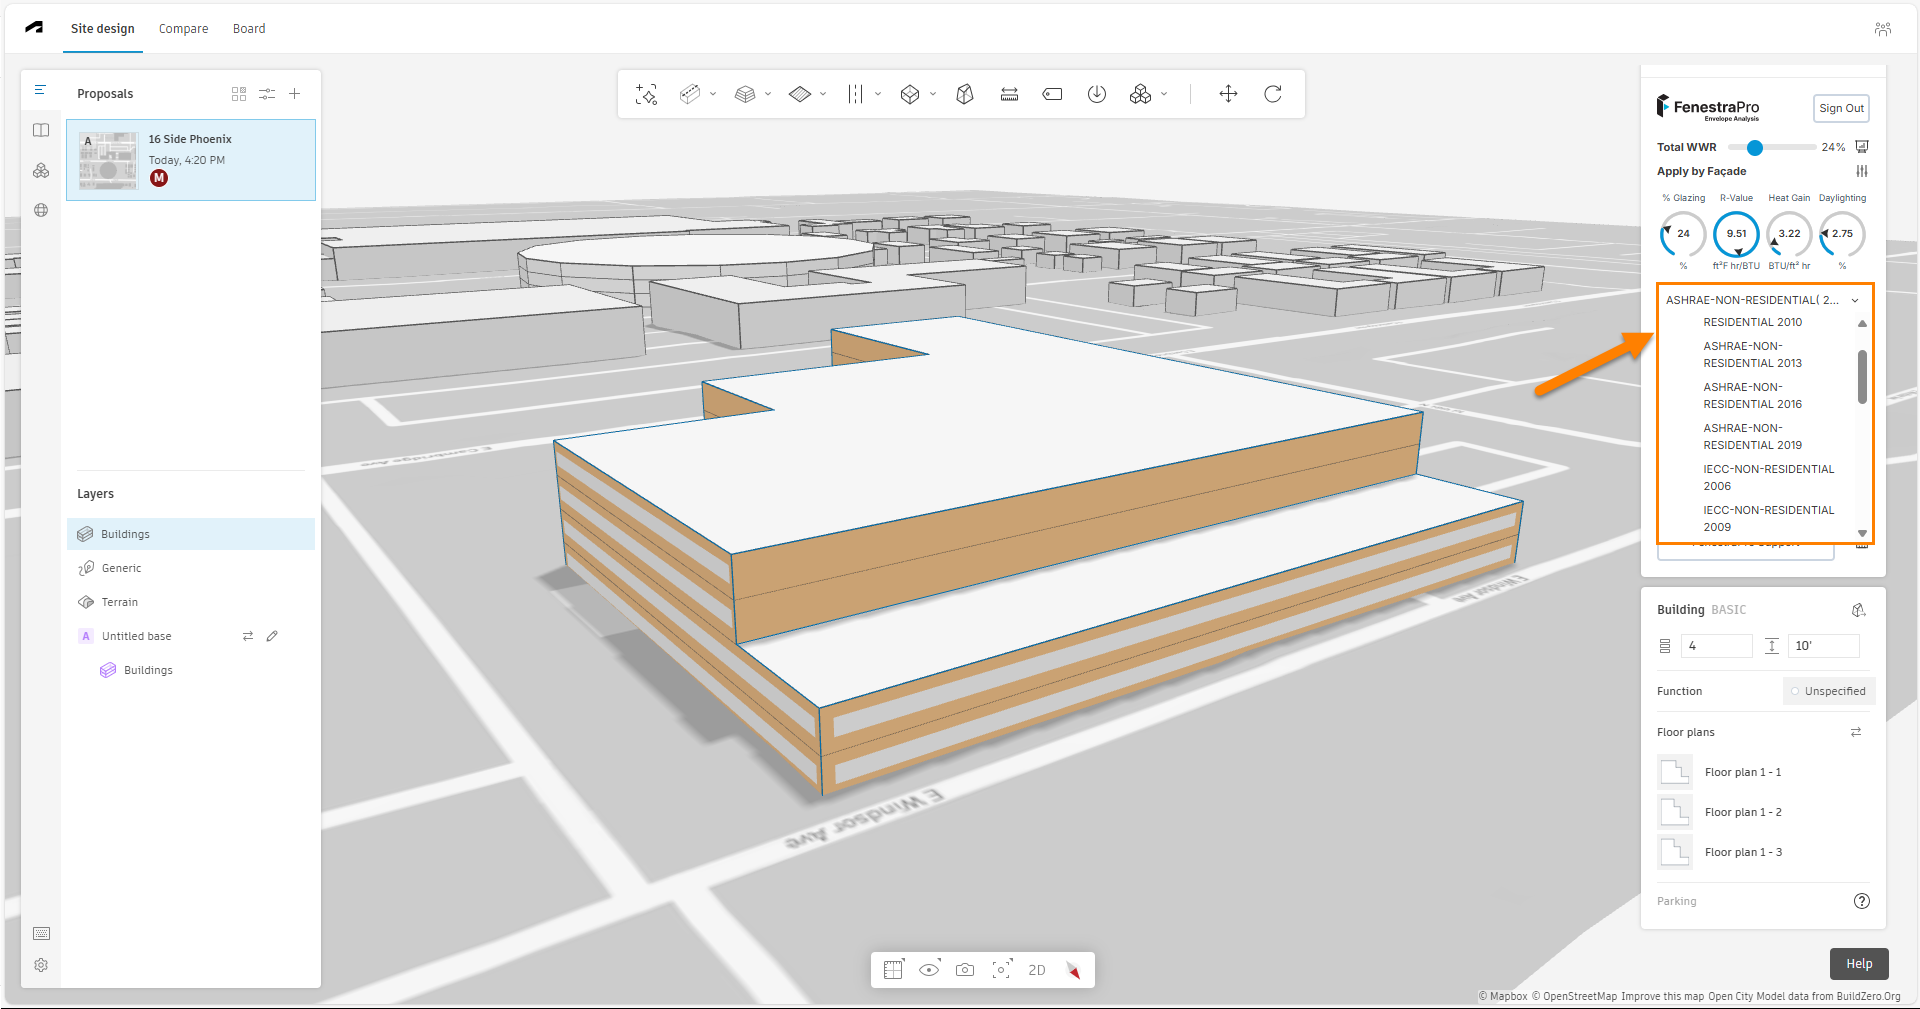
Select an Energy Code
From the dropdown list, select an Energy Code for use with your project.
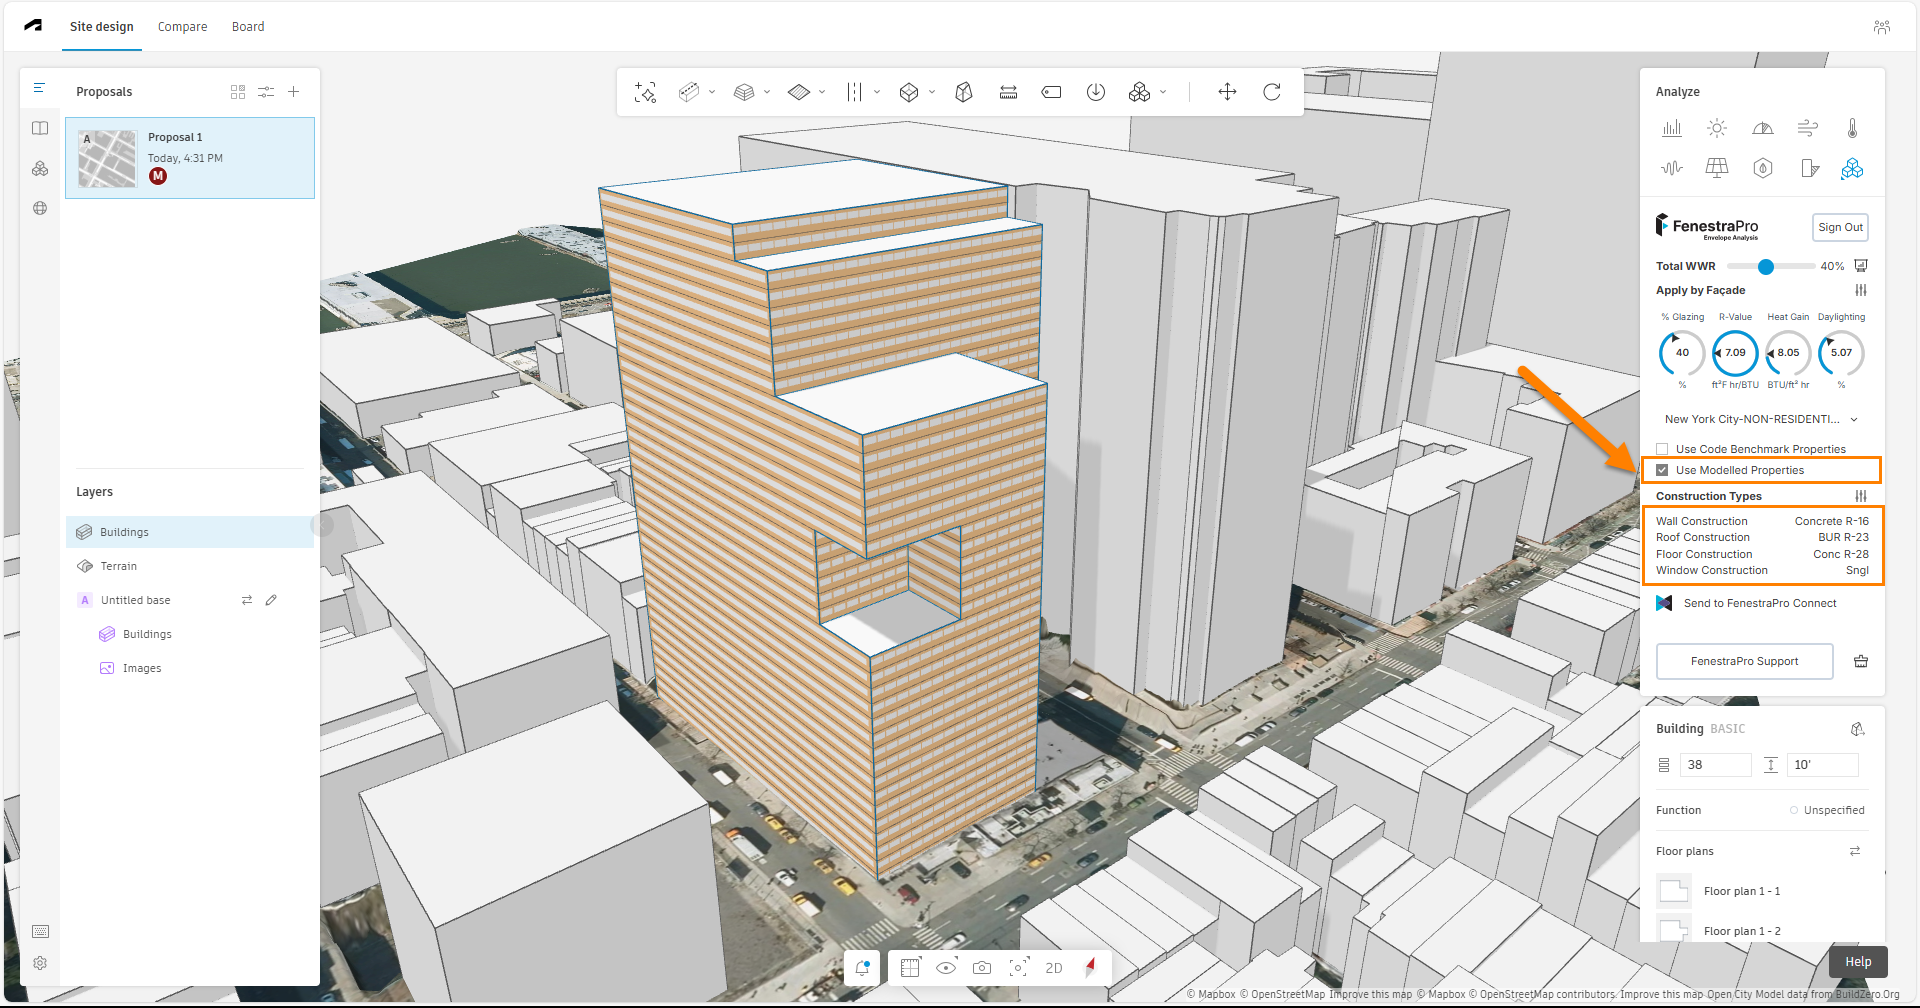
For some regions where regional Codes are not yet supported, only a default FenestraPro Code will display. For other regions, you may see a list of options from which to choose. Note: Code values in metric units will be used for compliance checking if the model site location is in regions which use metric units (Europe, Canada, Australia, Asia, Africa, South America) and imperial code values will be used for model locations in the USA. The default setting is that the default Construction Type properties from the model will be used (the ‘Use Modelled Properties‘ option is initially checked). Non-Compliance with the selected Energy Code will then be indicated by red font for that element type. Note: Changing the Code will not have any effect on the results if the ‘Use Modelled Properties‘ option is checked since only compliance is checked. Note: The ability to access Construction Types is only available when this setting is checked. The selected Code will be remembered if you exit from a project or refresh and relaunch this project later, only if you have the ‘Use Code Benchmark Properties‘ setting checked. If you had ‘Use Modelled Properties‘ selected in a previous session, please choose your selected Code again if you reload a project.
Note: If you find that you are not getting Code options in the dropdown list, please refresh your browser and try again. Most US States, the UK, Canada, Australia and Ireland are currently supported. We can also add a Code on your request. Please see this page for more details.
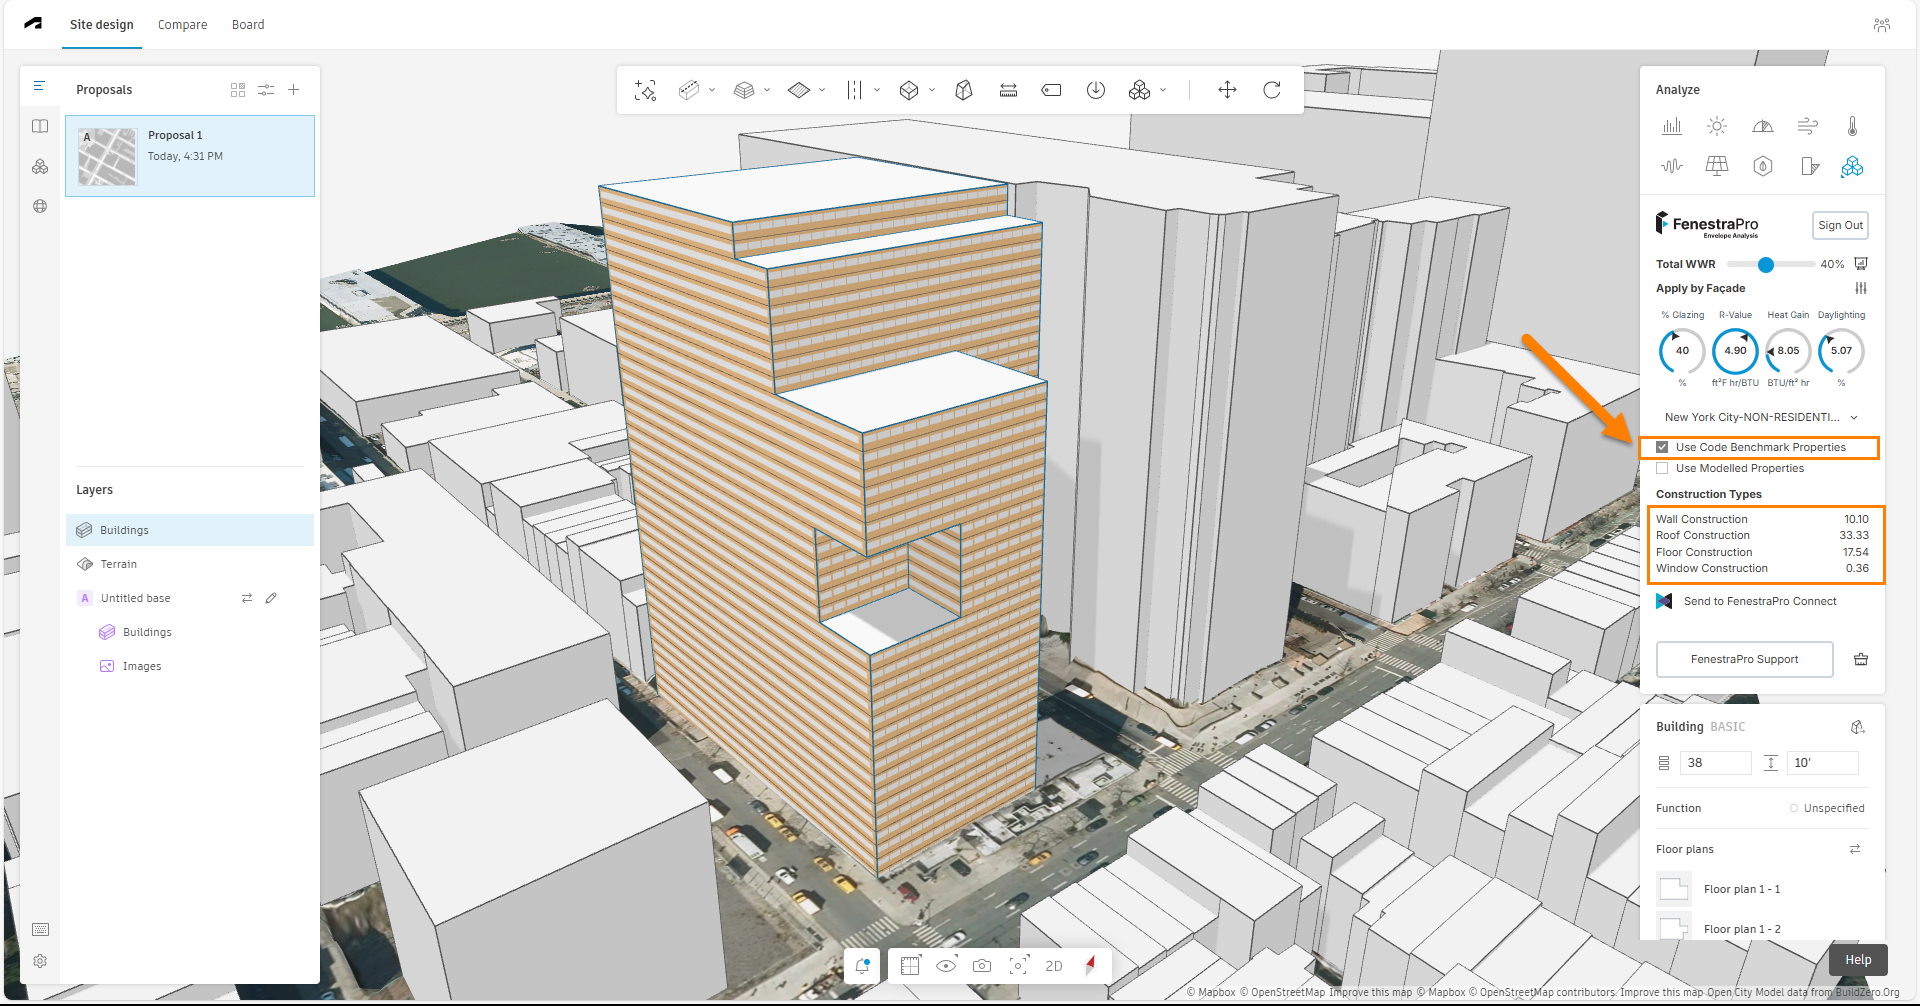
You may also choose to use ‘Use Code Benchmark Properties‘. This option may be activated by checking the box beside this setting and will assume that model elements will have thermal properties that comply with the selected Code. The target values recommended by the selected Energy Code are then displayed in the Construction Types list and are used to calculate the overall R-value/U-value in the results dial (the selected glass along with the recommended wall performance from the Code are used to calculate the result). Please Note: By changing from ‘Use Code Benchmark Properties’ to ‘Use Modelled Properties’, the results for Heat Gain and Daylight will not change in the dials since Energy Code recomendations do not include SHGC or VLT for glass (only the U-value/R-value is typically specified in the Energy Code).
Note: If you are using the ‘Use Modelled Properties‘ option, and you close and later reopen the same project, the Code selected will not be currently saved so you will need to reset this again. The selected Code is saved for the next session if you use the ‘Use Code Benchmark Properties’ setting.
A default FenestraPro Energy Code is currently used for regions where actual Energy Codes are not yet in our database (these are typically countries that use metric units).
U-values used to calculate the results are as follows:
Wall 0.3067 metric u-value
Floor 0.5225 metric u-value
Roof 0.5225 metric u-value
Glazing 3.13 metric u-value / SHGC 0.39 / VLT 0.59
This default Code is used when no other energy standard can be found for the site location.
The default performance values of model elements are assumed to be:
Wall = 0.31 u-value, Floor = 0.15 u-value, Roof = 0.15, Glazing = 1.53 u-value (metric values)
Wall = 18.32 R-value, Floor = 37.86 R-value, Roof = 37.86 R-value, Glazing = 0.27 U-value (imperial values)
Note: The Construction Types in Forma do not display when you open the FenestraPro extension until the model proposal is selected. The Code checkbox must also be set to ‘Use Modelled Properties‘ to access the Construction Types panel to change the definitions.
Note: Our Code Database is being improved to support more regions. Code values will be calculated from metric values for regions which use metric units (metric U-values for all elements) and imperial units for USA locations (imperial R-values for roof/floors and walls) and imperial U-values for glazing.
You can review our current regional Energy Codes or request a new Code be added on this page HERE

Construction Types
The assumed default Construction Types in Forma are listed here under the dials, with the associated thermal properties.
When the ‘Use Modelled Properties‘ setting is used, values that do not comply with the selected Energy Code display in red. Access to adjust the Construction Types is only available when this setting is checked. A value which does comply with the target Code values will display in black. If you choose the option to ‘Use Code Benchmark Properties‘ (which assumes that the model will have thermal properties for each element type that comply with the target Energy Code), the Code values will display here and will be used for calculations.
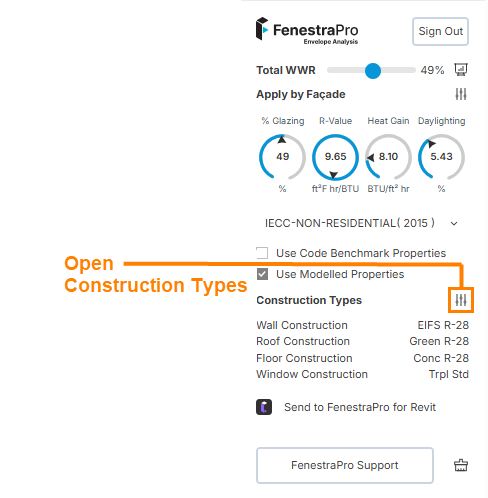
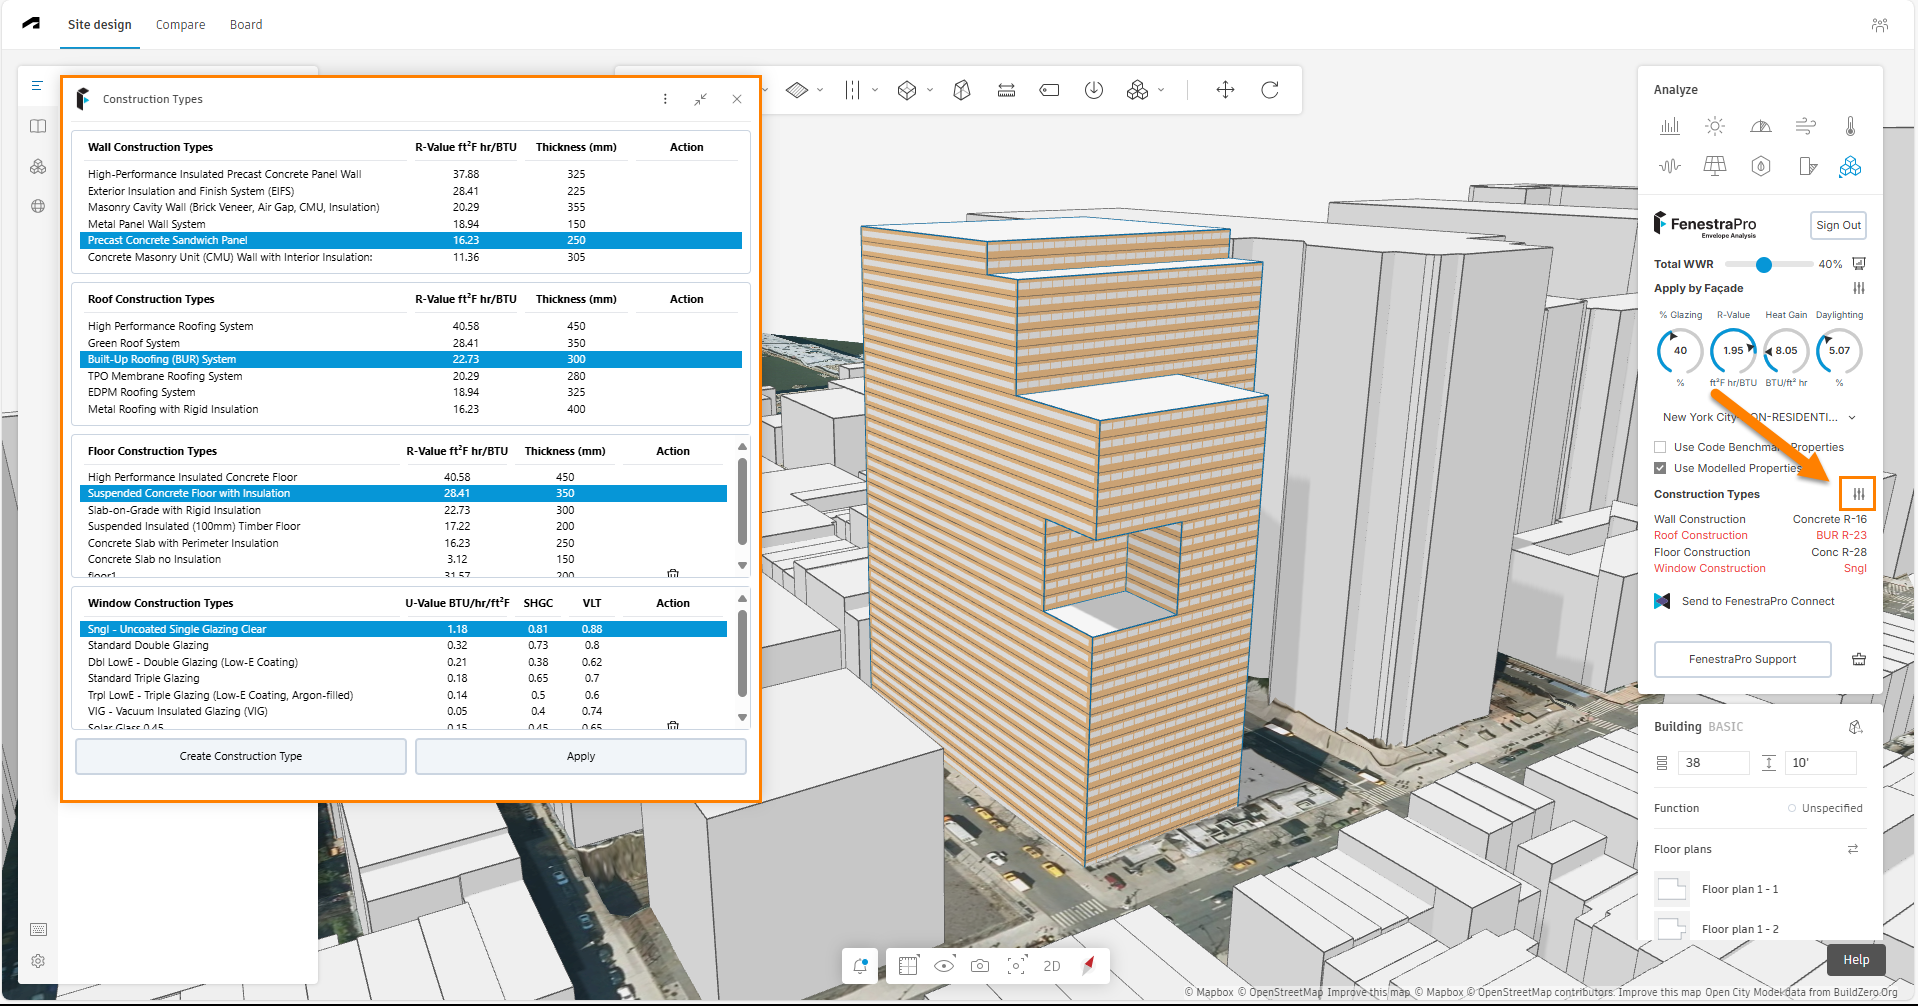
When the setting for ‘Use Modelled Properties’ is used, an extra icon will display beside Construction Types. This will allow you to open a panel to adjust element performances to comply with your selected Code (there may be occasions where none of the listed options comply. In that case you may choose to use the code values directly). Overall element thicknesses will also display in the Construction Types panel for walls, roofs and floors. Your selected Construction Types are also saved for your next session. If you start a new project or clear your cache (all previous settings), then the Construction Types will revert to default selections. When starting a new session, you are advised to please check your Code, Construction Types, Code Settings and Percentage Glazing/Shading settings again. The Construction Types that you set are also saved even if you exit the FenestraPro or Forma using ‘Use Code Benchmark Properties‘ instead of ‘Use Modelled Properties‘.
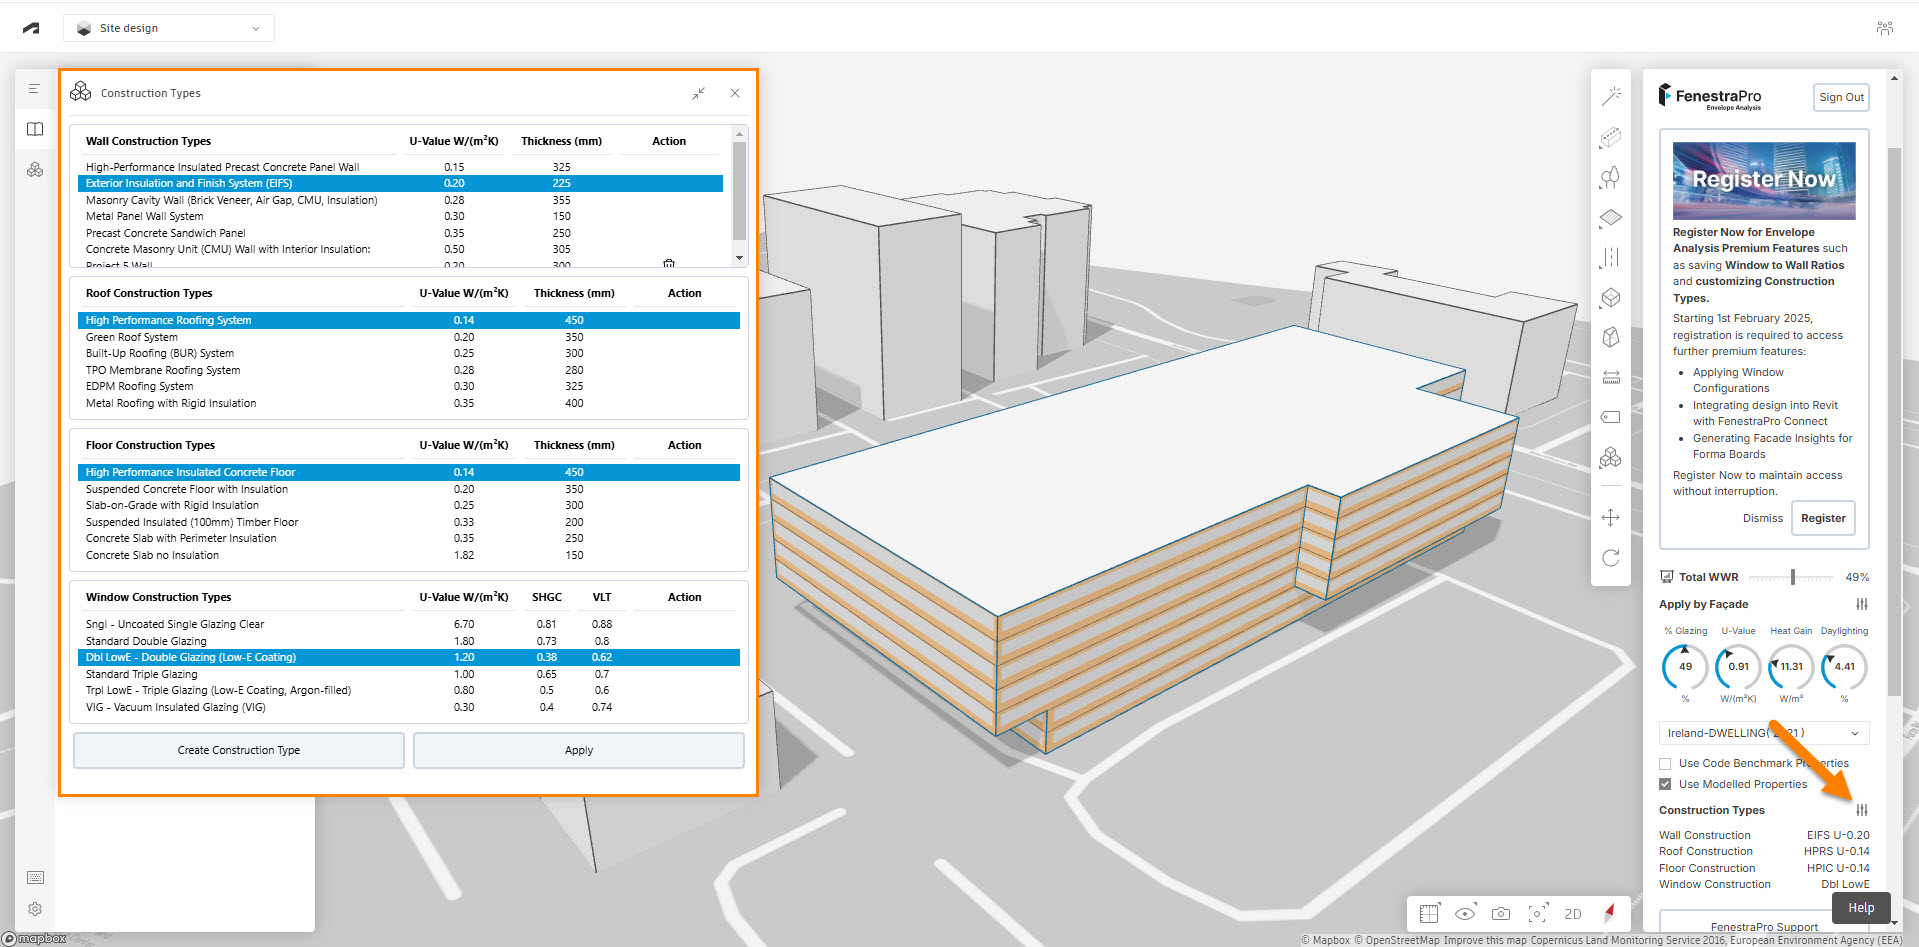
The current Construction Types in use are highlighted in blue. A different element makeup may be selected from the list. You may want to select a different construction type for walls, roofs, floors and glazing if they do not comply with the Energy Code (the values display in red), or to improve the overall U-value or R-value (only walls and glazing properties will affect this).
Use the Apply button at the bottom of the panel to update the settings. The current construction type list will then update and the results will recalculate. If the model properties do not comply with the Energy Code target values, they will display in red. The extension will also remember your settings for glazing percentages and construction types if a project is closed and later reopened.
Window types also have Solar Heat Gain Coefficient (SHGC), and Visible Light Transmittance (VLT) which influence the performance of the building envelope and affect the results in the dials (the dials display a weighted average performance for wall and glazing elements).

metric model:
imperial models:

Custom Constructions
It is also possible to create custom construction types for a project. To use this feature, please ensure that you have created a free account with FenestraPro and that you are logged in to this account (the constructions that you create will be saved to your account even if you close the project, log out or close out of Forma). If you click on ‘Create Construction Type‘ and you are not already logged into your account, a message will display to advise.
To access the Constructions panel, the Code setting must be set to ‘Use Modelled Properties’ (the ‘Construction Types’ icon will then become available).
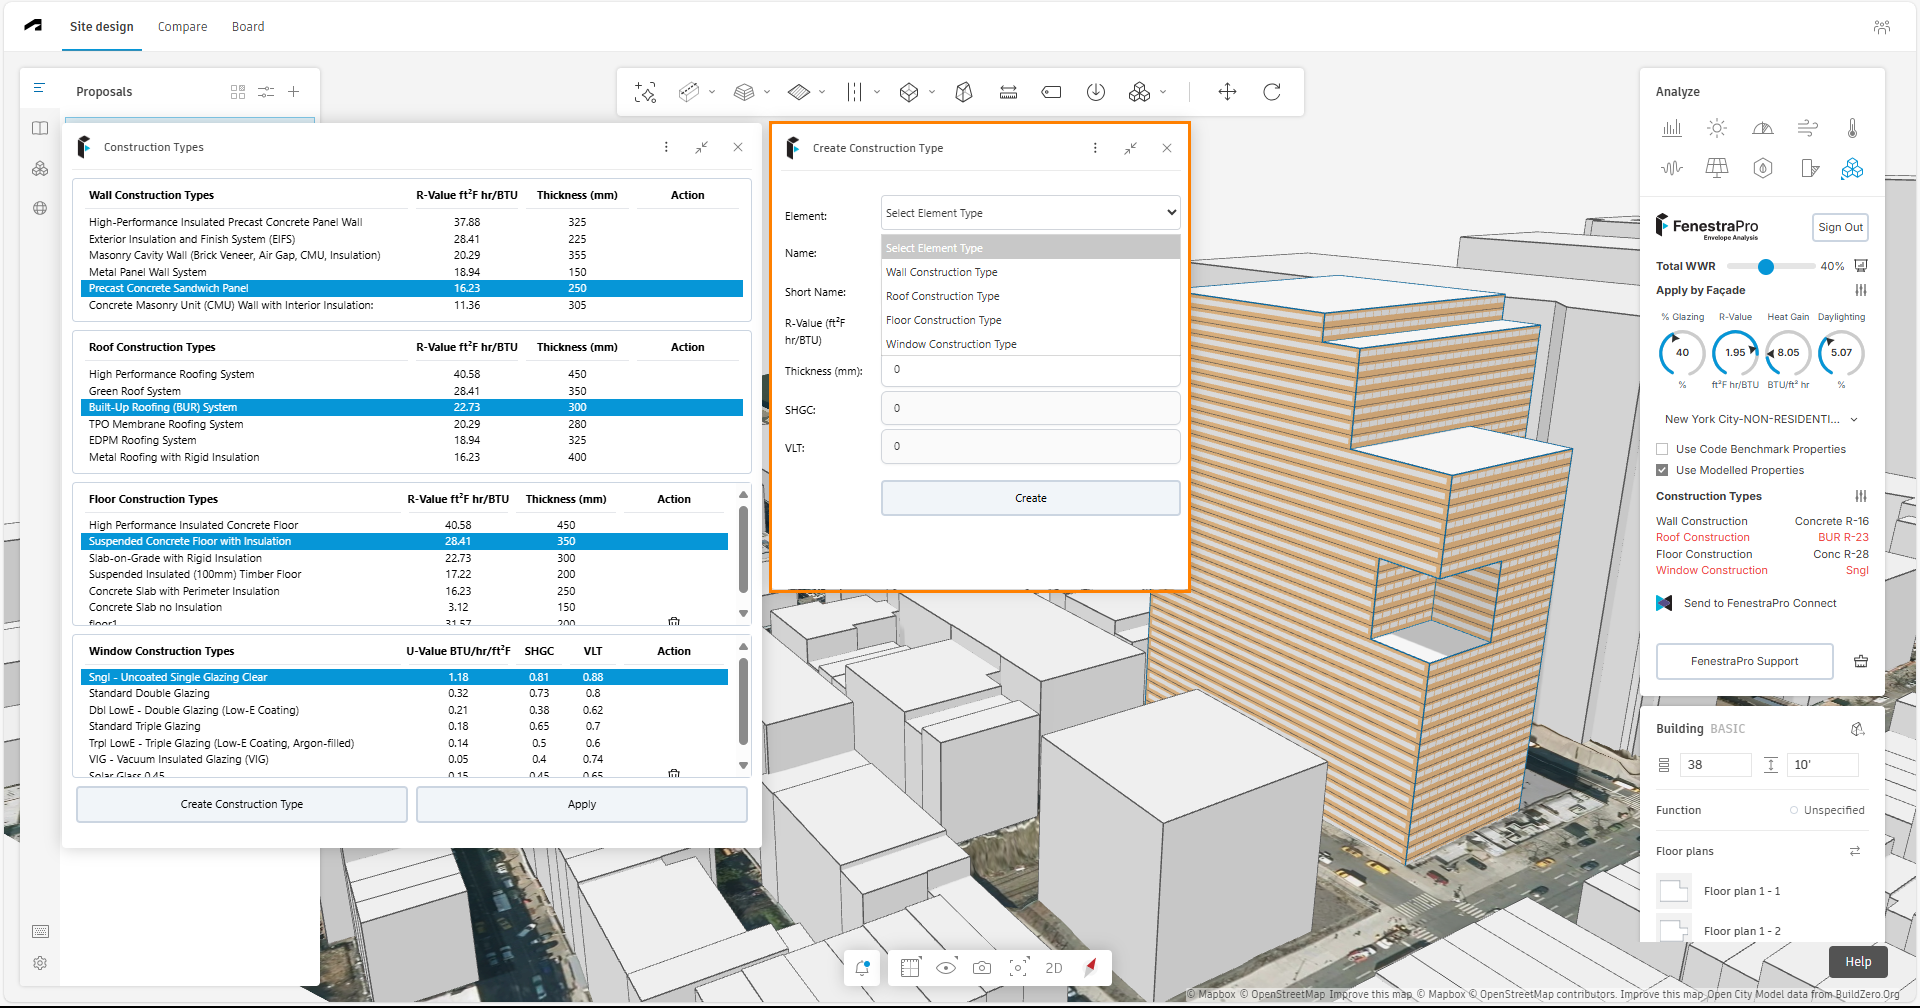
Open the Constructions panel, buttons at the bottom allow you to create new construction types. Once the panel opens, there are options for wall, roof, floor and glazing. Enter a name/description and short name (this is used in the right-hand panel).
Then enter a U-value (for metric models) or an R-value (for imperial models). The Short Name will be displayed under the Construction Types in the right hand panel, so it is a good idea to include the U-value or R-value here also. For solid elements (walls, roofs, floors), you should also enter an overall thickness for the assembly. Thicknesses currently use mm for both metric and imperial models. There are conversion calculators online to assist. Note: Thicknesses are for recording descriptions only and will not affect calculations. Note: The application will not calculate an assembly U-value/R-value based on your inputs, this input is the known value of the construction that is input. Therefore, you may wish to use a third party application to calculate the performance of a wall etc based on the layers and thicknesses used in the element assembly.
For glazed types, you may enter a U-value and values for SHGC (solar heat gain coefficient) and VLT (visual light transmission).
For metric models, all element units use metric U-values.
For imperial models, solid element units use R-values (for walls, roofs and floors). Glazing uses imperial U-value.
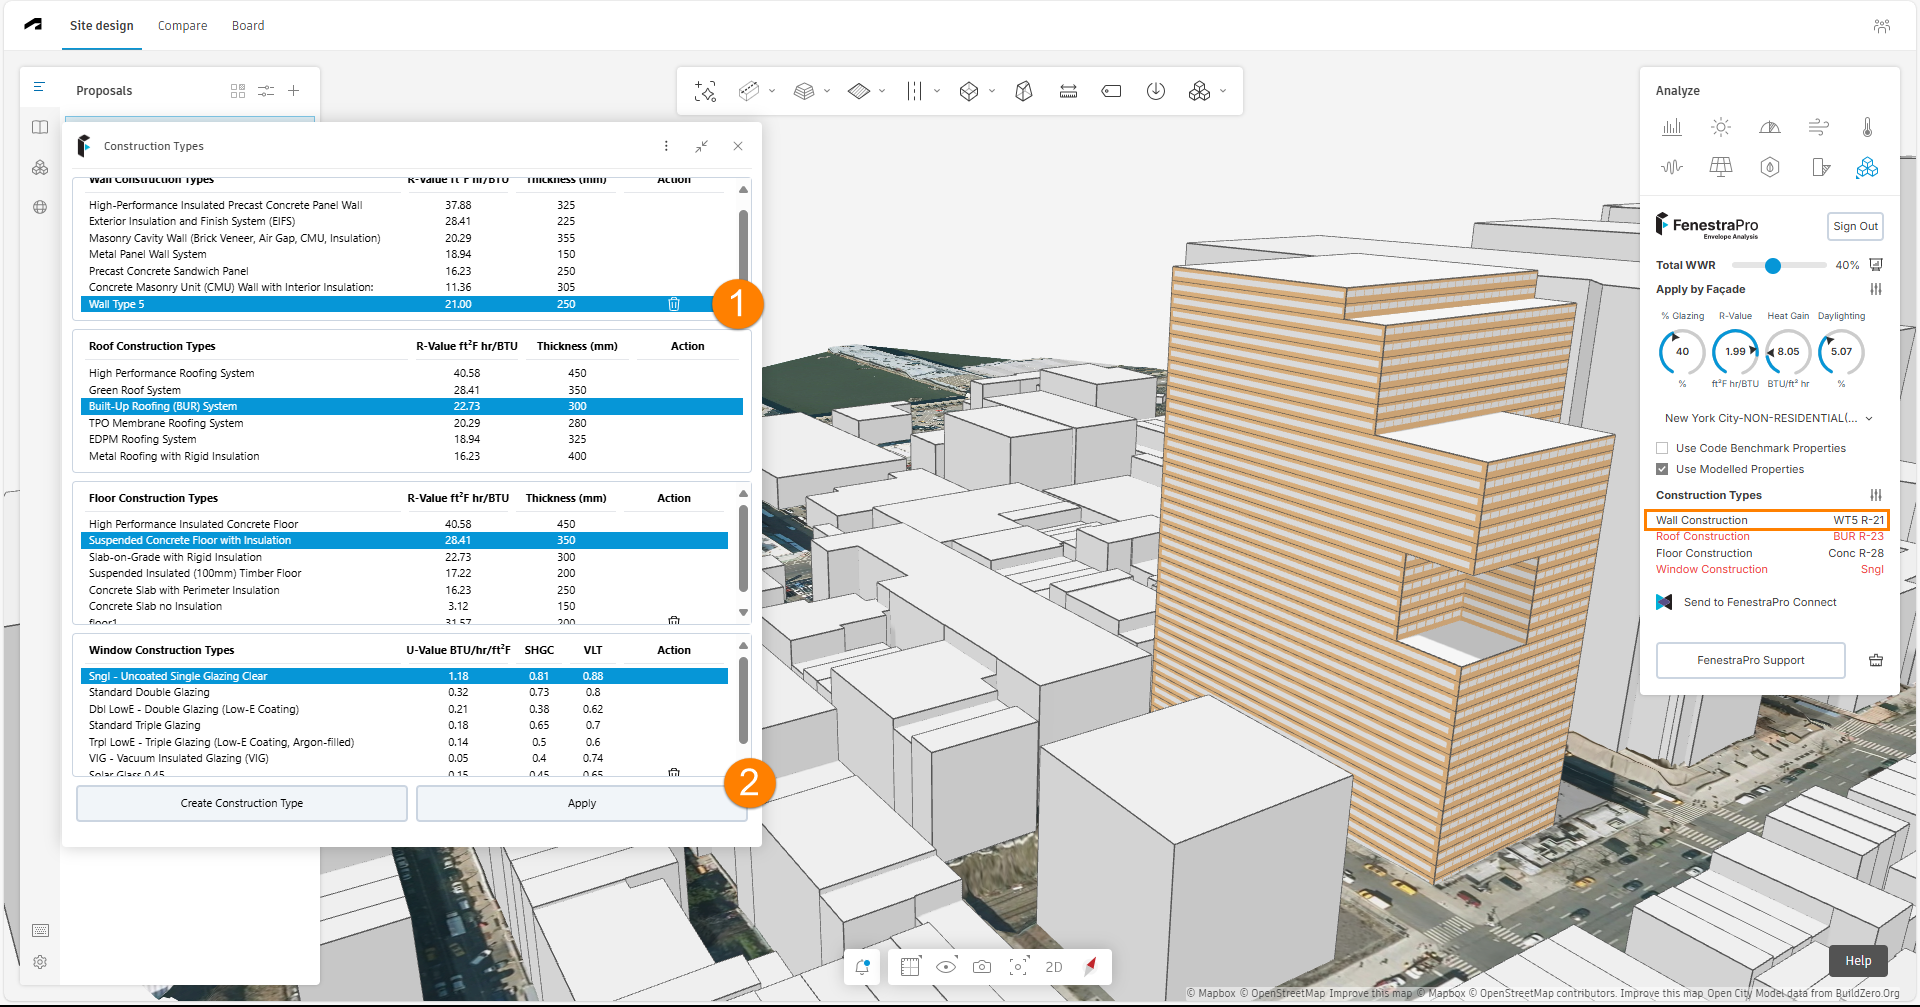
Once the construction type is created, the creation panel will close and the new entry will appear in the main panel ((1) in the image below). You must select this custom type and use the ‘Apply‘ button ((2) in the image below) if you wish to use it for calculations. You make create multiple new types before recalculating the results. Note: if you close the main Construction Types panel, the Create Construction Types panel will also close.
Changing the wall construction will affect the U-value or R-value results in the dials. Changing the Glazing type will affect the U-value or R-value and the Heat Gain results in the dials. If the properties of the active construction types are not significantly different from the previous type used, there may not be noticeable differences in the results. To update the Charts (after changing Construction Types), use the Refresh button after recalculations have completed.
Changing the roof or floor types will indicate compliance with the Energy Code or Building Regulation selected but will not currently affect the results in the dials.
When all data for the new construction type is completed, you may click on the ‘Create’ button. Note: if some data is missing, you may not be able to create the new entry (in this case complete all fields required for the new entry (SHGC and VLT are only required for glazing types)).
Once a Construction Type is created or deleted, a confirmation message will display to confirm. You may use the custom entries that you create in either metric or imperial models since they are saved to your login account (values will be converted automatically).
Deleting a custom construction
If a custom construction type that is in use (has been selected) is deleted, another type should be selected to replace it. If another type is not selected but the Apply button is clicked, one of the default types will be used to replace the deleted entry (this is to prevent issues with the application attempting to recalculate without a reference value). Note: the default type will not immediately highlight but will do so if the panel is closed and reopened.
Note: It is currently not possible to modify data for an existing custom type that has been created. You may delete it and create a new entry if required.

Shading Effects
Shading Effects are calculated in the Forma extension. This will factor in:
- shading effects from other parts of the building (self-shading)
- shading effects from surrounding buildings and from other geometries created in Forma (if they are close to the model)
- shade devices created separately on the model (using the recommended method as described below)
Shading Simulations
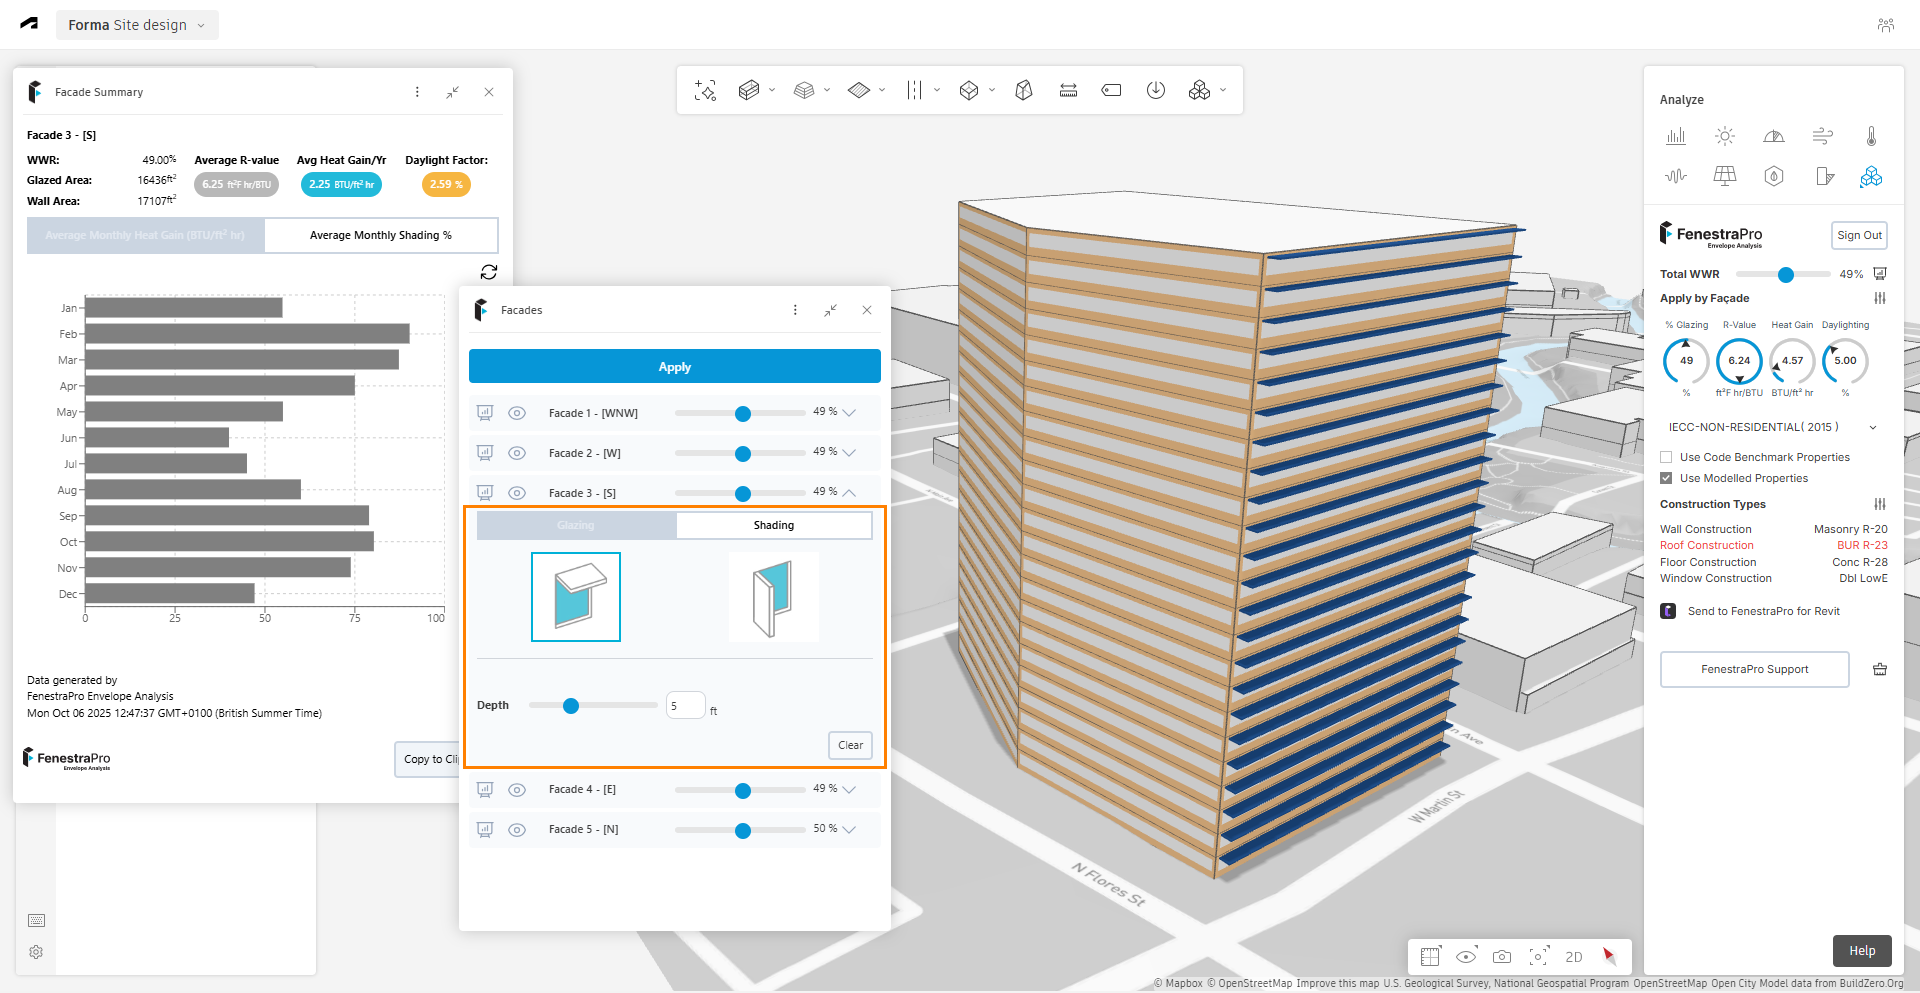
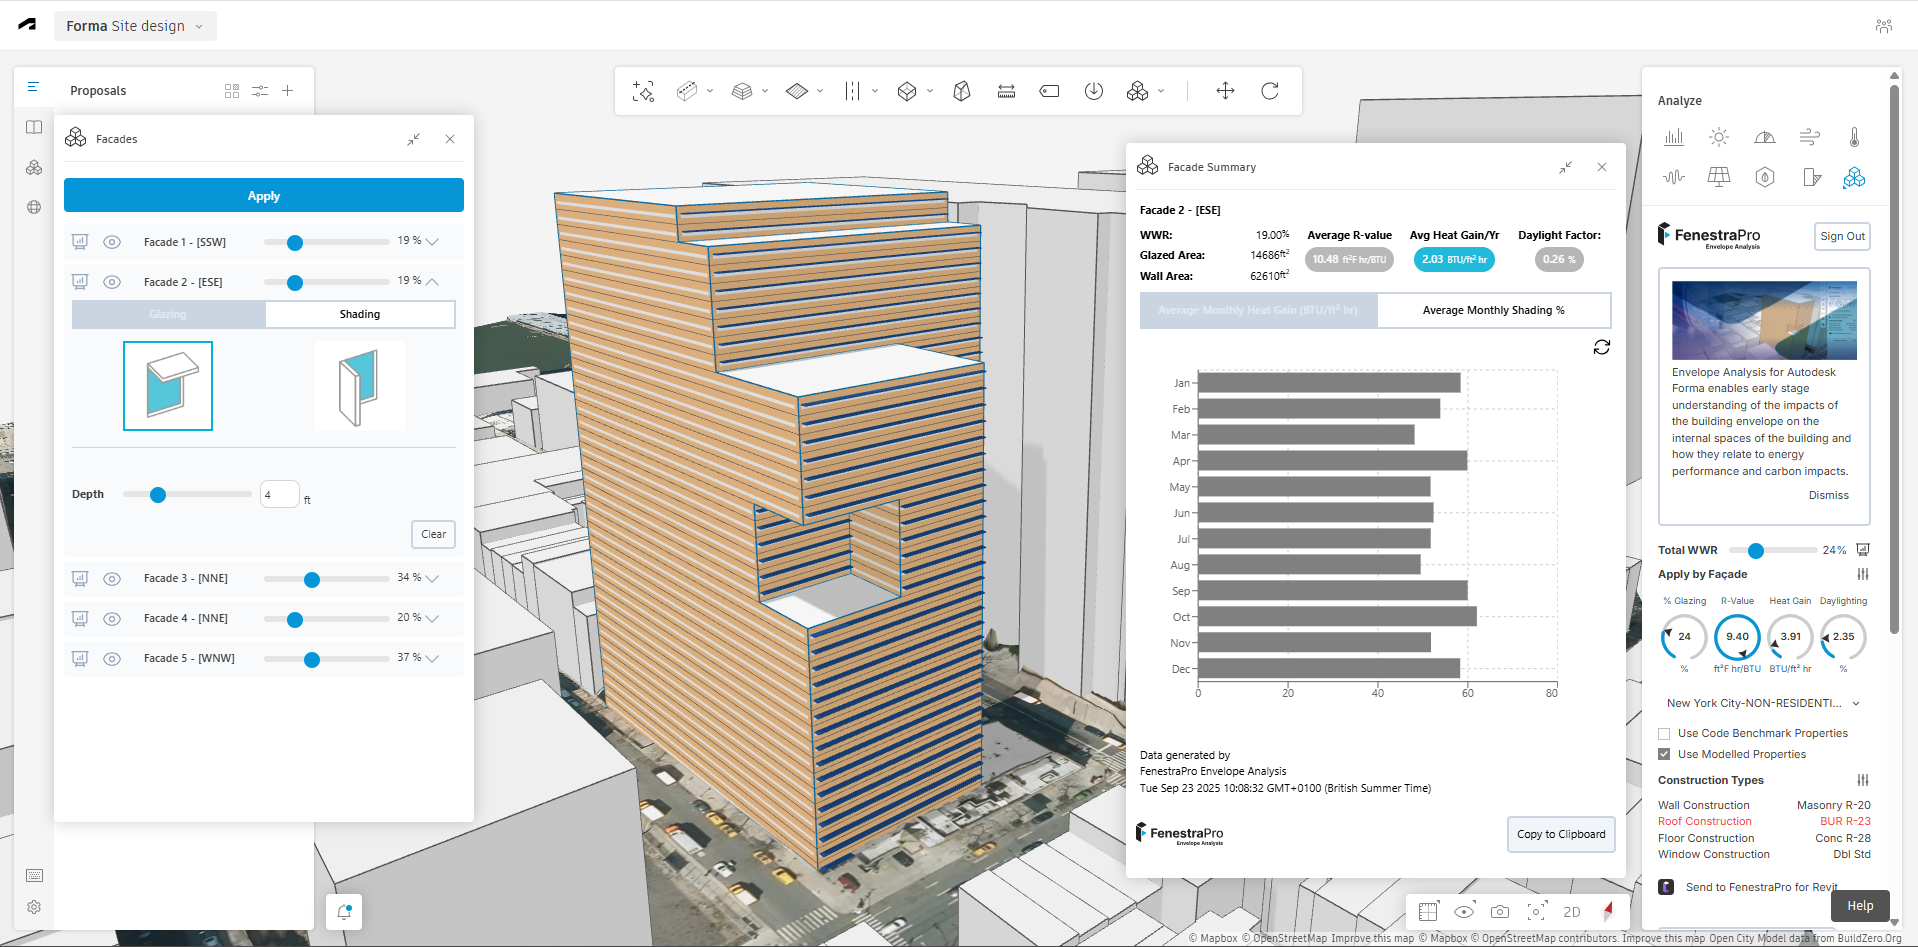
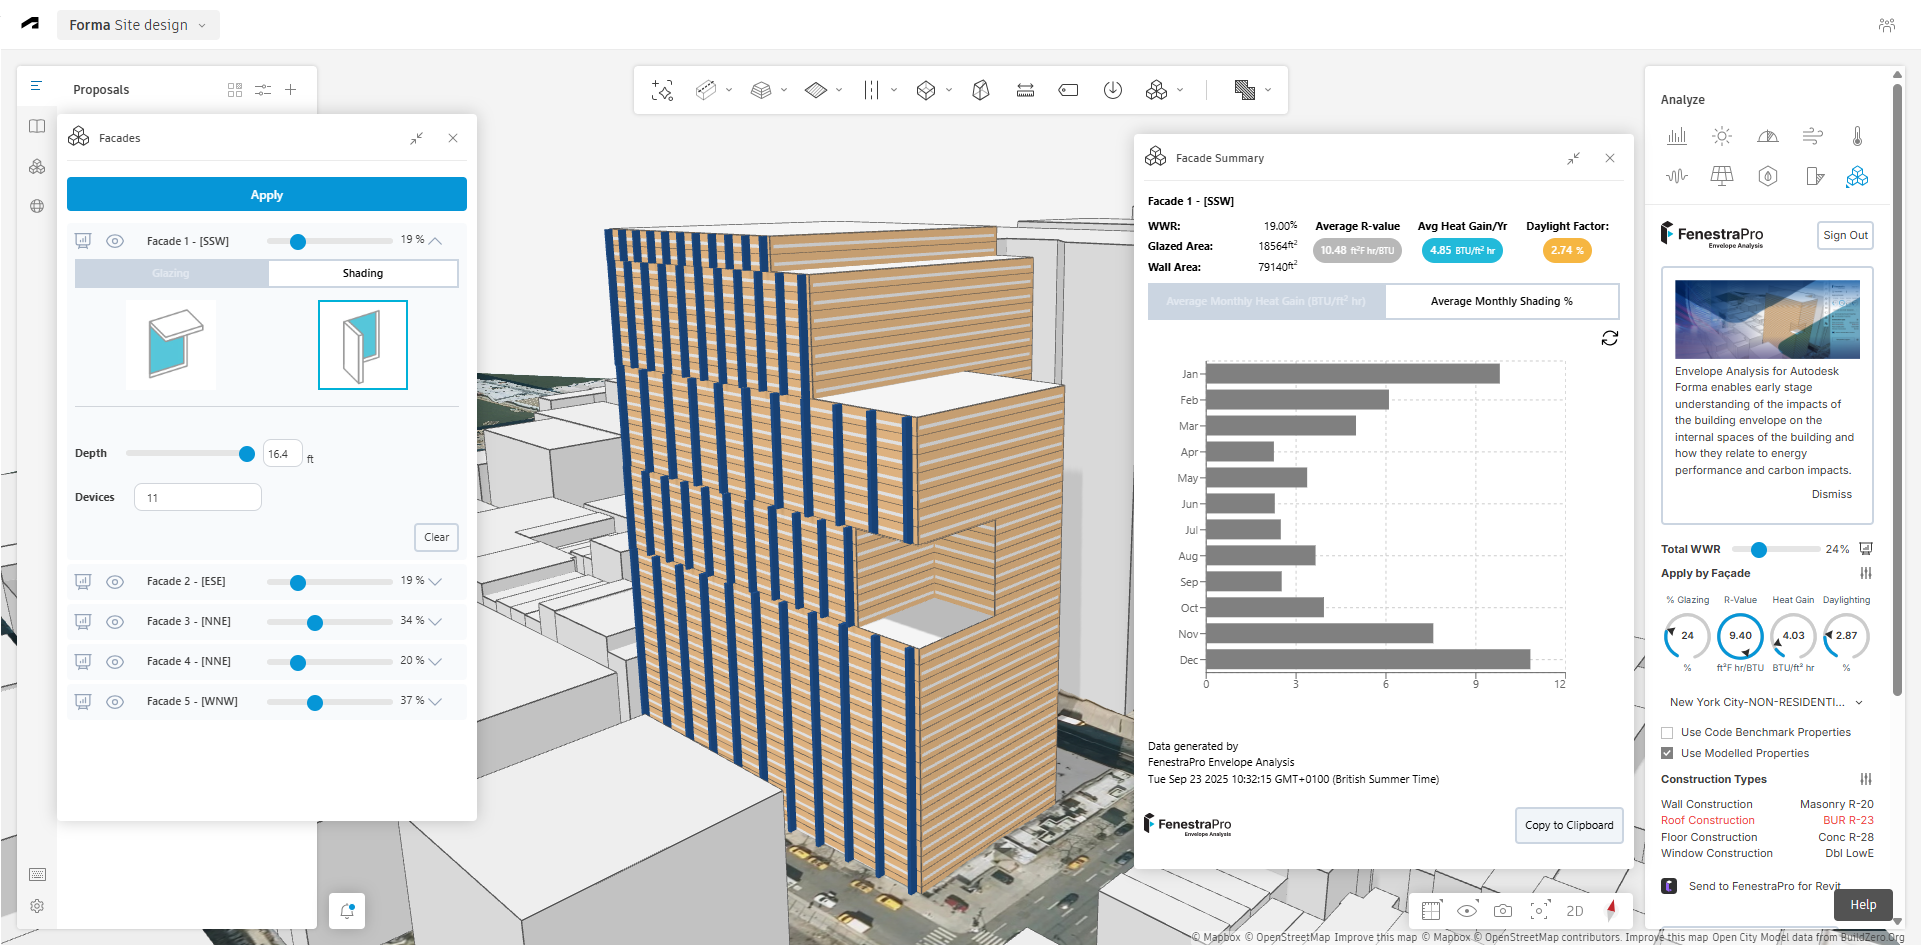
Under the Facade controls, you may configure shade devices on your project such as a canopy or vertical fin. There are tabs for Glazing (configure windows) and Shading (configure shade devices). You can also set the depth of the shade device and if you have windows, shades can be assigned separately for each window or over all glazing on that level. For canopies, all glazing will get a shade over it. For vertical fins, if you have notional glazing, you may define the quantity. If you have windows defined, a fin will be placed for each instance.
Glazing must be first configured (either notional glazing or windows), you may then use the Shading tab (under the Facade controls) to add shade devices. Select the relevant Facade, then the tab for Shading. There are options for a Horizontal Canopy or Vertical Fin (select the relevant image to start the process). Define the shade depth and quantity (for fins only).
Canopies
For canopies, you may set the shade depth. If windows are present, you may choose to have the devices either:
- ‘Full Length’ (across all windows)
- ‘To Window Opening’ (separate canopies for each window).
You must also set the ‘Depth’ of the shade device. You may use the slider or input a value to define this. The maximum depth is currently 5 meters or 16.4 feet.
Once these settings are complete, you may use ‘Apply’ button. Shades will get added to your project for that Facade.
Vertical Fins
For Vertical Fins, you must set the ‘Depth’ and if you have notional glazing, the number of devices ‘Devices’. Currently, only an even number of vertical devices is supported, inputs for odd values will round up to the next even number. This is to ensure that the ray casting calculation is not obstructed.
If windows are configured there, a fin will be placed for each window (so there is no setting for the number of devices). Use the ‘Apply’ button to place the shade geometry and recalculate the results.
Please Note: Vertical Fins will change the Heat Gain results but currently not the Daylighting results (they will remain as before, without shade devices). This will be supported in a future release soon.
Once the recalculations have completed, the Charts will update automatically (using refresh is not required). You may change the glazing after shading has been configured and it will update according to the new conditions.
To remove any shade devices, use the ‘Clear’ button and then ‘Apply‘. It does not matter which device type is highlighted (canopy or fin), any shade devices on that Facade will be removed. Shade devices created using the application are not Forma geometry and cannot be selected, repositioned or rotated. You may configure windows and shades and then ‘Apply’ both together or clrear both windows and shades and then ‘Apply’ both settings.
If you have the FenestraPro for Revit Add-in (version 9.0 beta), these shade devices in Forma can also be exported along with your proposal to Revit.
Modeling Shades Geometry in Forma
As an alternative, you may also manually model shade devices on the project using the Forma Volume – ‘Cube’ tool or freeform function. Shade canopies will affect both Heat Gain and Daylight results. Vertical fins currently will currently only affect Heat Gain results.
Note: modeling these devices using other methods such as the surface or line tool in Forma is currently not supported and these geometries may therefore have no effect on results. Creating shades by extruding existing floors or roofs is not recommended as they may also get assigned glazing zones when the model is analyzed.

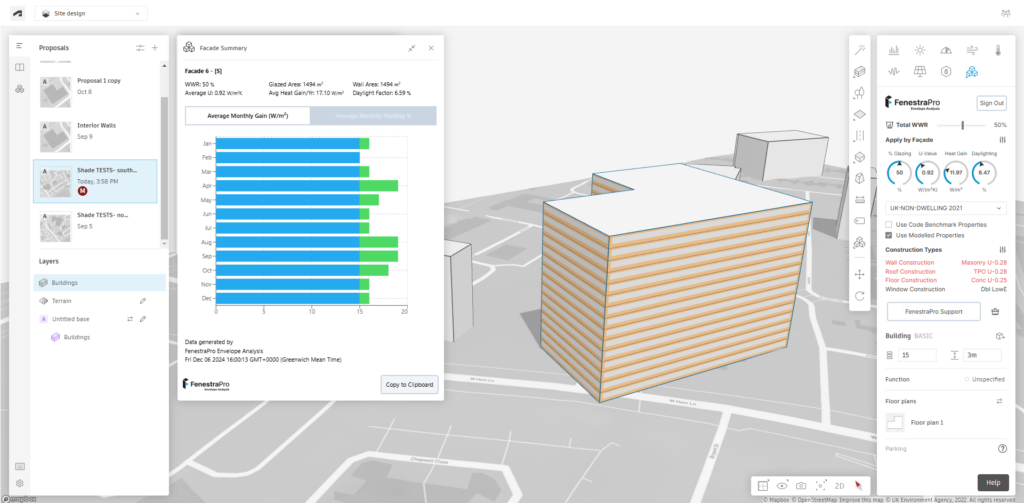
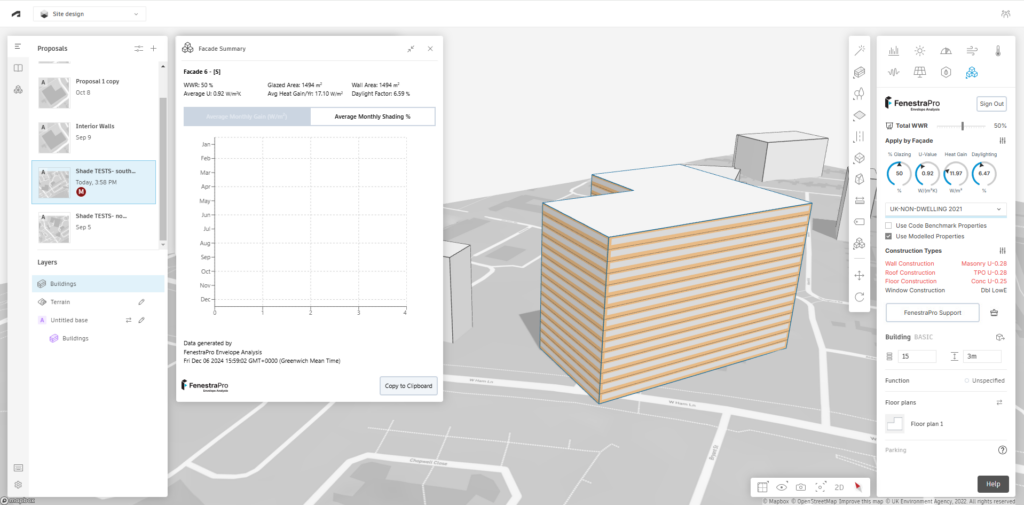
Model without Shading:
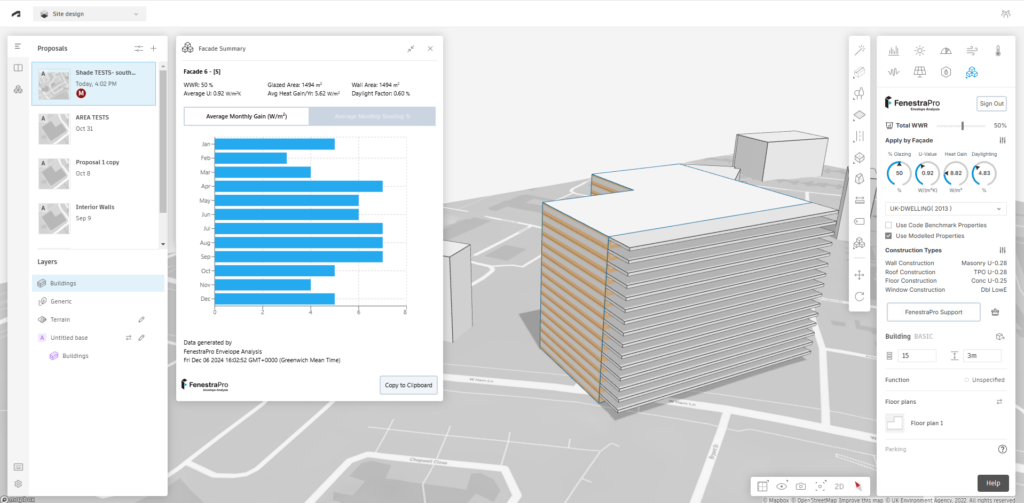
Model with shading:


To create a shade device (horizontal canopy or vertical fin)
- Select the Volume tool and Cube/Freeform option in Forma.
- First define the length of the shade device over the glazing, then extend to define the depth out from the building envelope, then extrude upwards to create the thickness.
- You may adjust these dimensions and exact location later by clicking onto edge surfaces and using the point handle to push/pull.
- For multiple canopies, you may copy a ‘shade device’ by selecting the geometry and using the move tool in Forma while holding the control key on your keyboard.
- Drag the geometry to another location by selecting a corner point and it will snap to a new point location.
Please see the video HERE for this workflow.
It is good practice after any changes to the model or surroundings, to refresh your browser to update the model conditions before recalculating and re-select the model. This applies when you add a shade device, change the depth, alter the model geometry or move the surroundings etc. You may also use another tool in Forma such as the Area Metrics feature on the toolbar to exit the FenestraPro extension and avoid any modifications being analyzed until you have fully completed the changes.

Shading Charts are also provided for each Façade and you can toggle between Heat Gain and Shading Charts using the tabs provided (these can be accessed by opening the details for Facades. Shading Charts are also provided for the overall model (this can be accessed from the icon beside the Total WWR slider). These provide the weighted average percentage of the relevant glazed area(s) that is shaded during exposed sun hours for the month/year.

Notes: If you find that recalculation is taking a long time, please refresh your browser and re-select the model to restart the analysis. If the analysis progress continues to spin and does not complete, the current model condition may not be suitable for analysis (it may be too complex). Calculations may take a few minutes depending on model complexity and shading conditions. Simplifying the model may improve success. Projects that have imported geometry, were created using 3D Sketch etc may not currently be suitable for analysis. Models must have Floor Levels before analysis is started. It may be possible to ‘Add Floors’ to the existing model (if they have none) and try selecting again. Remodeling using the ‘Basic Building‘ method in Forma may also be an option.
- Projecting a floor as shade geometry may not work in some cases since currently the extension is attempting to collect all surfaces on the same plane to create Facades. This is to be improved shortly.
- Shade devices modeled using surfaces or line geometry will not create shading effects or affect the results. For the moment, please model shade devices as described above (using ‘volume – cube/freeform’ method).
- Shading effects are always included in the results and there is currently no option to calculate without this feature. This ensures that the results reflect realistic site and model conditions.
- Shade effects from Forma trees are not yet supported due to the calculation method currently employed. If required, significant large trees on site can be modeled as similar size building blocks as a workaround (using rectangle or circular footrpints and extruded), by defining the story height and dimensions, similar to the planting.

Results
Results will then display in the dials for Glazing Percentage on the model, U-Value for the model facade (including walls and glazing), Heat Gain and Daylighting (total for the model) based on the window to wall ratio selected and if you are using the construction types’ properties or the selected Energy Code values. The arrow in the dial will indicate where the current result value is located within the range provided for that parameter. Results will be displayed as metric or imperial values depending on the model location.
If lines are used in Forma to define rooms or spaces, results may change depedning onthe depth of the space. The application uses a perimeter zone area of 6 metres or 19.7 feet to calculate the results. If the depth of a space is less than this (defined by lines in Forma), this actual space depth in the proposal will be used. Any ‘internal walls’ further away than this will not affect the results since the perimeter zone depth is the maximum value used to calculate results.


FenestraPro Connect*
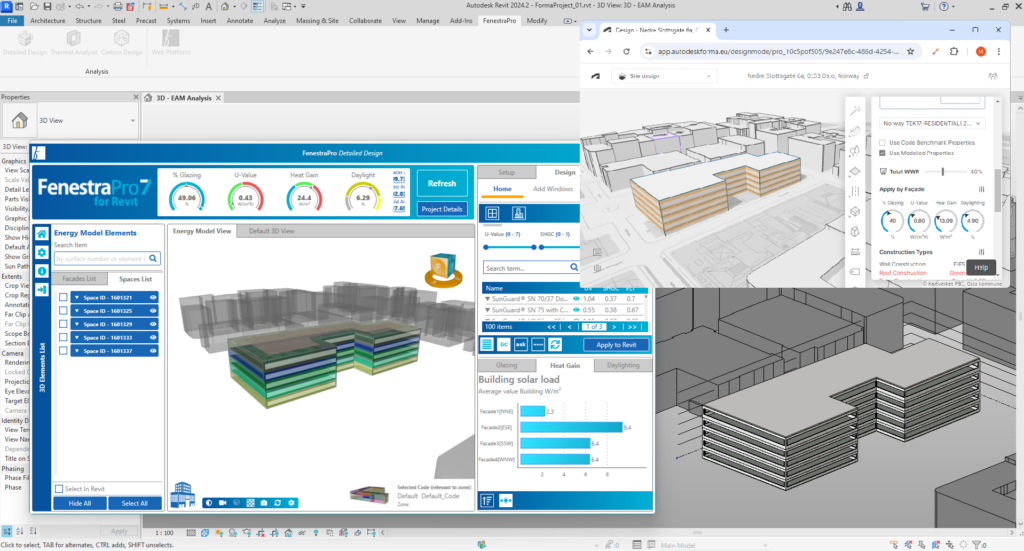
FenestraPro has a feature where the Forma model can be converted to a Revit model with detailed elements and the same Glazing Areas and Construction Types as defined in Forma. Revit templates are built into the importer (which have element families with the same construction types as our extension in Forma). This will ensure that the when the geometry is converted to Revit elements, they will automatically use the same construction properties as the Forma model. These families can of course be swapped later for different/custom family types in Revit. The Revit model can then also be analyzed with FenestraPro for Revit (separate license required). Note: If you purge the template file after downloading, this will remove the custom families that were created for Forma models. In this case, you will need to import the Forma model to Revit again. A full explanation on this workflow is provided HERE.
* Note: Connect is part of premium features in the Forma application. This is included in your Trial (full functionality) but will be disabled after the Trial expires and will then require a subscription.

Notes:
Sharing Projects (multiple contributors)
If you are sharing a project with other users and they have permission to edit the same model, any changes that one project member makes to the model or changes to percentage settings for Facades using FenestraPro, will also update in other member’s screens when the Facades panel is reopened.
Also note that for the moment, if internal wall divisions are added to the model, this will divide the Facades into separate areas in Forma. This is currently being investigated.
Multiple Models
If you have multiple proposed buildings in the project, close the Façades List and reopen it when switching from one model to another, to allow it to reset with the new list (and possibly new number) of Façades for the active building.
Currently, there is no redistribution of glazing percentages throughout the model (e.g. if the Total value is defined and one Façade is adjusted, other Façades do not adjust to maintain the total).
Imported Models
If you import an .obj file from Revit or Rhino into Forma, this can be edited using the 3D Sketch tool and Floors may be added to the model. Once this is done, FenestraPro should be able to analyze the model (some complex models may not always be successful). Note: There may be some restrictions on file import size (currently 100mb) or the number of mesh objects allowed by Forma.

FAQ’s
- What model areas can be selected? The model is arranged into Facades, which are model faces per orientation. You can get results for each Facade on the Forma model (glazing that contributes Heat Gain and Daylight). Results are based on spaces in the perimeter zones (6m/20ft depth from the glazed wall). If interior walls are placed in locations less than these values, these depths are used instead. Currently, the model is not isolated into Surfaces or Spaces to review results in specific rooms or spaces.
- How should the model be created? It is recommended to use the ‘Basic Building‘ tool in Forma to create the model (rather than ‘3D Sketch’, ‘Line Building’ or ‘House’ options).
- How do I select the model? Click on the uppermost roof on the model (if your model has multiple roof levels) to start the calculation process. Clicking on model walls or individual Floors will not initiate the analysis.
- Can I switch between different models in the same Forma project? Yes, it is possible to switch analysis from one model to another. Simply select the second model to start analysis (the first model selection will be cancelled but settings will be saved there).
- Will the results update automatically? Settings may need to be applied first before the changes are recalculated. If the model geometry is adjusted, the browser should be refreshed and the model re-selected to recalculate results for the new model condition. Selecting a different Energy Code or adjusting Overall Glazing Percentage should initiate an automatic recalculation.
- What if my model cannot be analyzed? It is recommended to use the ‘Basic Building‘ method in Forma to create models suitable for analysis. If you are not getting results for your project, it may have been created using the 3D Sketch method or imported from another software. The model must have floor levels to allow analysis. For these types of models, it may help to ‘Add Floors’ to the model by right clicking or editing. The model may then get results. For more complex models, it may help to simplify the model. Other models with large gaps between volumes, separate towers etc may not yet be supported. Development is ongoing to provide additional support for these conditions. Some imported geometry may not be currently suported.
- What happens if I reset Overall Glazing after setting individually for Facades? In this case, all Facades will reset to the single Overall Glazing value and separate Facade settings will be lost.
- How can shade devices be added to the model? Using the ‘Volume – Cube’ option in Forma, shade objects (canopies or vertical fins) can be modeled separately on required levels (rather than extending floors or roofs). See the section on Shading above on this page for more details.
- Can the previous settings be removed? Yes, there is a ‘Reset‘ button to remove all previous saved settings (glazing percetnages/shades/windows/construction types etc. This is provided as a paintbrush icon beside the FenestraPro Support button.
- What if the existing model properties do not comply with the reference Energy Code? You may use the Construction Types panel to adjust constructions for walls, roofs, floors and glazing. Sample types are provided and selecting a different construction with an improved thermal performance, may then comply with the reference values. Note: there may be cases where no construction listed will be compliant with a reference value in an Energy Code/Building Regulation.
- Can the Forma model be sent to Revit? Yes, the Forma model along with the selected constructions, glazing areas, automatic shade devices and ‘internal walls’ can be converted to Revit geometry using the application’s Connect function. Please click on the button in Forma to review payment options.
Known Issues
- Currently the Basic Building type in Forma is supported to create geometry for analysis (‘Line Building’ and ‘House’ types are not yet supported). Geometry created using the 3D Sketch tool in Forma is also not currently supported. To analyze all parts of a project together, the model should be created at the same time (draw a footprint shape and extrude). Adjustments can then be made on each level using the ‘Floor Plan’ tool. Further use of the ‘Buildings – Basic Building‘ tool to add more geometry, will in effect create separate buildings which can be selected and analyzed separately.
- Results will not be produced if the entire model is not selected (if only one floor or selected floors are selected). In this case please select the proposed design by clicking on the uppermost roof.
- Adjusting the Forma geometry while the Envelope Analysis extension has already loaded will not automatically update the extension. In this case, please use the Escape key on your keyboard to disengage from the editing mode and select the model again to analyze. Forma proposals which are rotated after analyzing with Envelope Analysis may have the renders remain with the original footprint. In this case, the rotation may need to be undone (ctrl + z) or if this is not possible, the proposal may need to be remodelled in Forma. This issue is being investigated with Autodesk.
- Larger projects will take a little longer to process since glazing has to be applied to each story, so please allow the calculations to complete. There may be very large models such as masterplans where a memory limit will restrict analysis.
- If you are analyzing one proposal and switch to another proposal in the same project, facade renders may persist from the previous model. In this case, please refresh your browser to reset, select the new proposal and allow the extension to load the active model.
- Energy Code values that are provided may be simplified where there are multiple recommendations for construction types (eg. flat roof, sloped roof, heated/unheated floors, element materials wood/metal etc). When the ‘Use Modelled Properties’ option is used, the selection is not saved if the project is refreshed or closed and reopened (please check and select again).
- If you have multiple buildings in your project, only one can be analyzed at any one time. Selecting all buildings will only produce results for one. Currently, as you select another building, calculations will commence and then display for this (results for the previous building do not continue to display but are stored if you wish to return to the first building). Attempting to add geometry to existing proposals in Forma by using the Basic Building tool, sketching a new footprint and extruding, will typically produce another separate model. It is recommended to use the floor plans to make any revisions to an existing proposal.
- If part of the building is underground, you may want to model this part separately, otherwise if it is part of the main model, it will also be assigned glazing when you set the window to wall ratio and get results. This is to be addressed in a future release where underground areas will be recognized and excluded.
- Complex models with large openings separating volumes, detached geometry may not currently produce results as these conditions require more complex identification of spaces and elements. Better support for these conditions will be provided soon. There may still be some model conditions which will have difficulty being analyzed. These are currently being explored and improved. Glazing may not get applied to walls that are slanted (non vertical walls). There may be some projects with multiple imports/content which will prevent the extension from running correctly. This is being explored and a solution is to be deployed soon. If you have issues with a Forma project, please contact us at support@fenestrapro.com and we can advise.
- If using ‘Connect‘ to send a Forma model to Revit with shading geometry (modeled in Forma), the import may fail. Please make a copy of your proposal in Forma without any shade geometry on the surfaces and export this version instead. Version 9.0 of FenestraPro for Revit does support shade exports when shade devices are configured using the Facade controls in Envelope Analysis.
- If moving the model to a different level, duplicating floors or adding new geometry, sometimes geometry may get overlapped or duplicate floors created on the same level if ceiling heights are not uniform. This can cause issues when trying to analyze the model. Please check by selecting a floor plan and checking where this level is positioned in the project. You may also try to delete a floor level and undo (Ctrl +Z) to check if there are duplicates (caution should obviously be taken when modifying the model).
- If the Forma model is exported to Revit using the Forma function (‘Send to Revit add-in’), you may need to refresh the browser to continue using the extension or to open the Facades List – this issue is being explored.
- It is not recommended to have multiple projects open in separate browser tabs at the same time (since multiple simultaneous updates are not yet supported). Please work with one project at a time, close this and open another project.
- If you have made settings on the model and then choose to change the geometry of the model, the settings may not update to the new geometry straight away (for example, windows will not recalculate). You may refresh your browser window and select the model again. If you are having issues, a ‘Reset’ button is provided in the form of a brush icon. This will cancel any existing settings and you may begin again.
- Your browser may timeout if calculations are ongoing for larger models and it may show a message asking if you want to ‘Wait’ or ‘Exit page’, you may ignore this mesage and allow the calculation to continue or click ‘Wait’
