
If accessing this page from the Forma extension and you wish to view in a browser, please click HERE

To use the FenestraPro extension in Autodesk Forma, you must first have access to Forma (an online modeling tool). To add Forma to your Autodesk ‘Products and Services’, you may need to contact Autodesk to have it added to your subscription package (free Trials are available).
For release notes for the current version of the FenestraPro Envelope Analysis extension in Forma, please see HERE
Summary of how to use the FenestraPro Forma Extension. Each of these are explained in more detail below.
- User Interface
- Set the Window to Wall ratio for the overall model
- Window to Wall ratios per Facade may also be set using the Apply by Facade option (if required)
- Configure Windows
- Review Results and Charts for the overall model and per Facade
- Connect – export model to Revit
Video for FenestraPro Extension Version 1.8
User Interface
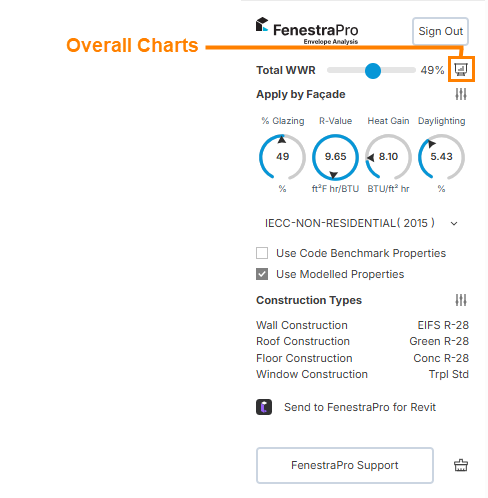
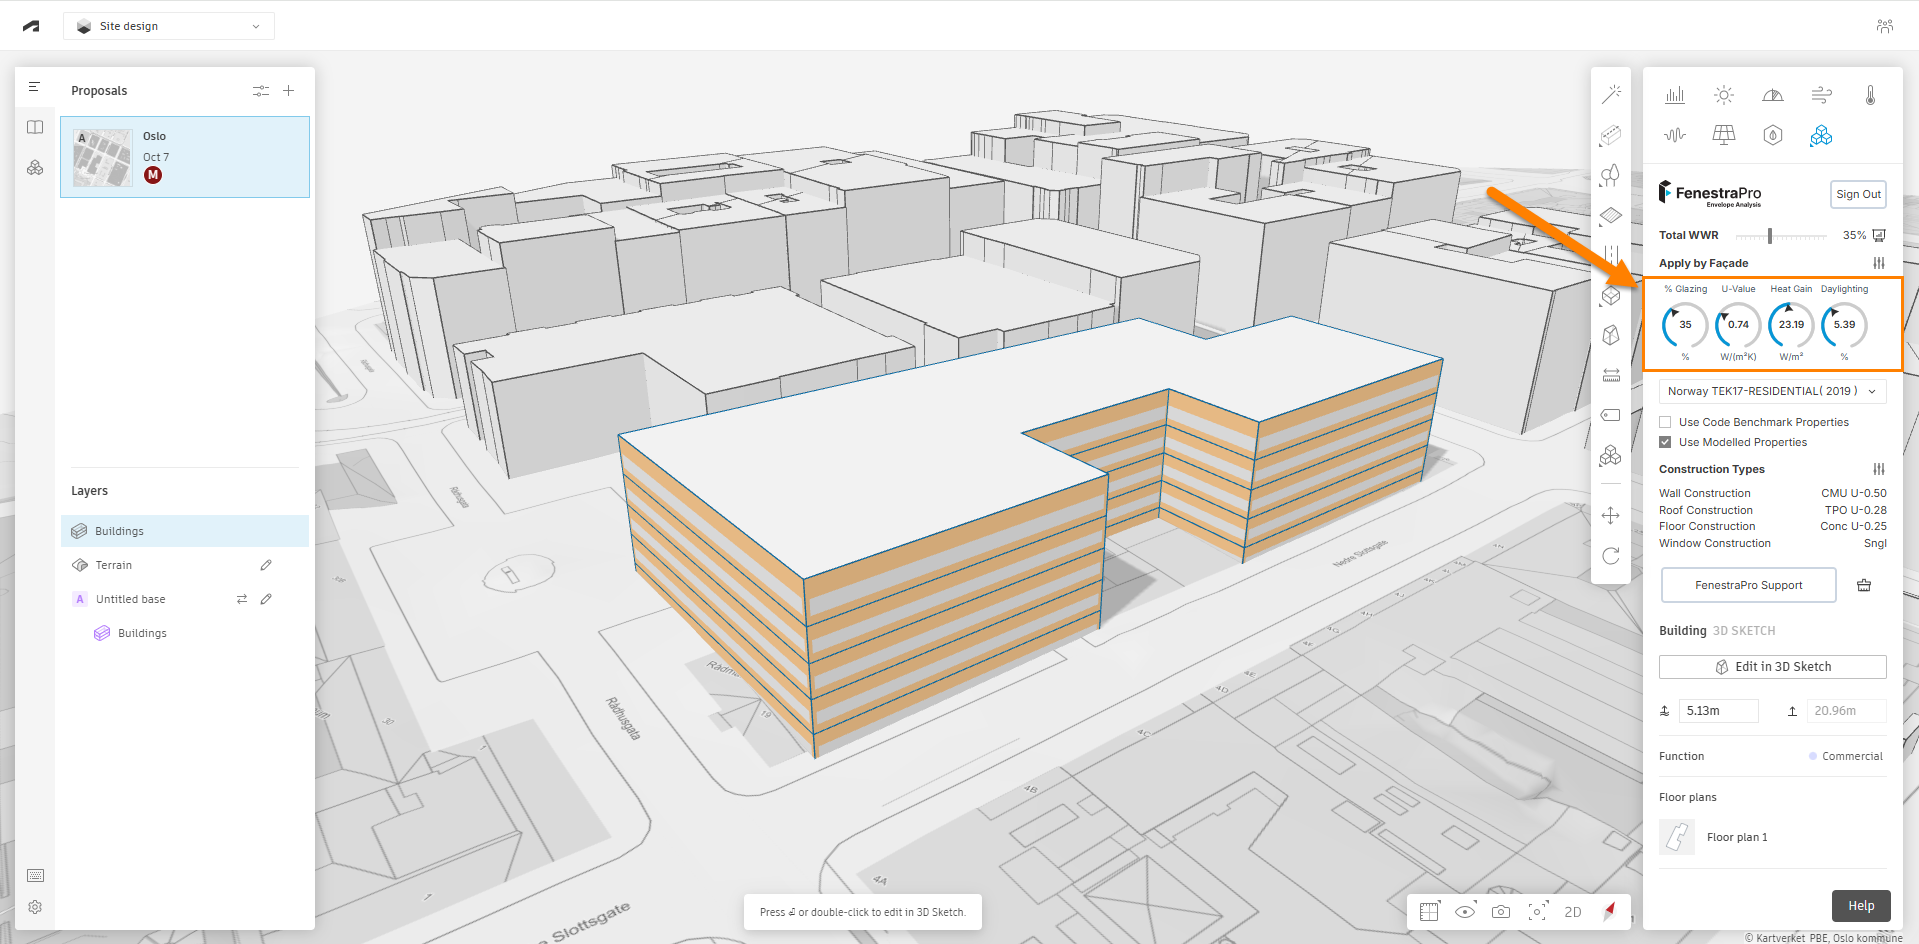
The main features in the extension are outlined in the image below.
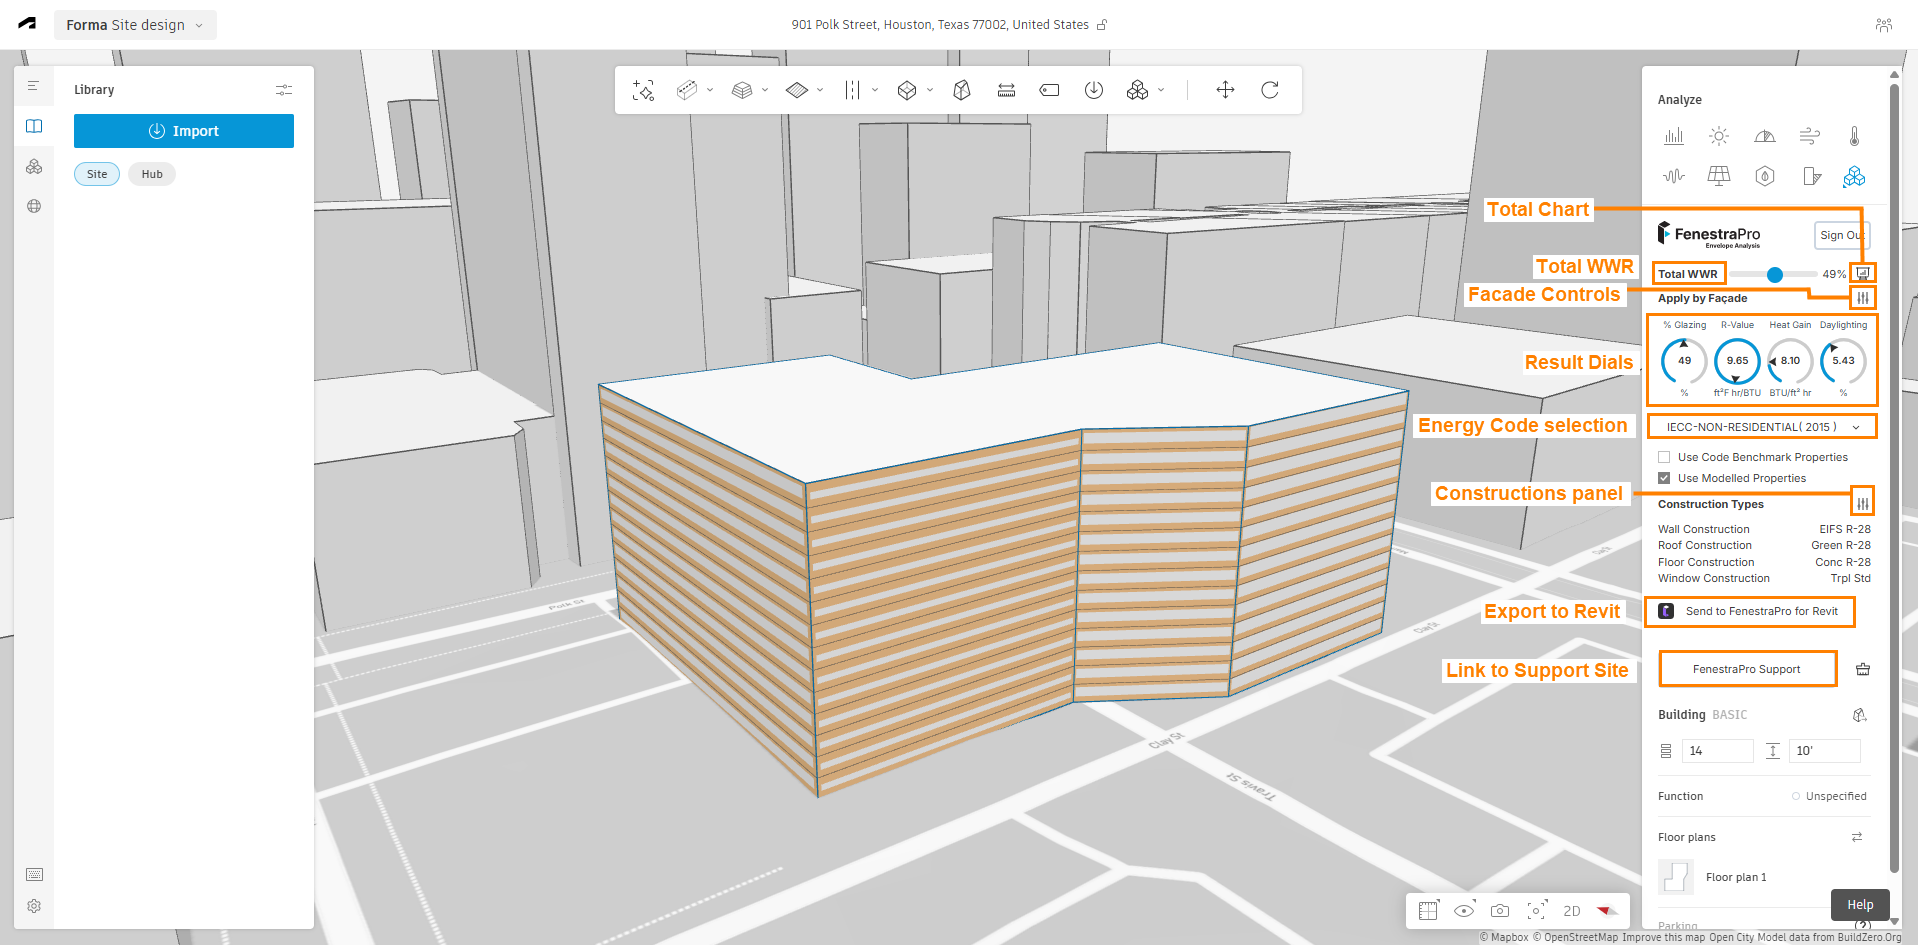
Metrics /Results
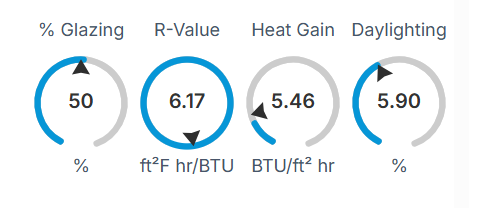
% Glazing
This is the current percentage of the total Facade areas that are glazed. This will adjust as individual Facades have their percentage adjusted or if windows are configured on areas.
U-value / R-value
The dial displays the current overall Facade Performance (wall and glazing) based on the current construction types used and their U-values/R-values. The Facade Charts also display Facade Performance for each selected Facade.
Heat Gain
The Heat Gain value will display the heat from the sun being collected and contained per unit floor area of space (metres or feet) in the perimeter zone. This is expressed as W/m2 or BTU/ft2 hr. If there are spaces/rooms defined, the Heat Gain will typically be higher than an open plan arrangement where the heat is dispersed. Rooms/Spaces can be defined in the Forma model by adding lines on a Floor Plan. To obtain the Heat Gain result, FenestraPro uses standard factors sourced from the CIBSE Environmental Design Guide, such as Solar Transmittance of the glazing, perimeter zone depth, shading factor, Facade length etc. Meteonorm is used to obtain certified global solar radiation data for project locations.
A perimeter zone of 6 metres / 19.6 feet is taken as default space depths but will soon allow you to define your own typical space depths for your project.
Daylighting
Design Daylight Factor is calculated as a percentage per Unit Floor Area within the Perimeter Zone for each Façade/Surface. The perimeter zone is an area inside the envelope of the building with a typical depth of 6 metres / ~20 feet. Daylight and Heat Gain are measured in this area.
This is a ratio of illuminance indoors on a horizontal work-plane to the horizontal illuminance outdoors under an overcast sky. It is a good measure for quickly comparing daylight penetration. Most guidelines recommend a value of 2 – 5% to achieve a ‘cheerfully lit’ condition and to avoid a room being both underlit or glare.
Daylight Factors can be compared to published guidance for your region. Guidelines usually recommend that a certain value be achieved for a certain percentage of critical task zones.
Window to Wall Ratio
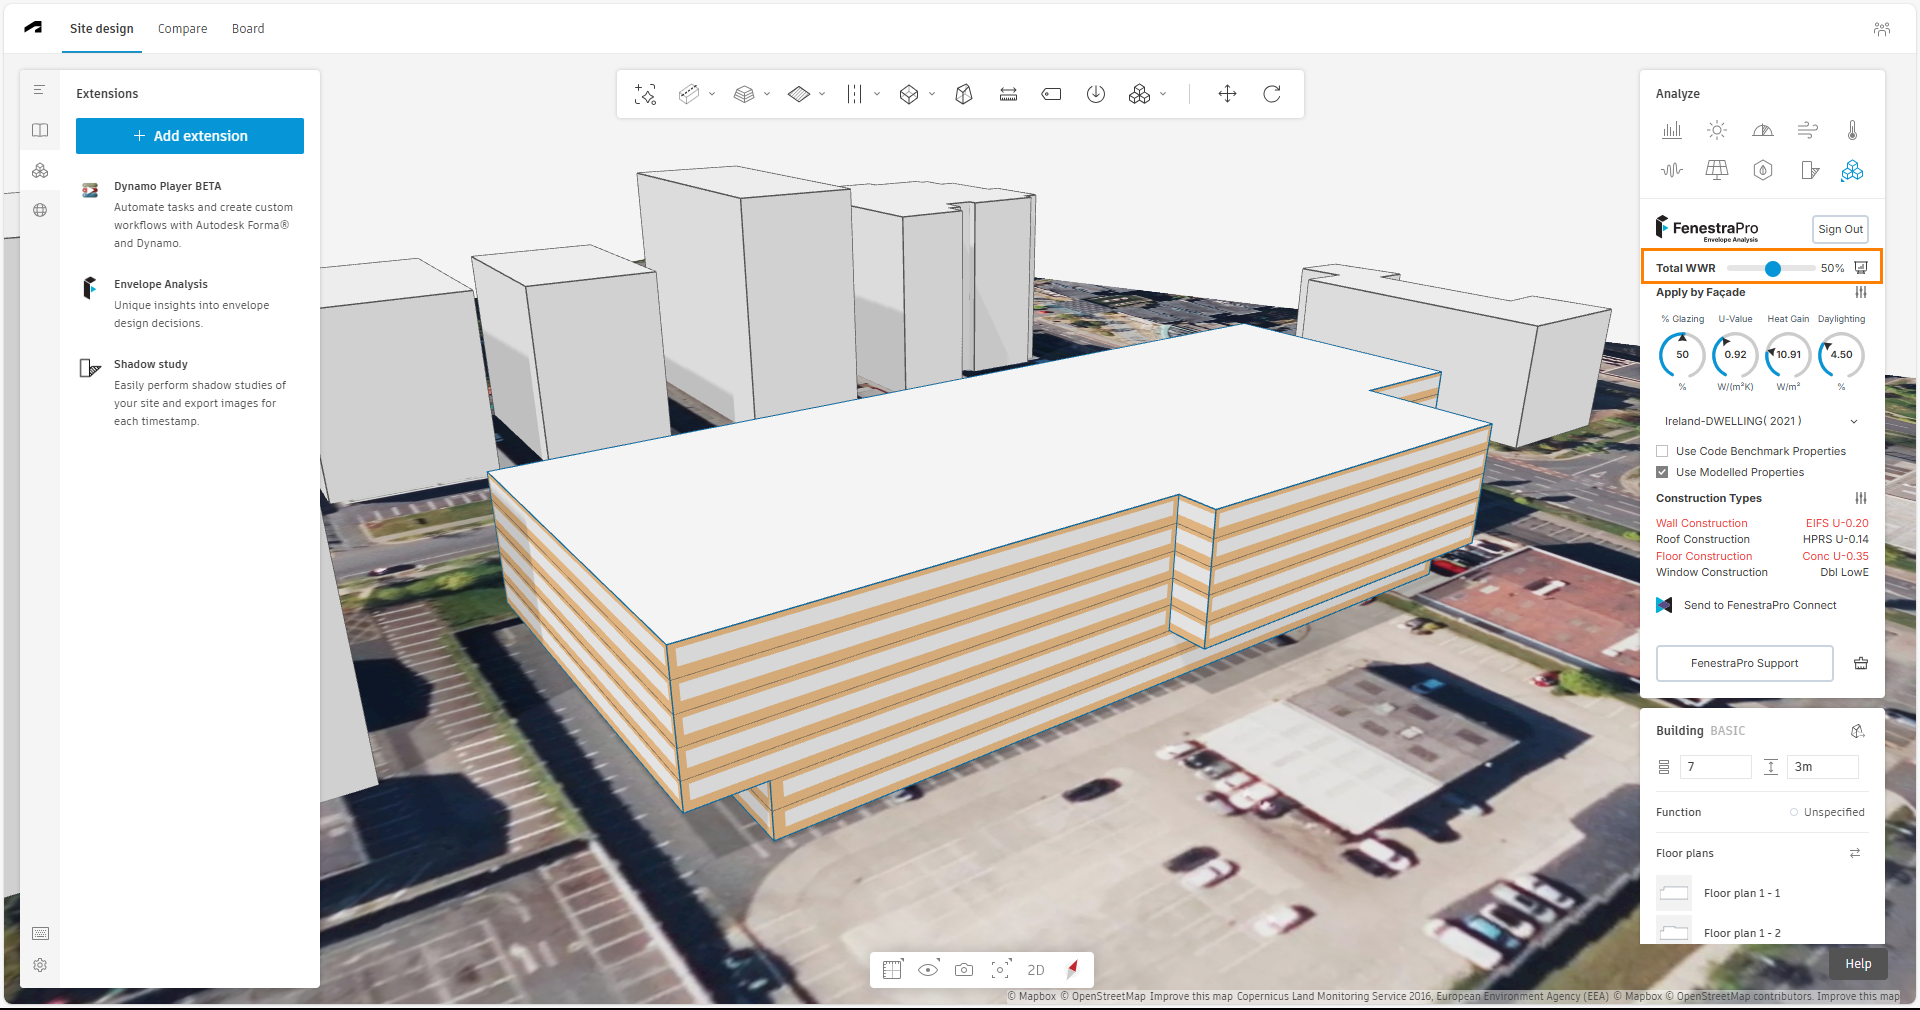
Next, select a Window to Wall ratio to apply to the Forma model. This will be the percentage glazing for the project. The percentage shown is the glazed area compared to the opaque wall area. Use the slider provided to adjust the glazing percentage that you wish to apply. Once this is done, calculations will be performed. Please allow this to complete. Results will then display depending on the amount of glazing applied. Note: the less storeys the building has, the faster it will be to process the calculations.
Apply by Facade
First ensure that the model proposal has been selected in Forma and the extension has calculated initial results and areas. You may use the tab key on your keyboard to help select the entire model. Opening the Façades List before this is done will not display any information.
You may open controls for the Façades List which will allow you to set glazing percentages separately for individual Facades.
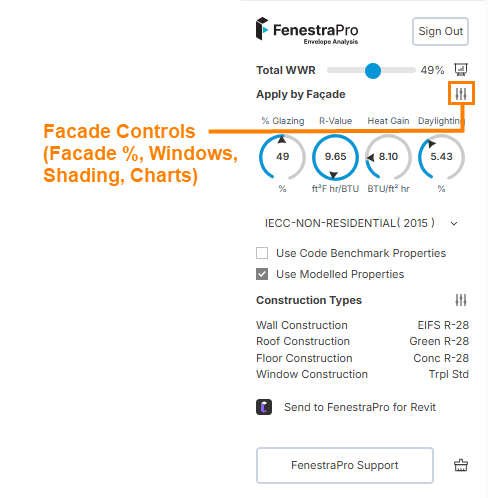
Click on the icon for slider controls beside ‘Apply by Façade’ to open a panel, listing all Façades on the model. You can set the Total Window to Wall (WWR) ratio first and then adjust values for individual Façades, or open the Façades List first and set separate glazing percentages here (the Total WWR for the overall model will then update).
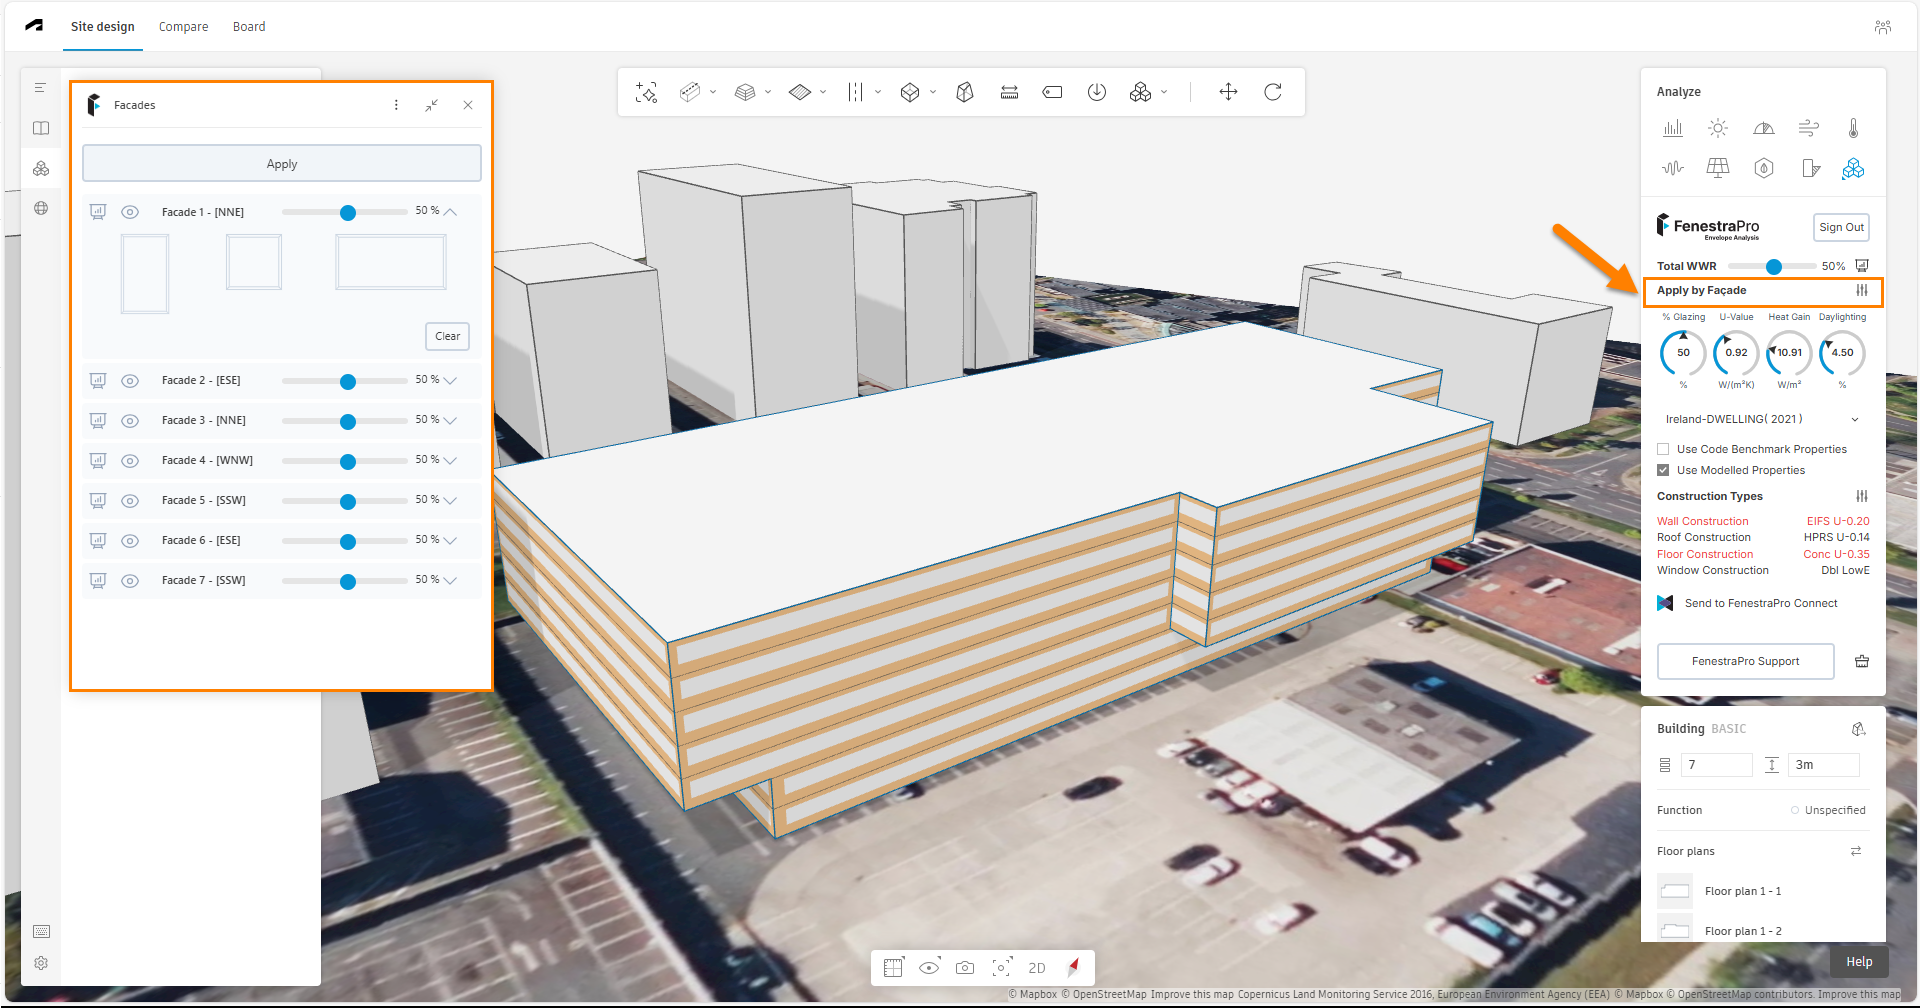
Depending on the design, there may be multiple model planes facing one orientation. There may be several South facing facades for example. Use the sliders to adjust the window to wall ratio for that Façade. A Façade can be set to any percentage in increments of 5 (from 5% to 95%). A Façade may also be set to zero percent. Any adjustments must then be applied using the Apply button to update the Overall Percentage setting for the model.
Important Note: If any changes are made to the project (surroundings are adjusted, the model geometry is changed, shades are added etc) and then settings are adjusted in the extension (percentage glazing, code type, construction types etc), the application may not refresh correctly, since the updates/changes will first need to be recalculated. If any changes are made to the model or project, the model should be re-selected or the browser refreshed FIRST to recalculate results with the updates included. Then you may make changes to the existing settings in the extension.
Highlighting a Facade
You may highlight the Façade which you wish to adjust using the eye icon in the Facade. Click on the eye icon and the relevant Facade will highlight for a few seconds on the model. The project will also rotate to display and highlight this area for easy identification.
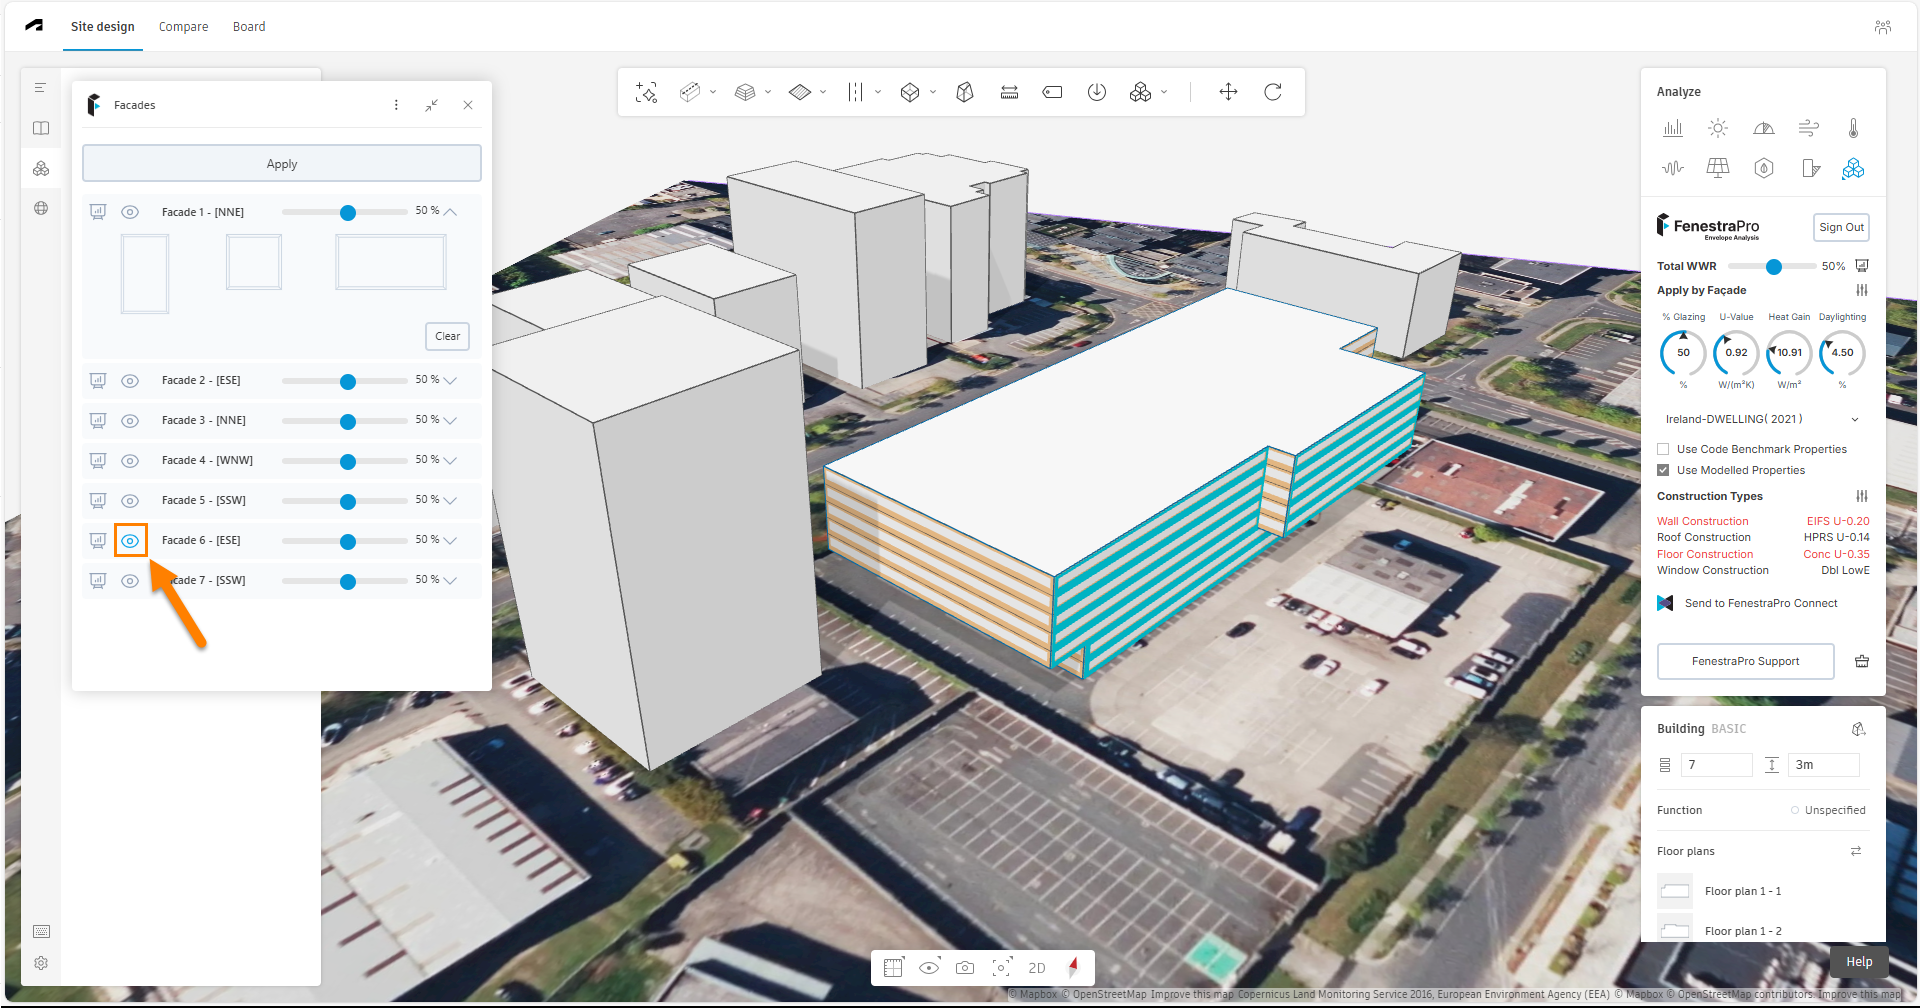
Then use the ‘Apply Here’ button to update the Total WWR (window to wall ratio) for the model. Results for Solar Load and Heat Gain will also update in the dials. The glazing zones displayed on the model will also update to reflect the current percentages.
You may also minimize the Façades panel (to view more of the Forma screen), by using the icon at the top right of the panel. Façade settings will be preserved when the panel is maximized again. If the Façades panel is left open and the Total WWR is adjusted, this setting will override the Façades List. Glazing zones will also update on the model.
Values set for individual Facades will persist when the panel is closed and reopened or if you close your browser window or switch to another model. If you have not yet set any individual values in the Facades panel, once you set the overall percentage Window to Wall ratio slider, all sliders in the Facades will reset to this overall setting. Once the individual Facade sliders are adjusted, the application will remember these individual values instead.
If the Total WWR slider is subsequently adjusted after the individual Façade settings are defined, this overall percentage value will reset all Facades to this percentage (the Facades panel must be closed and reopened to allow the update to happen). If the Façade percentages are defined and applied (after the Total WWR is set), the Façade settings will then override the overall percentage (the overall percentage will update to display the average of the Facade settings). If the project browser is refreshed, the latest percentage setting will be saved and loaded when the model is selected again.
If you select an Energy Code and check the ‘Use Code benchmark properties’ setting, the selected Code will also be remembered even if you close your browser, switch to a different project and back again to this project or open a different Forma extension and later reopen FenestraPro again. Note: the selected Code is not saved if you check the ‘Use Modelled Properties’ setting.

Configure Windows
Under the Façade Settings, there are pull-down options to select window sizes to replace notional glazing (rectangular glazed areas). Click on the arrows provided for each Facade to get additional settings to apply windows for the percentage value in the slider.
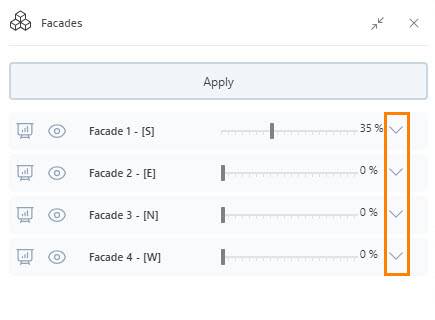
Selecting a window type will highlight that option and show which is currently active. Then ‘Apply’ this window type to the Façade to review these windows on the Surfaces. The overall WWR will update as well as the Chart areas for glazing and walls. You may switch to another window type and apply that (this will trigger a recalculation).
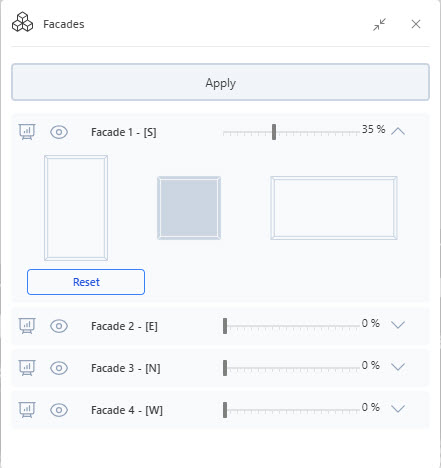
The metric window type options are 2.1m x 1.5m vertical, 1.2m x 1.2m square and 2.4m x 1.2m horizontal. These equate to approximately 7ft x 4ft vertical, 4ft x 4 ft square, 8ft x 4ft horizontal (when converted to imperial units). Windows are currently fixed sizes and based on metric units (converted to imperial when required). Windows will not be exact imperial sizes.
Please Note: Windows in imperial projects are representations only and are currently converted from metric. They will not be exact imperial dimensions (therefore total areas of glazing may not be exact multiples).
You may set options for multiple Facades and ‘Apply’ all when ready.
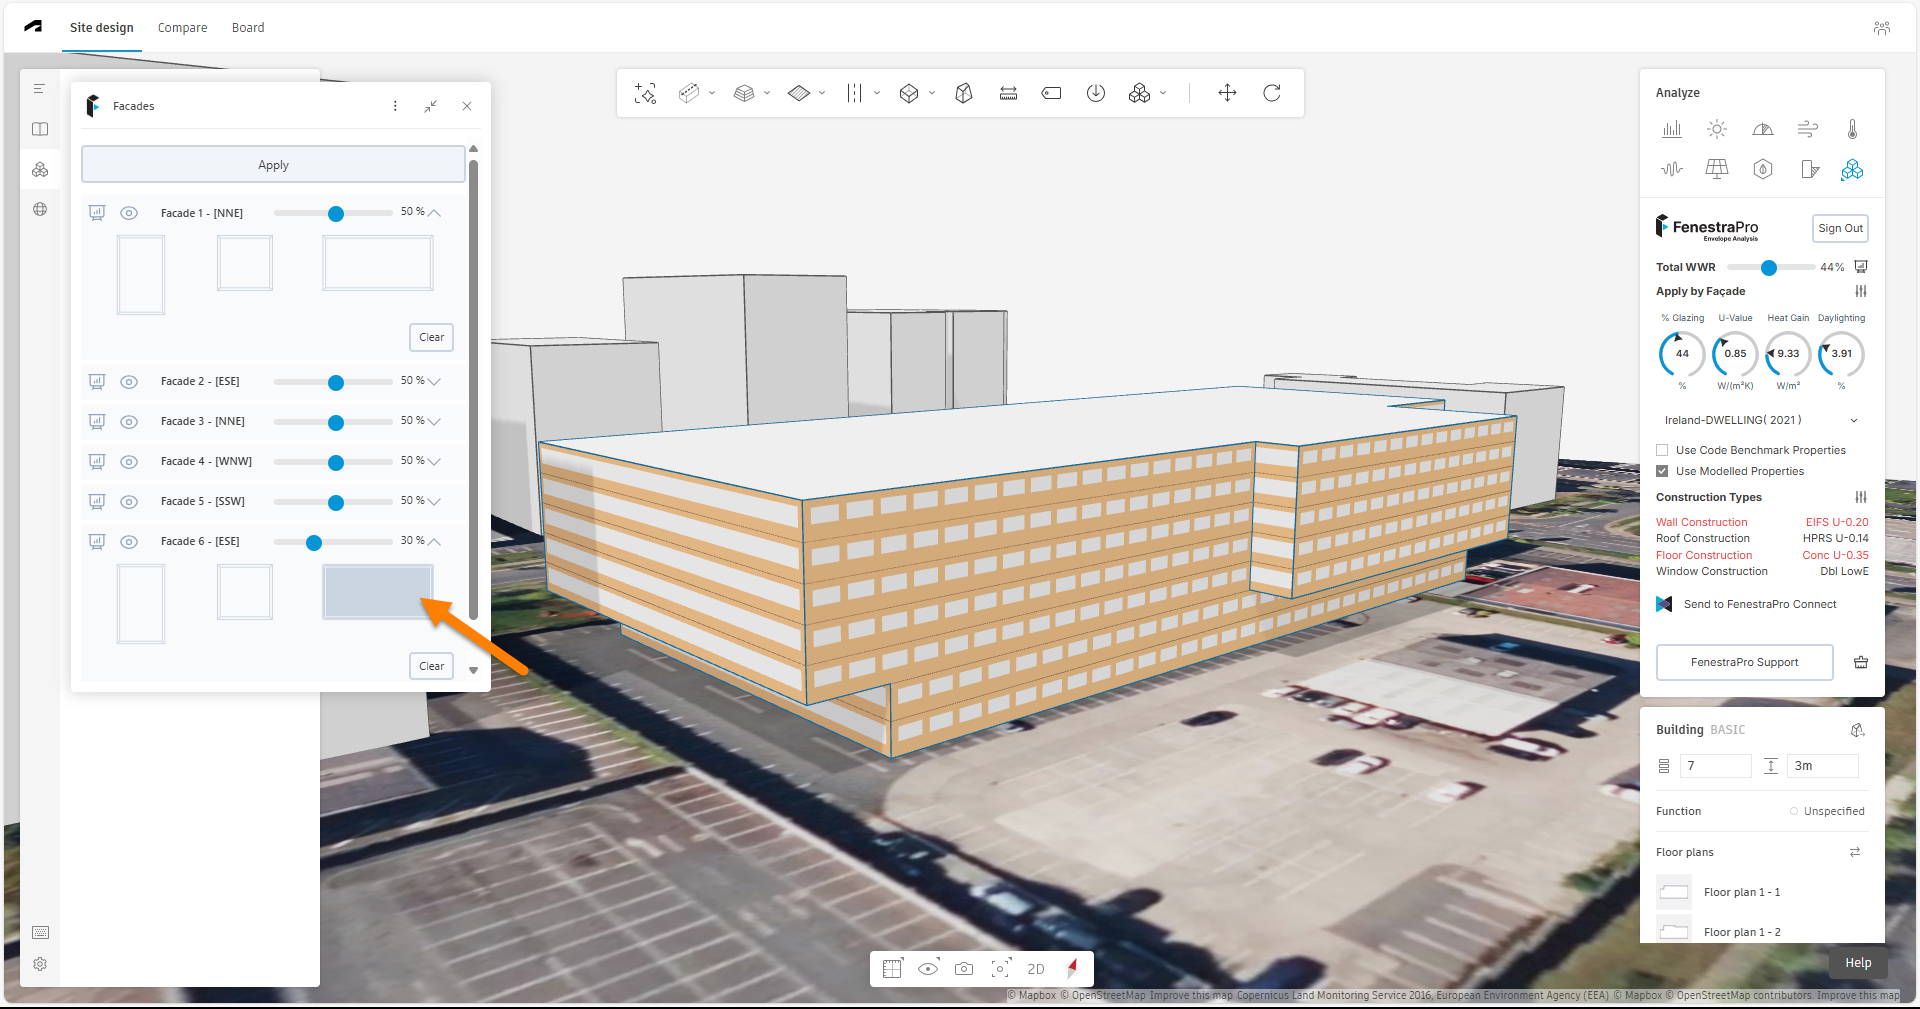
If you wish to remove windows but switch back to notional glazed areas, a ‘Clear’ button is provided. This will remove any windows and use the percentage setting in the slider to create notional glazing instead. (Once you have clicked on this button, it will disappear). Then click on ‘Apply’ to update the model. Note: if adding windows has adjusted the glazing percentage from the original setting, removing the windows will not restore the original setting. You may need to adjust the slider to set the WWR for that Facade after clearing windows and before applying/recalculating this update.
Note: there may be occasions where you will not be able to achieve the target glazing value with the selected window. For example, you may enter 90% glazing but the actual glazing area for windows applied will be less than this (since the windows currently available are a fixed dimension). The slider will then display the actual maximum glazing possible after recalculations are complete. You will more likely be able to achieve higher percentages with notional glazing instead, since the windows are a fixed size. If you do not have any glazing percentage set for that Facade but try to apply windows, this will not be successful (glazing percentage must first be defined).
Also Please Note: if windows are placed on the project and you subsequently adjust the Total WWR for the building, the windows will be removed and notional glazing will be applied instead.
If you have already applied windows and then change the model floorplans or internal wall positions, you will need to reload the model to reconfigure glazing with the new model condition. It may be necessary to set the glazing to zero and begin again if the model geometry has been adjusted.
Charts
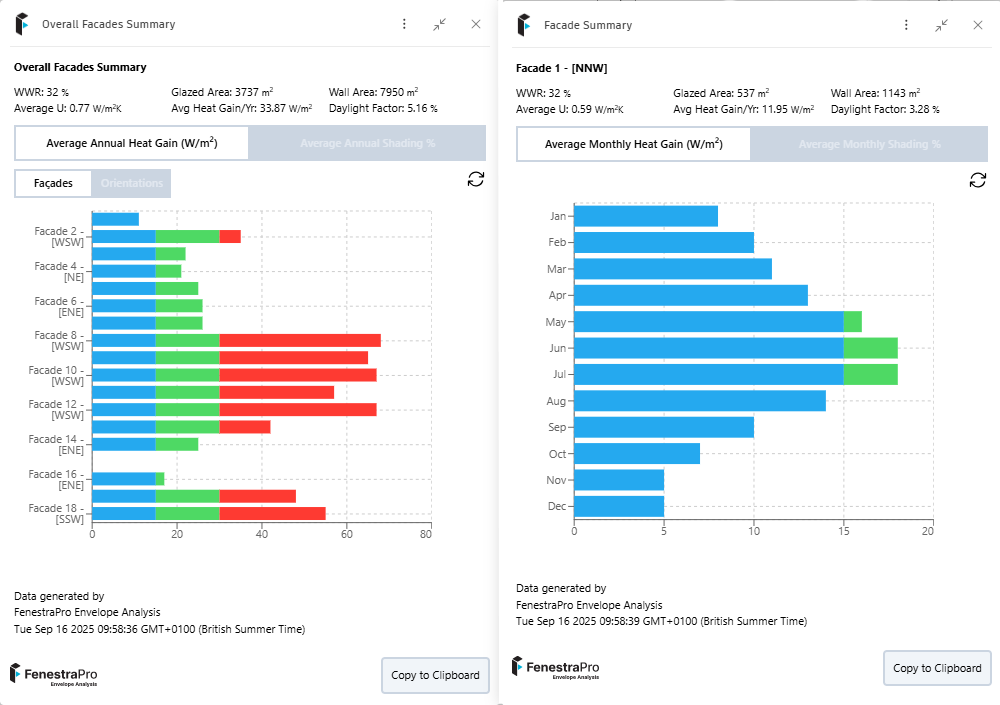
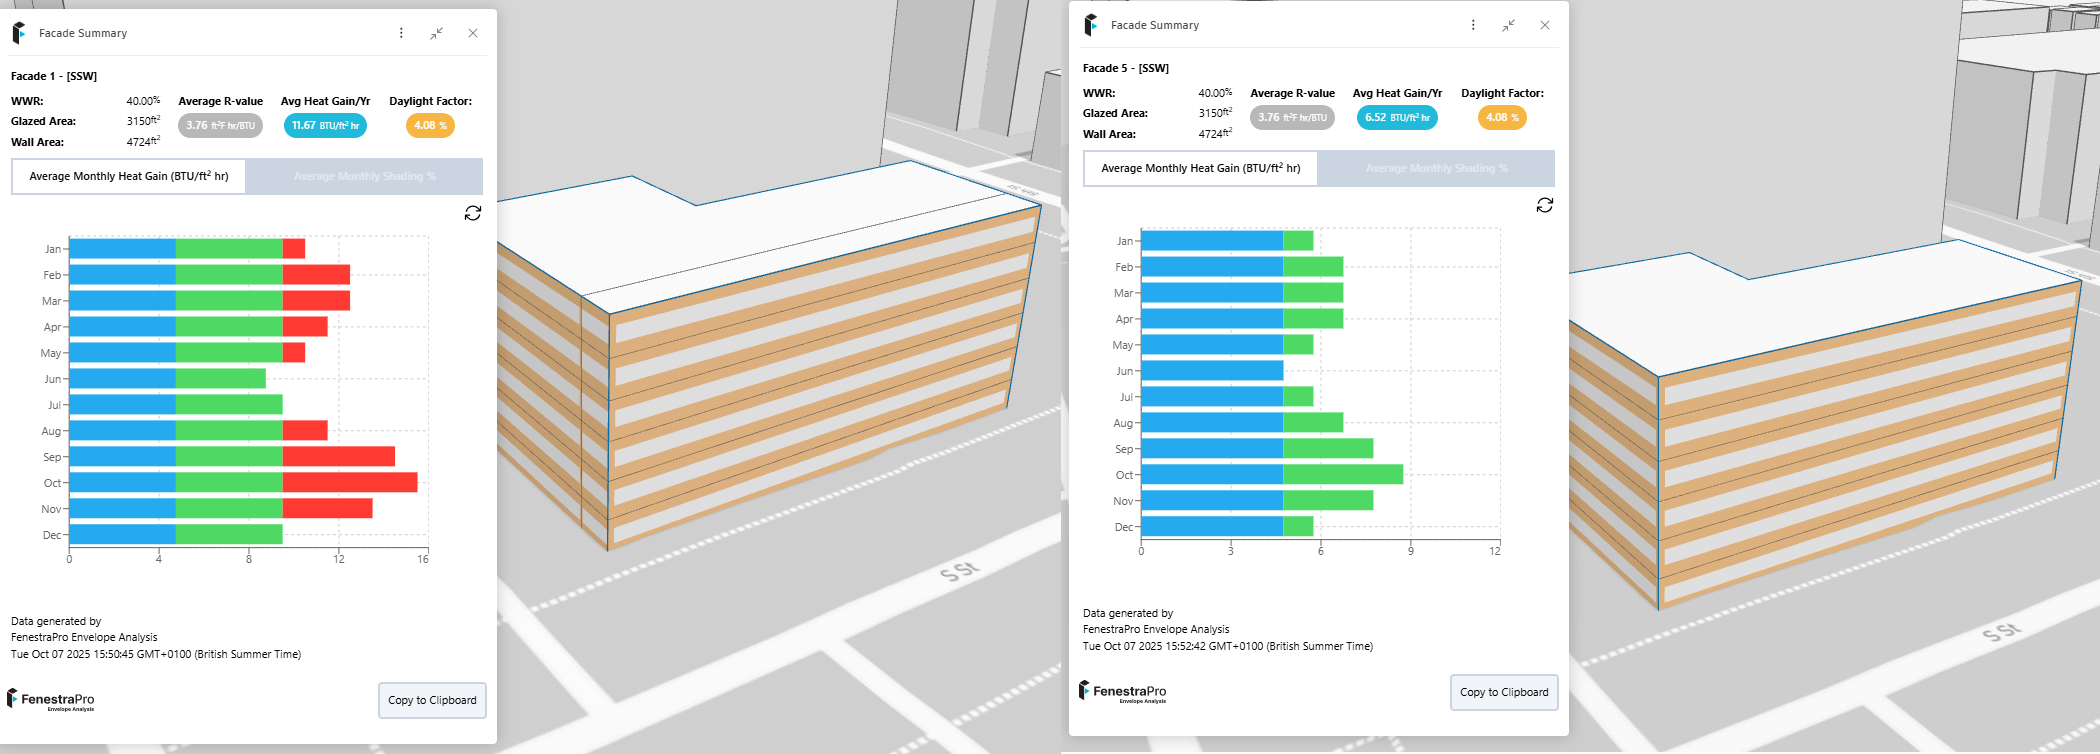
Charts display for each Façade when opened from the Facades List (‘Apply by Facade’). Simply click on the icon beside the Facade name and a new panel will open to display monthly Heat Gain values for that Façade as well as the Window to Wall ratio (WWR ), Glazed and Wall areas, Average U-value or R-value and Daylight Factor. Multiple Chart windows may be opened for different Facades. With more glazing on a Facade, the U-value for metric models can be expected to be higher (the R-value for imperial models can be expected to be lower) both indicating a building envelope that allows more heat loss. This will also depend on the glass performance.
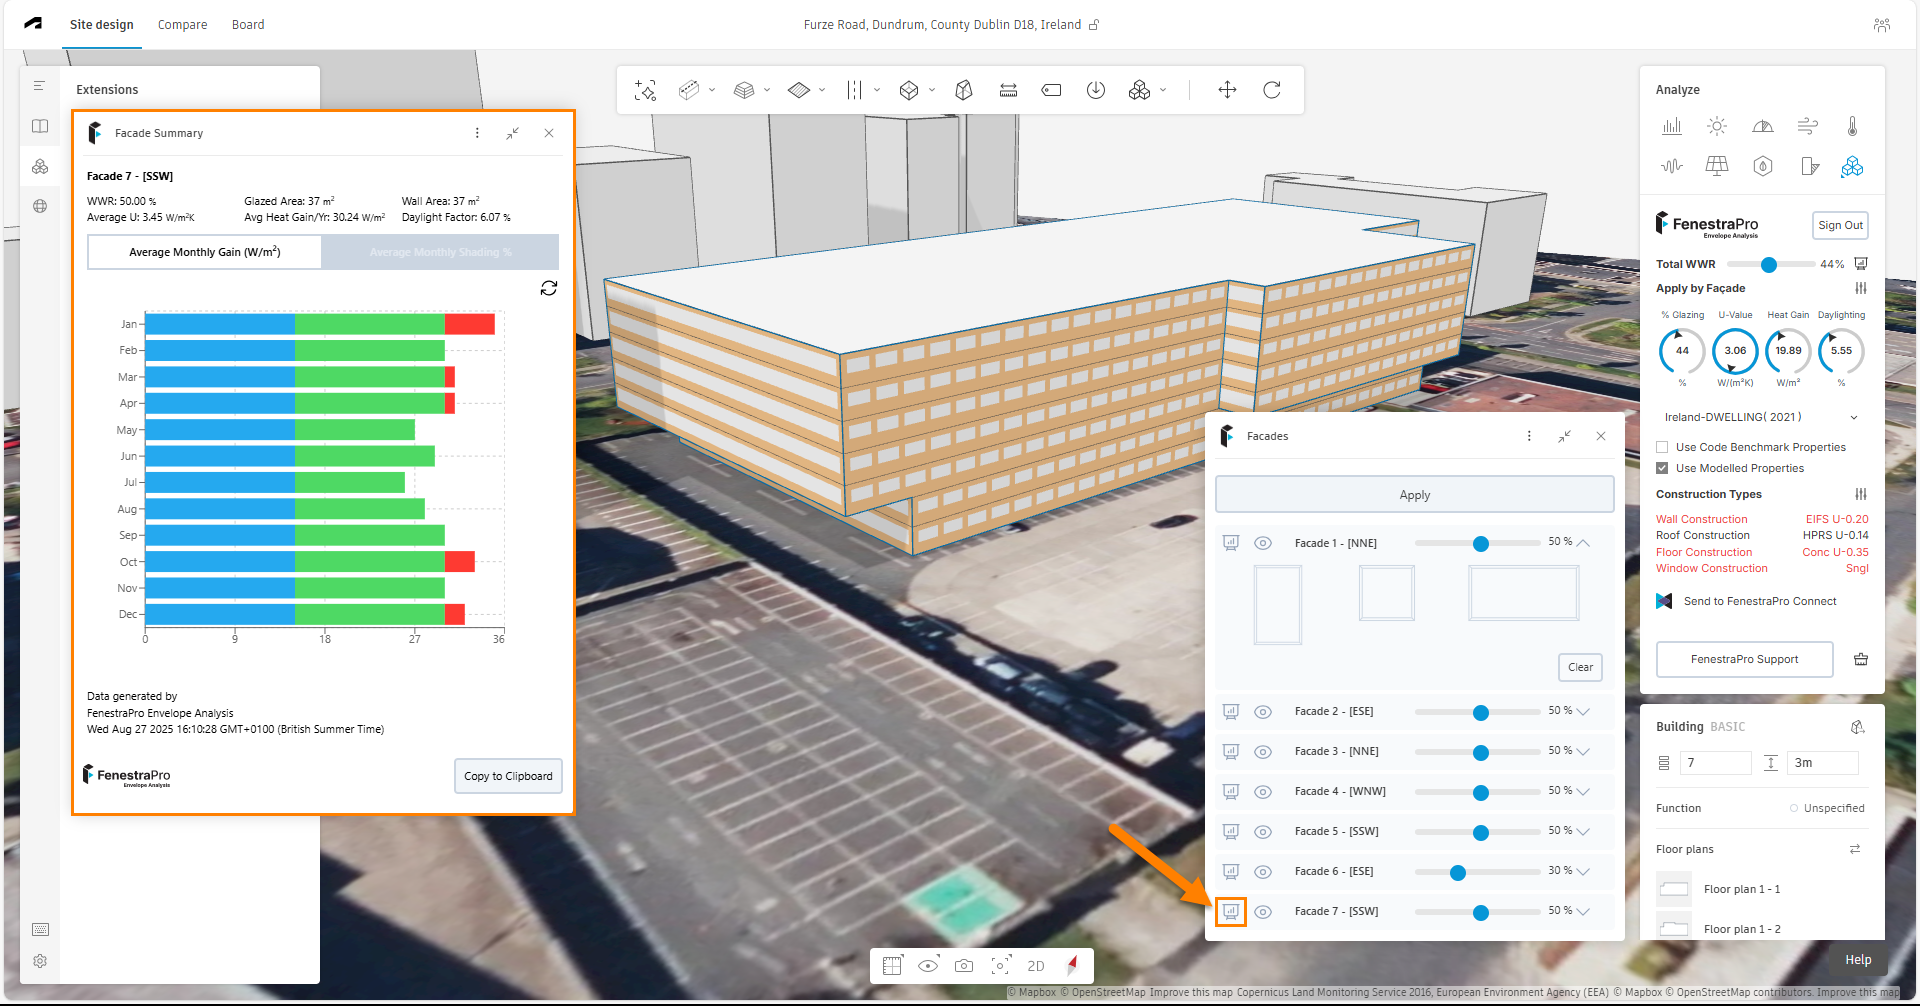
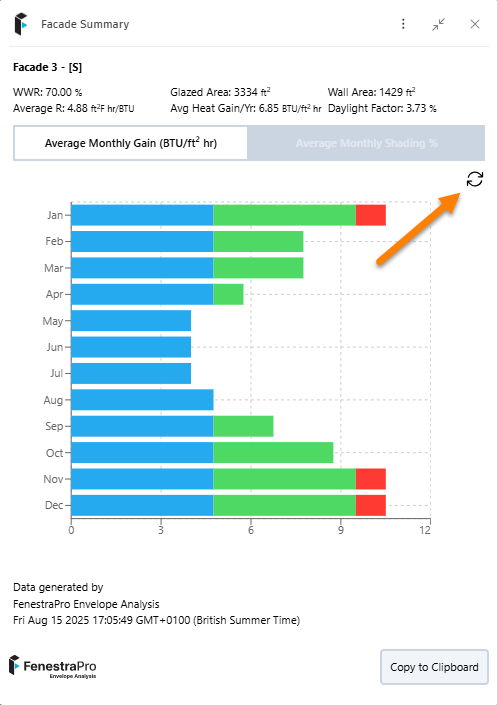
Note: When Glazing Percentages or Window Configurations change for Facades or Total WWR, the Charts will automatically update. After adjusting Construction Types, the Refresh button is required to update the Chart (see image above with circular arrows).
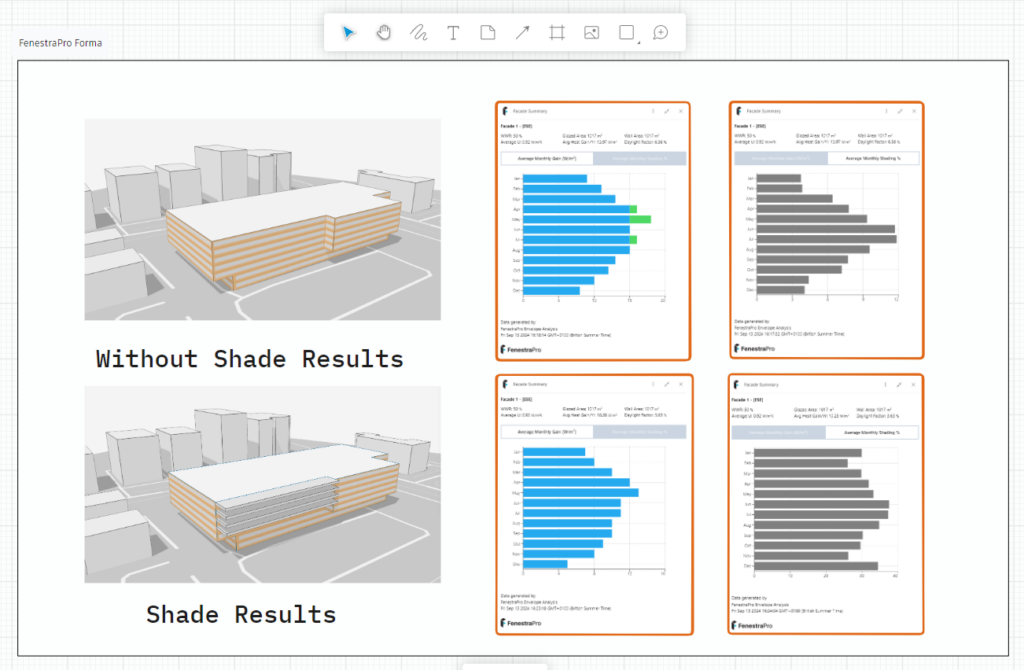
The Charts will update dynamically as changes are made to your proposal. When Charts are copied and pasted to a Forma Board however, these are static images (a snapshot with timestamp) and will not of course update if any changes are made to the project. Each Chart that opens has a timestamp for the user’s location (not the project location). If changes are made to settings and subsequent Charts are opened and images saved, the timestamp will indicate the sequence.
Chart Ranges
Users can define the threshold/ranges and colors in their preferences. Ranges for Heat Gain and Daylight can both be defined by the user. To do this, please go to settings at the top of the extension panel and a window will open with options. Please Note: due to ‘Display Options’ in Forma, renderings made on the Forma Proposal by the extension may not appear as expected. It may be necessary to temporarily turn off Display Option settings to better visualise FenestraPro options (windows, shades etc).
Heat Gain ranges: Input values and define colors if you wish, that define thresholds where Chart colors change to indicate optimum/too high/too high values.

Daylight ranges: Input values and define colors if you wish, that define thresholds where Chart colors change to indicate optimum/too high/too high values.

The default ranges currently in use indicate blue for values less than 15 W/m2 K (<4.75 BTU/ft2 hr), green for values between 15 – 30 W/m2 K (4.75 – 9.5 BTU/ft2 hr) and red for values above 30 W/m2 K (>9.5 BTU/ft2 hr) . The chart below describes the color coding used for Heat Gain values. These ranges can now be adjusted as shown above for your preference or depending on project requirements.
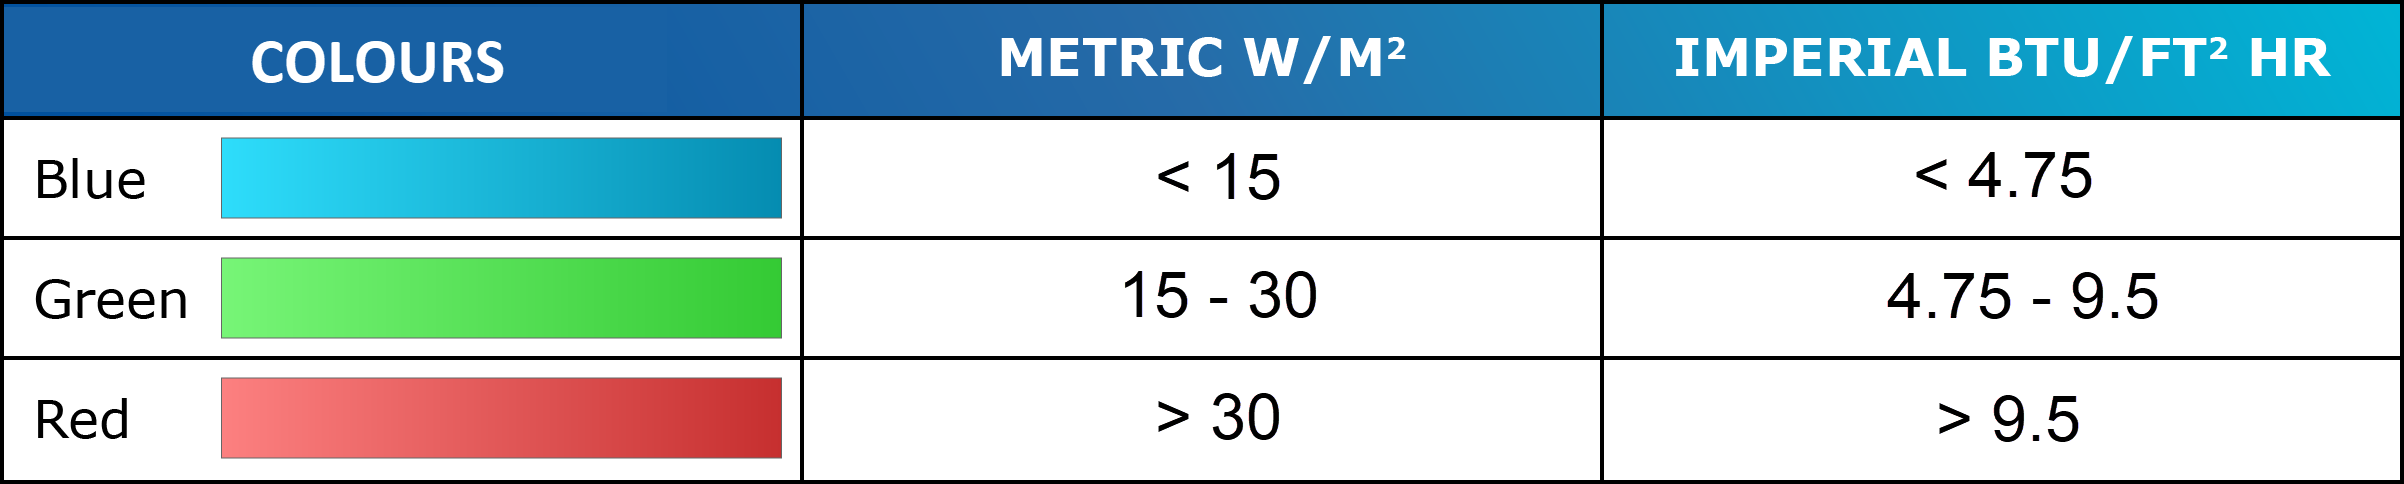
Please Note: This Chart is a snapshot in time and does not dynamically update if the overall percentage glazing on the model is then modified. Each Chart opened has a timestamp for the user’s location (not the project location). If changes are made to settings and subsequent Charts are opened, the timestamp will indicate the sequence. To update the Chart, close the Chart panel, modify the Façade settings, ‘Apply‘ these settings and when new values are displayed in the dials, open a new Chart for that Facade. Closing the Facades panel will also close any open Charts. The settings in the Facades List will persist even if there is a subsequent change in the overall WWR setting (the Charts will reflect the Facade settings). This is to be improved soon.
Overall Charts
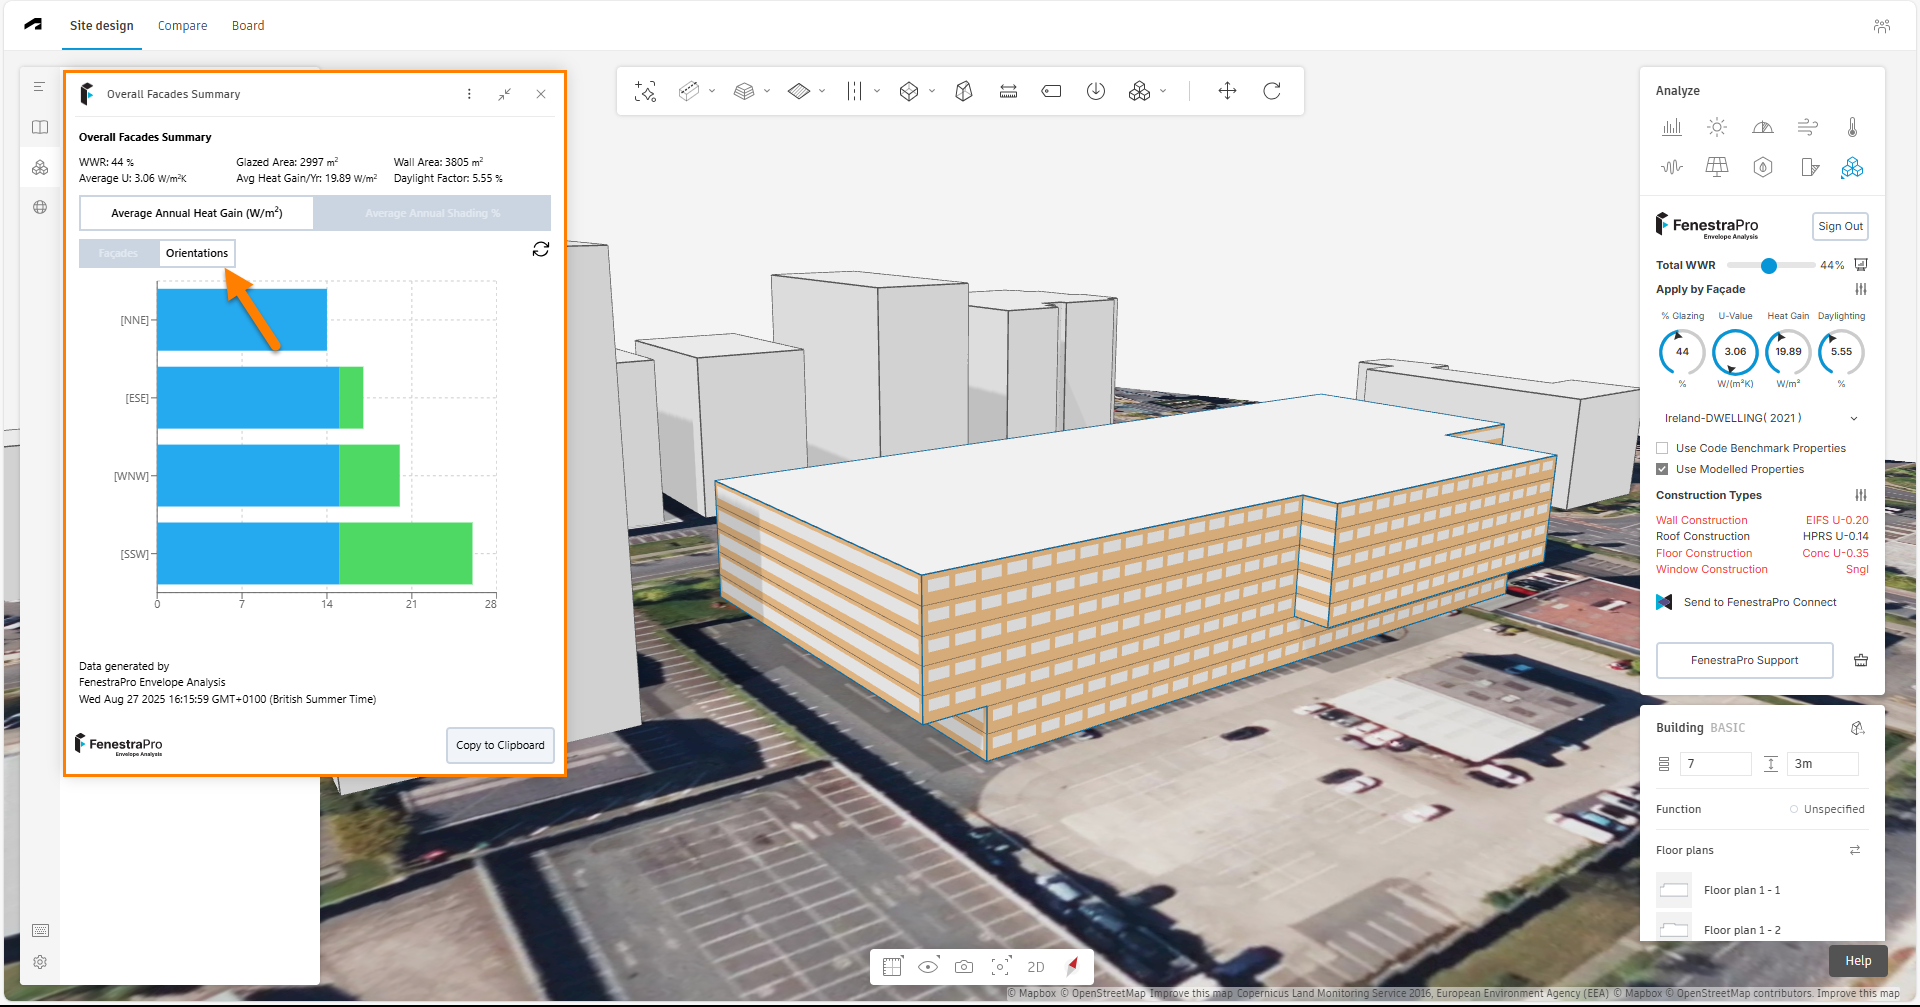
An icon beside the Total WWR slider will open the overall building Chart summary. This will display data for Total Window to Wall ratio, Overall Glazed Area, Overall Solid Wall Areas (non-glazed), Average U-value or R-value for the model, Average Annual Heat Gain and Overall Daylight Factor.
Existing Facades are listed by number and orientation. For reference, the Chart is timestamped for the user’s location (not the project location).
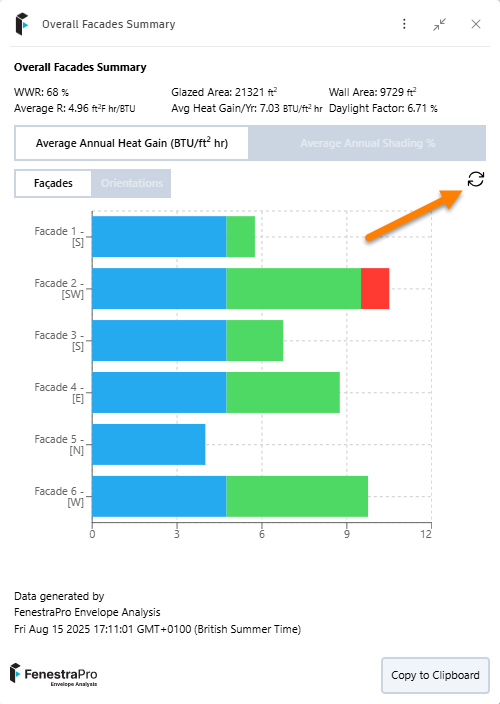
There is a Refresh button to update the Chart, if it is left open and you update the glazing percentages or window configurations etc, click on this to update the results.
The Overall Chart has tab options to review the Average Annual Heat Gain or Average Annual Shading %.
For each of these options, there are 2 additional tabs to review:
- Results for each Facade
- Results per Orientation (grouped)
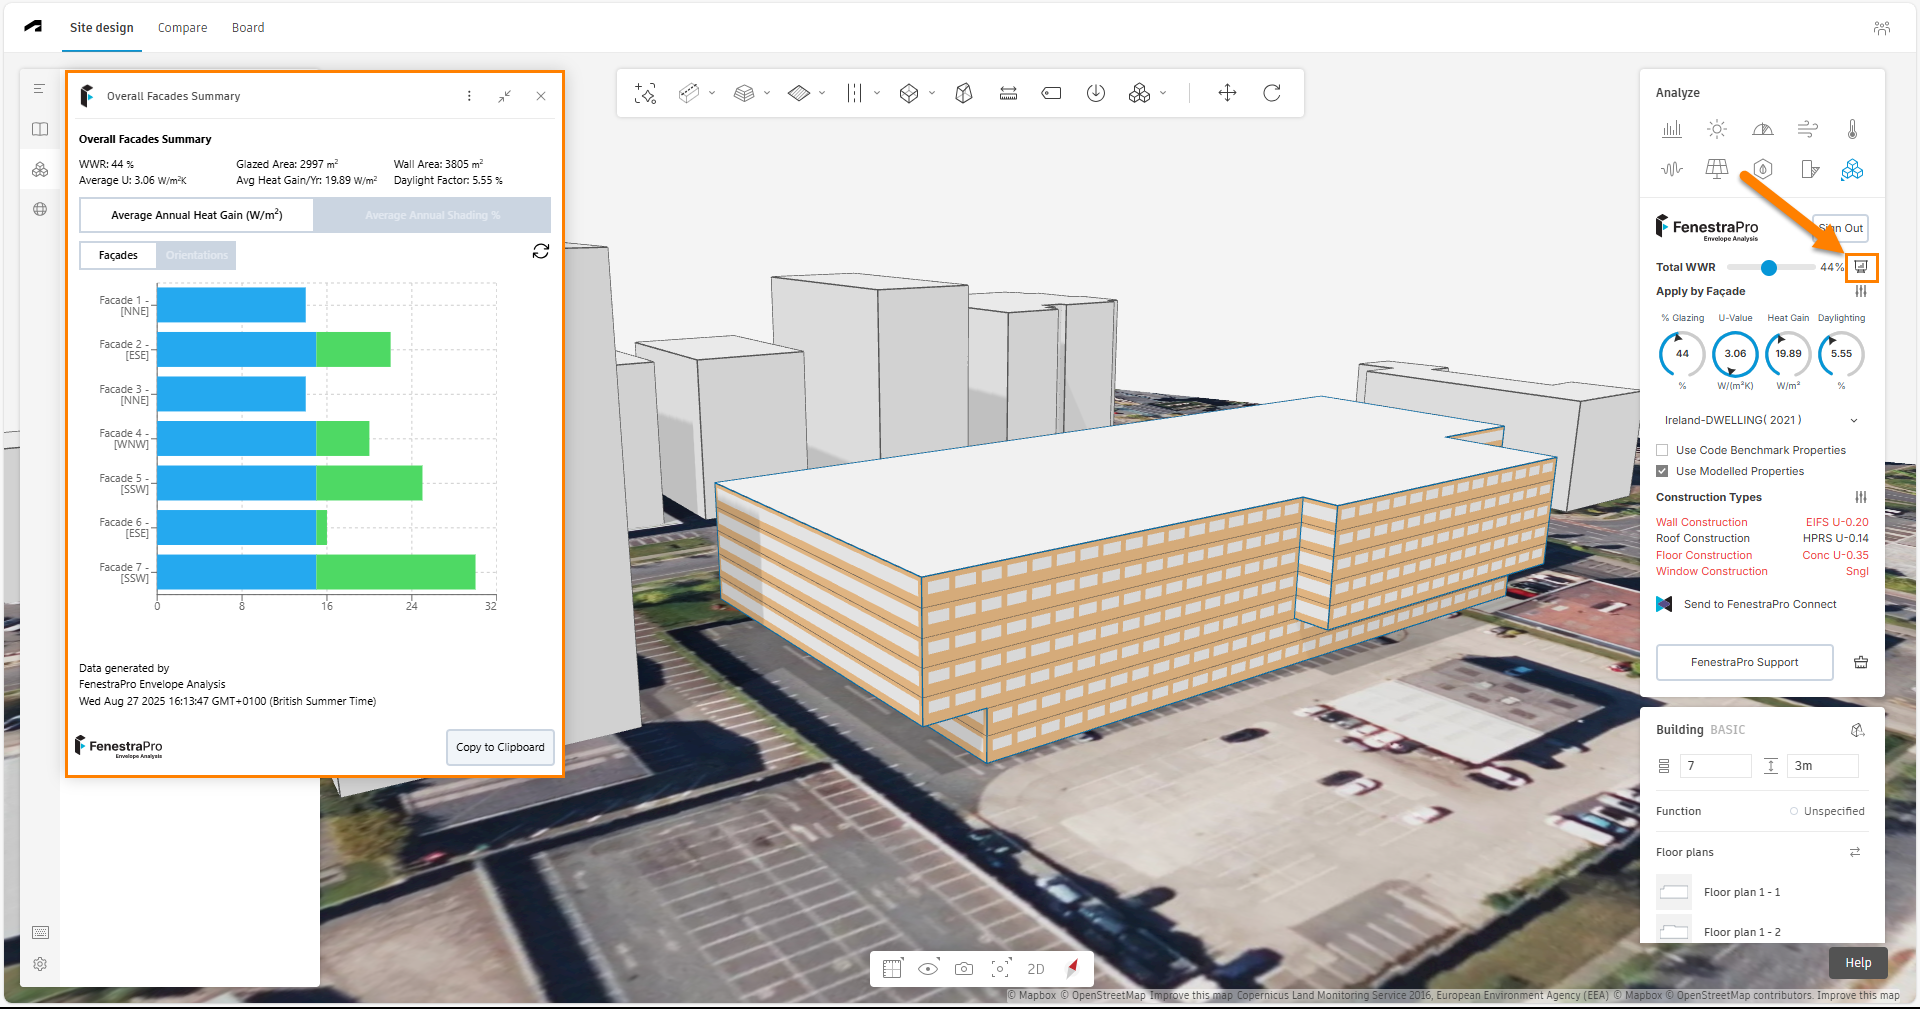
It is not recommended to have multiple projects open in browser tabs at the same time (since results and settings for each user are stored for the last user session and are not yet differentiated per project). Projects may also have multiple members and contributors who have access to modify the Forma project or settings in the FenestraPro extension.
Note: Dragging the mouse across two open windows should be avoided when using the extension (e.g. Facades List and Charts). This may cause a halftone or blue filter over one window. If this occurs, close and reopen the windows again. This issue is being investigated.
The Chart and Facade windows on screen can be minimized by clicking on the arrows beside the x on the top right corner. This can make more space on screen temporarily. You can also overlap Chart and Facade windows in front of each other if required.

Copy to Clipboard
Both Overall and Facade Charts also have a copy function to take a screenshot of the active Chart and copy to clipboard. This can be then pasted into a document or pasted into a Forma Board. This can be useful for comparing results of previous model iterations with different model conditions such as glass types, shading devices, Heat Gain or Daylighting results etc. You may wish to paste multiple images to an interim application for temporary storage and then paste images to prepare a Forma Board for the project which can be made available to other project members. (When returning from the Forma Board to Site Design, the project will need to be reloaded into the FenestraPro extension (previous settings for the project are saved). You can also use the Forma Compare area to look at analyses for different project versions/proposals.
Results
Results will then display in the dials for Glazing Percentage on the model, U-Value for the model facade (including walls and glazing), Heat Gain and Daylighting (total for the model) based on the window to wall ratio selected and if you are using the construction types’ properties or the selected Energy Code values. The arrow in the dial will indicate where the current result value is located within the range provided for that parameter. Results will be displayed as metric or imperial values depending on the model location.
If lines are used in Forma to define rooms or spaces, results may change depending on the depth of the space. The application uses a perimeter zone area of 6 metres or 19.7 feet to calculate the results. If the depth of a space is less than this (defined by lines in Forma), this actual space depth in the proposal will be used. Any ‘internal walls’ further away than this will not affect the results since the perimeter zone depth is the maximum value used to calculate results.
Reset the Model
A button to remove previous settings on the model is also provided – this may be used if you have already applied windows but then change the geometry of the model (the existing window percentages will not automatically update and you will need to re-apply).
Click on the brush icon to get an option to reset the model. Hovering over this icon will reveal the tooltip that this process will ‘Reset the Model’. Note: care should be taken since this will clear all settings that you have made for this model to date.
Once you click on this icon, you will get a chance to confirm or cancel your decision. Select No to return to the main panel and continue working on your model or select Yes to delete all existing settings and begin afresh.

You should then refresh your browser window (usually by using a circular arrow to the left of the search bar) and re-select the Forma model to start analysis again (all previous settings are removed, such as Glazing Percentages, Window settings, Code selections, Construction types, results etc).
FenestraPro Connect*
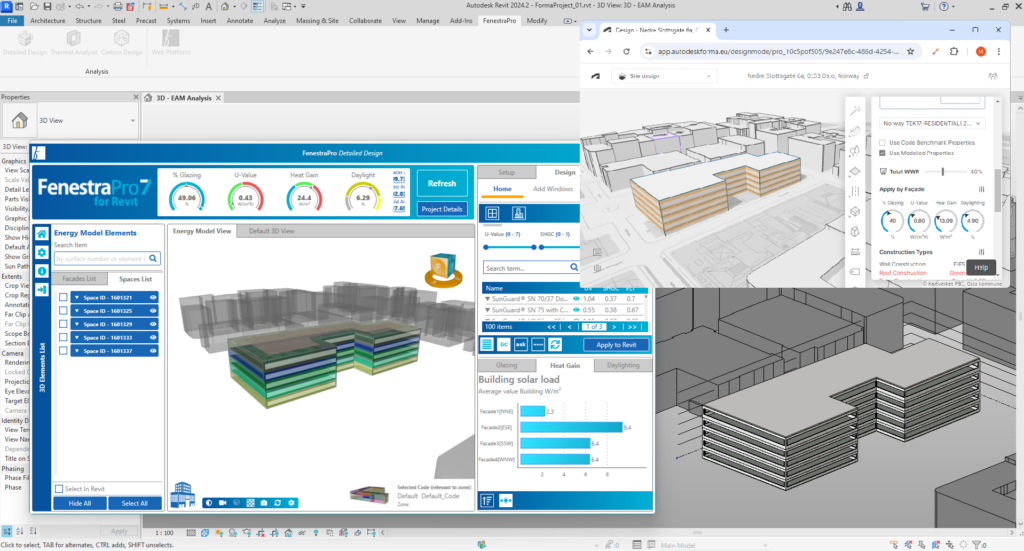
FenestraPro has a feature where the Forma model can be converted to a Revit model with detailed elements and the same Glazing Areas and Construction Types as defined in Forma. Revit templates are built into the importer (which have element families with the same construction types as our extension in Forma). This will ensure that the when the geometry is converted to Revit elements, they will automatically use the same construction properties as the Forma model. These families can of course be swapped later for different/custom family types in Revit. The Revit model can then also be analyzed with FenestraPro for Revit (separate license required). Note: If you purge the template file after downloading, this will remove the custom families that were created for Forma models. In this case, you will need to import the Forma model to Revit again. A full explanation on this workflow is provided HERE.
* Note: Connect is part of premium features in the Forma application. This is included in your Trial (full functionality) but will be disabled after the Trial expires and will then require a subscription.
Notes:
Sharing Projects (multiple contributors)
If you are sharing a project with other users and they have permission to edit the same model, any changes that one project member makes to the model or changes to percentage settings for Facades using FenestraPro, will also update in other member’s screens when the Facades panel is reopened.
Also note that for the moment, if internal wall divisions are added to the model, this will divide the Facades into separate areas in Forma. This is currently being investigated.
Multiple Models
If you have multiple proposed buildings in the project, close the Façades List and reopen it when switching from one model to another, to allow it to reset with the new list (and possibly new number) of Façades for the active building.
Currently, there is no redistribution of glazing percentages throughout the model (e.g. if the Total value is defined and one Façade is adjusted, other Façades do not adjust to maintain the total).
Imported Models
If you import an .obj file from Revit or Rhino into Forma, this can be edited using the 3D Sketch tool and Floors may be added to the model. Once this is done, in some cases, FenestraPro may be able to analyze the model (some complex models may not always be successful). Note: There may be some restrictions on file import size (currently 100mb) or the number of mesh objects allowed by Forma.


