
Construction Types
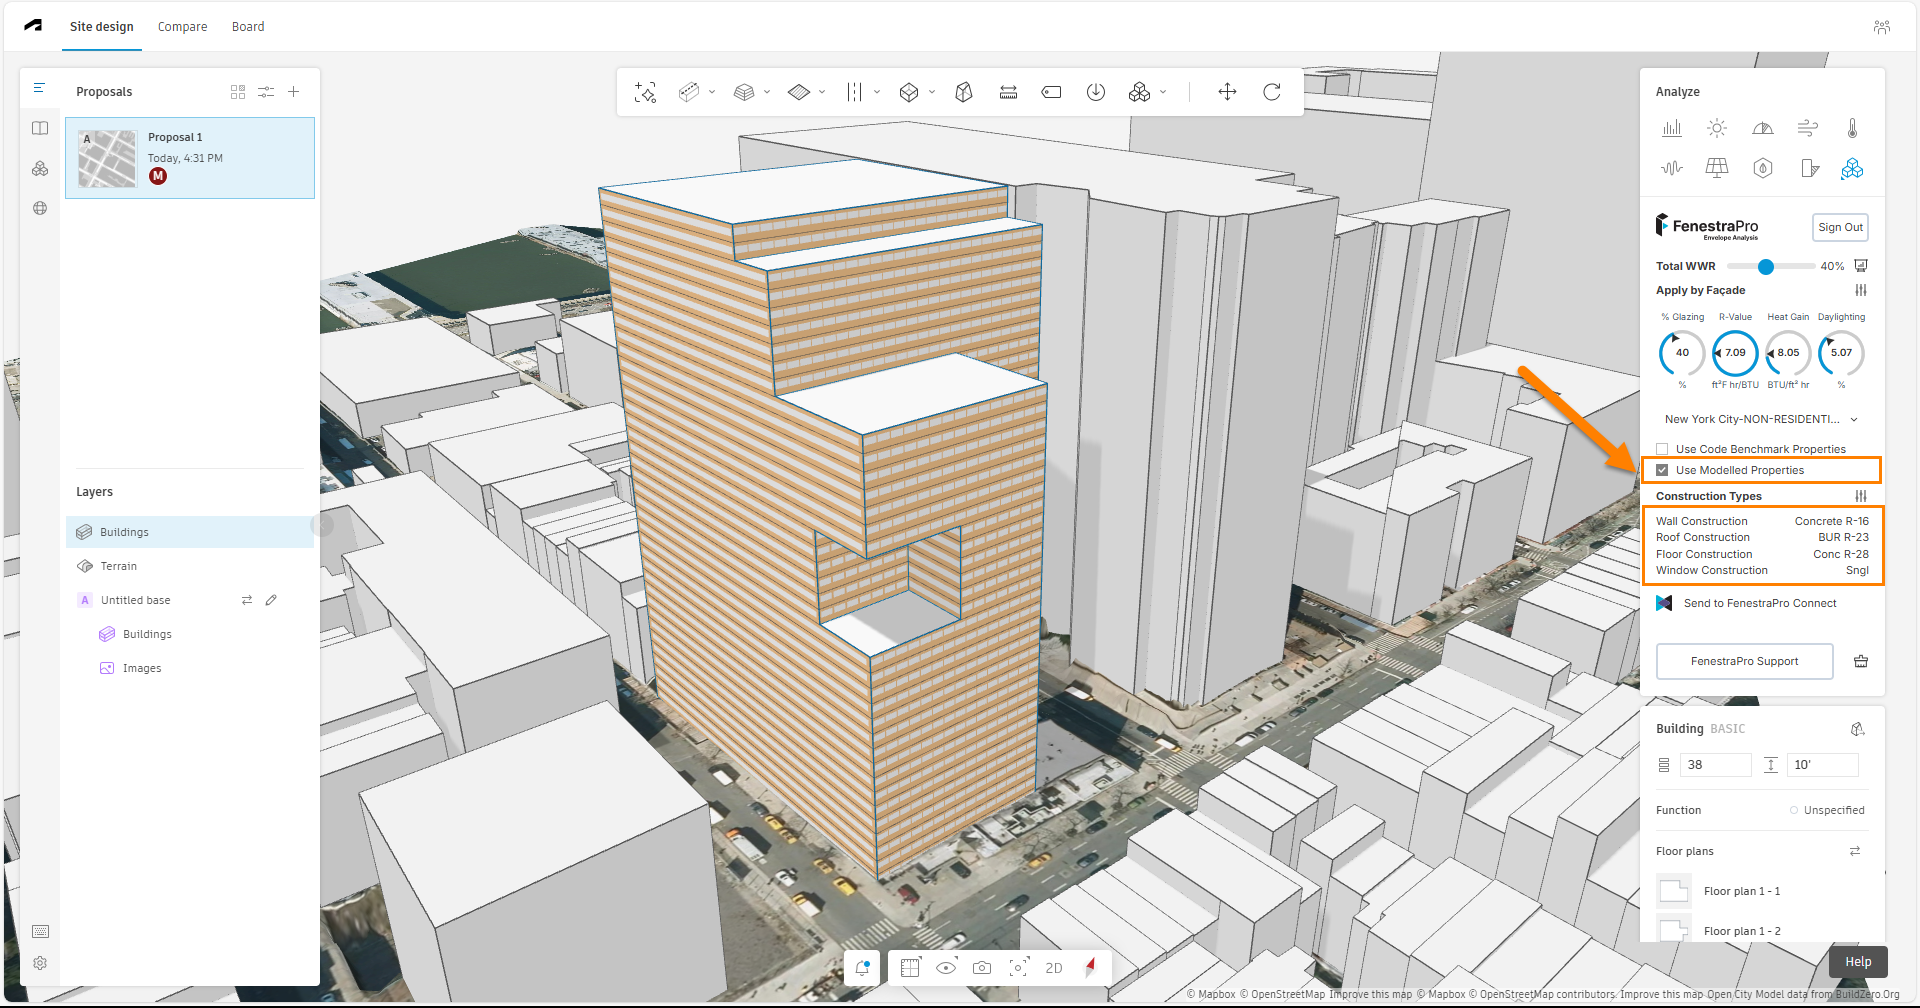
The assumed default Construction Types in Forma are listed here under the dials, with the associated thermal properties.
When the ‘Use Modelled Properties‘ setting is used, values that do not comply with the selected Energy Code display in red. Access to adjust the Construction Types is only available when this setting is checked. A value which does comply with the target Code values will display in black. If you choose the option to ‘Use Code Benchmark Properties‘ (which assumes that the model will have thermal properties for each element type that comply with the target Energy Code), the Code values will display here and will be used for calculations.
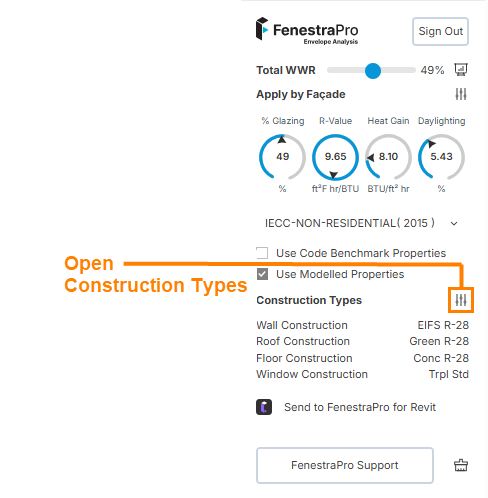
When the setting for ‘Use Modelled Properties’ is used, an extra icon will display beside Construction Types. This will allow you to open a panel to adjust element performances to comply with your selected Code (there may be occasions where none of the listed options comply. In that case you may choose to use the code values directly). Overall element thicknesses will also display in the Construction Types panel for walls, roofs and floors. Your selected Construction Types are also saved for your next session. If you start a new project or clear your cache (all previous settings), then the Construction Types will revert to default selections. When starting a new session, you are advised to please check your Code, Construction Types, Code Settings and Percentage Glazing/Shading settings again. The Construction Types that you set are also saved even if you exit the FenestraPro or Forma using ‘Use Code Benchmark Properties‘ instead of ‘Use Modelled Properties‘.
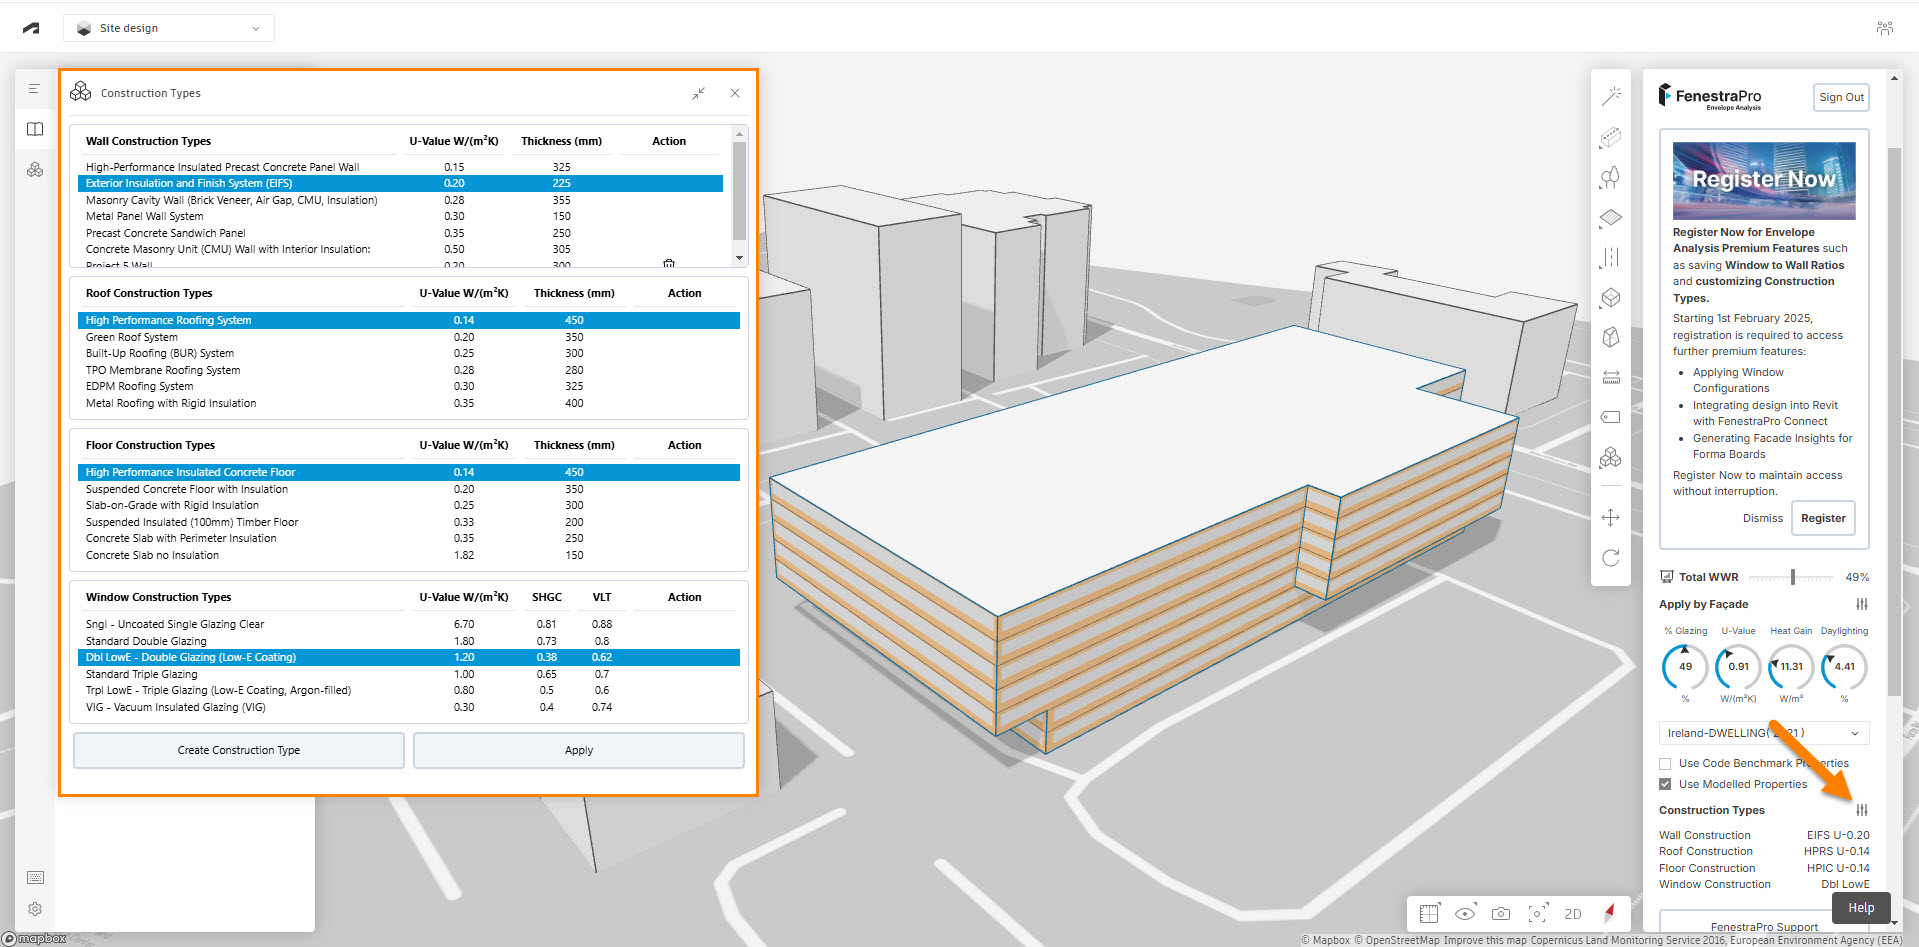
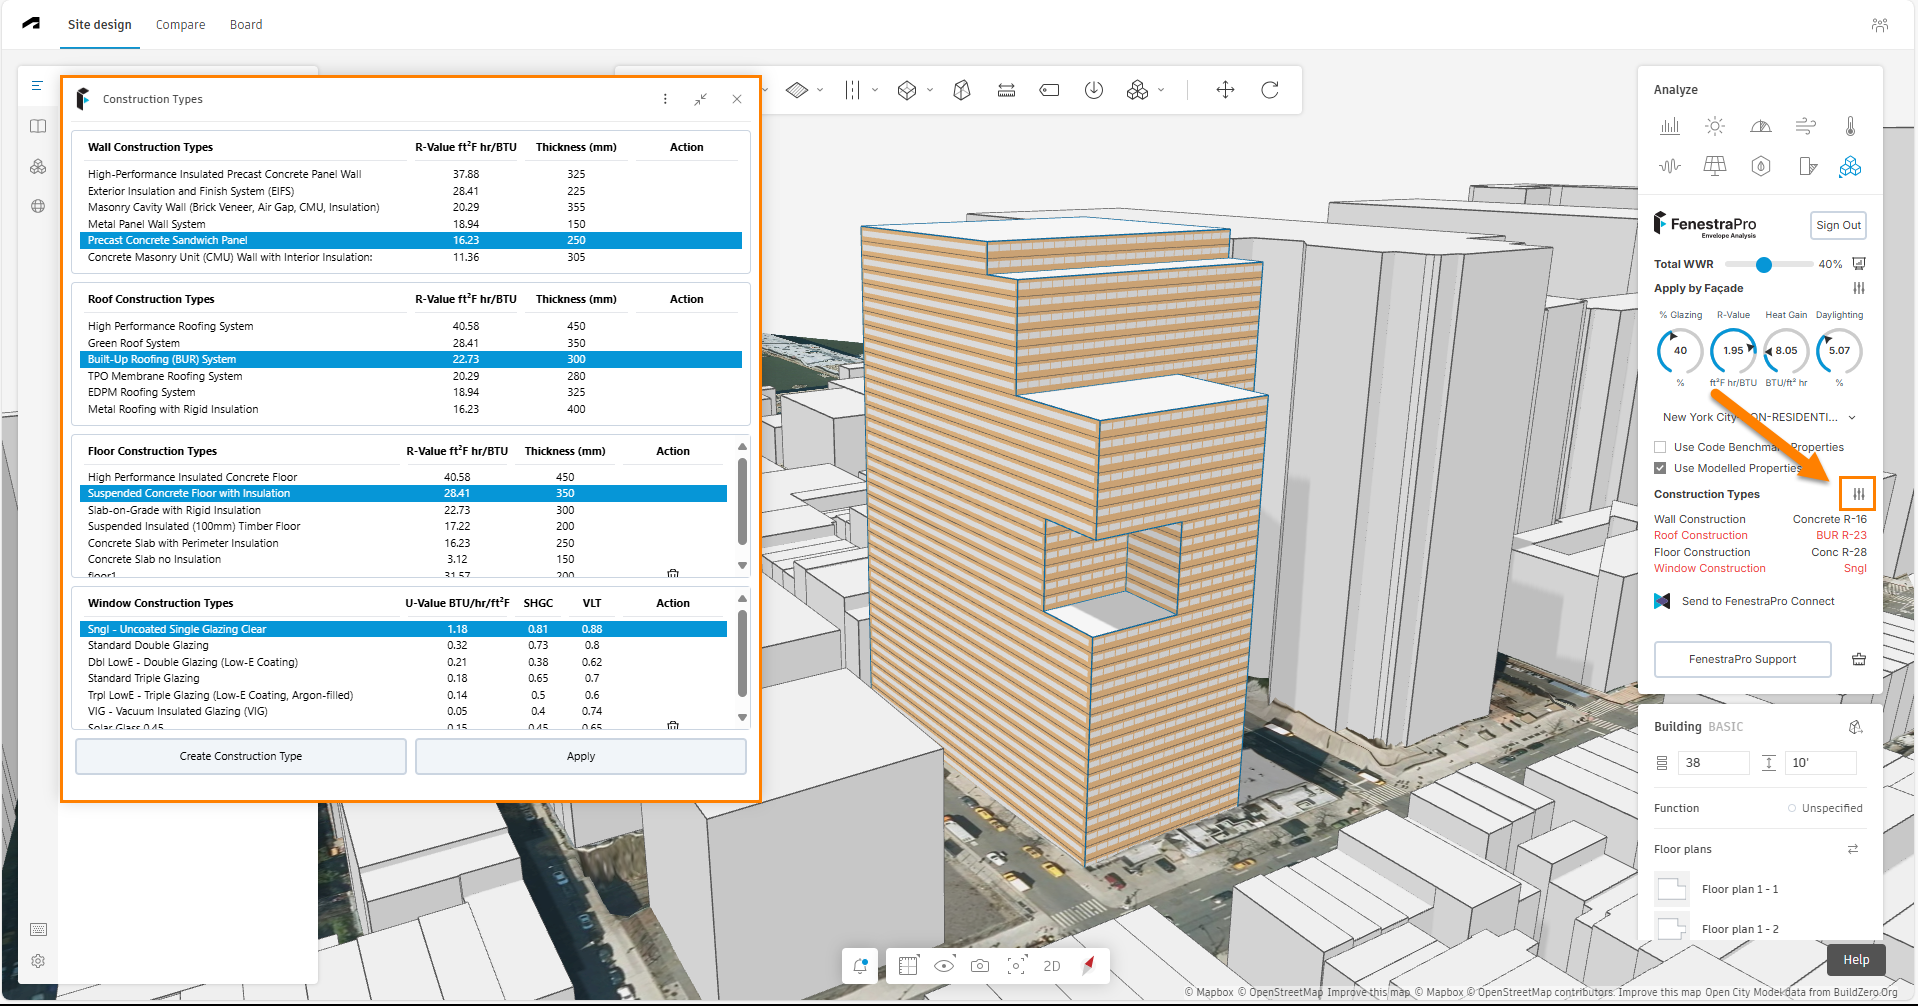
The current Construction Types in use are highlighted in blue. A different element makeup may be selected from the list. You may want to select a different construction type for walls, roofs, floors and glazing if they do not comply with the Energy Code (the values display in red), or to improve the overall U-value or R-value (only walls and glazing properties will affect this).
Use the Apply button at the bottom of the panel to update the settings. The current construction type list will then update and the results will recalculate. If the model properties do not comply with the Energy Code target values, they will display in red. The extension will also remember your settings for glazing percentages and construction types if a project is closed and later reopened.
Window types also have Solar Heat Gain Coefficient (SHGC), and Visible Light Transmittance (VLT) which influence the performance of the building envelope and affect the results in the dials (the dials display a weighted average performance for wall and glazing elements).

metric model:
imperial models:

Custom Constructions
It is also possible to create custom construction types for a project. To use this feature, please ensure that you have created a free account with FenestraPro and that you are logged in to this account (the constructions that you create will be saved to your account even if you close the project, log out or close out of Forma). If you click on ‘Create Construction Type‘ and you are not already logged into your account, a message will display to advise.
To access the Constructions panel, the Code setting must be set to ‘Use Modelled Properties’ (the ‘Construction Types’ icon will then become available and you can access these settings).
Open the Constructions panel, buttons at the bottom allow you to create new construction types. Once the panel opens, there are options for wall, roof, floor and glazing. Enter a name/description and short name (this will display in the right-hand panel. For instance for a new glazing type, you may wish to enter the SHGC value here for reference).
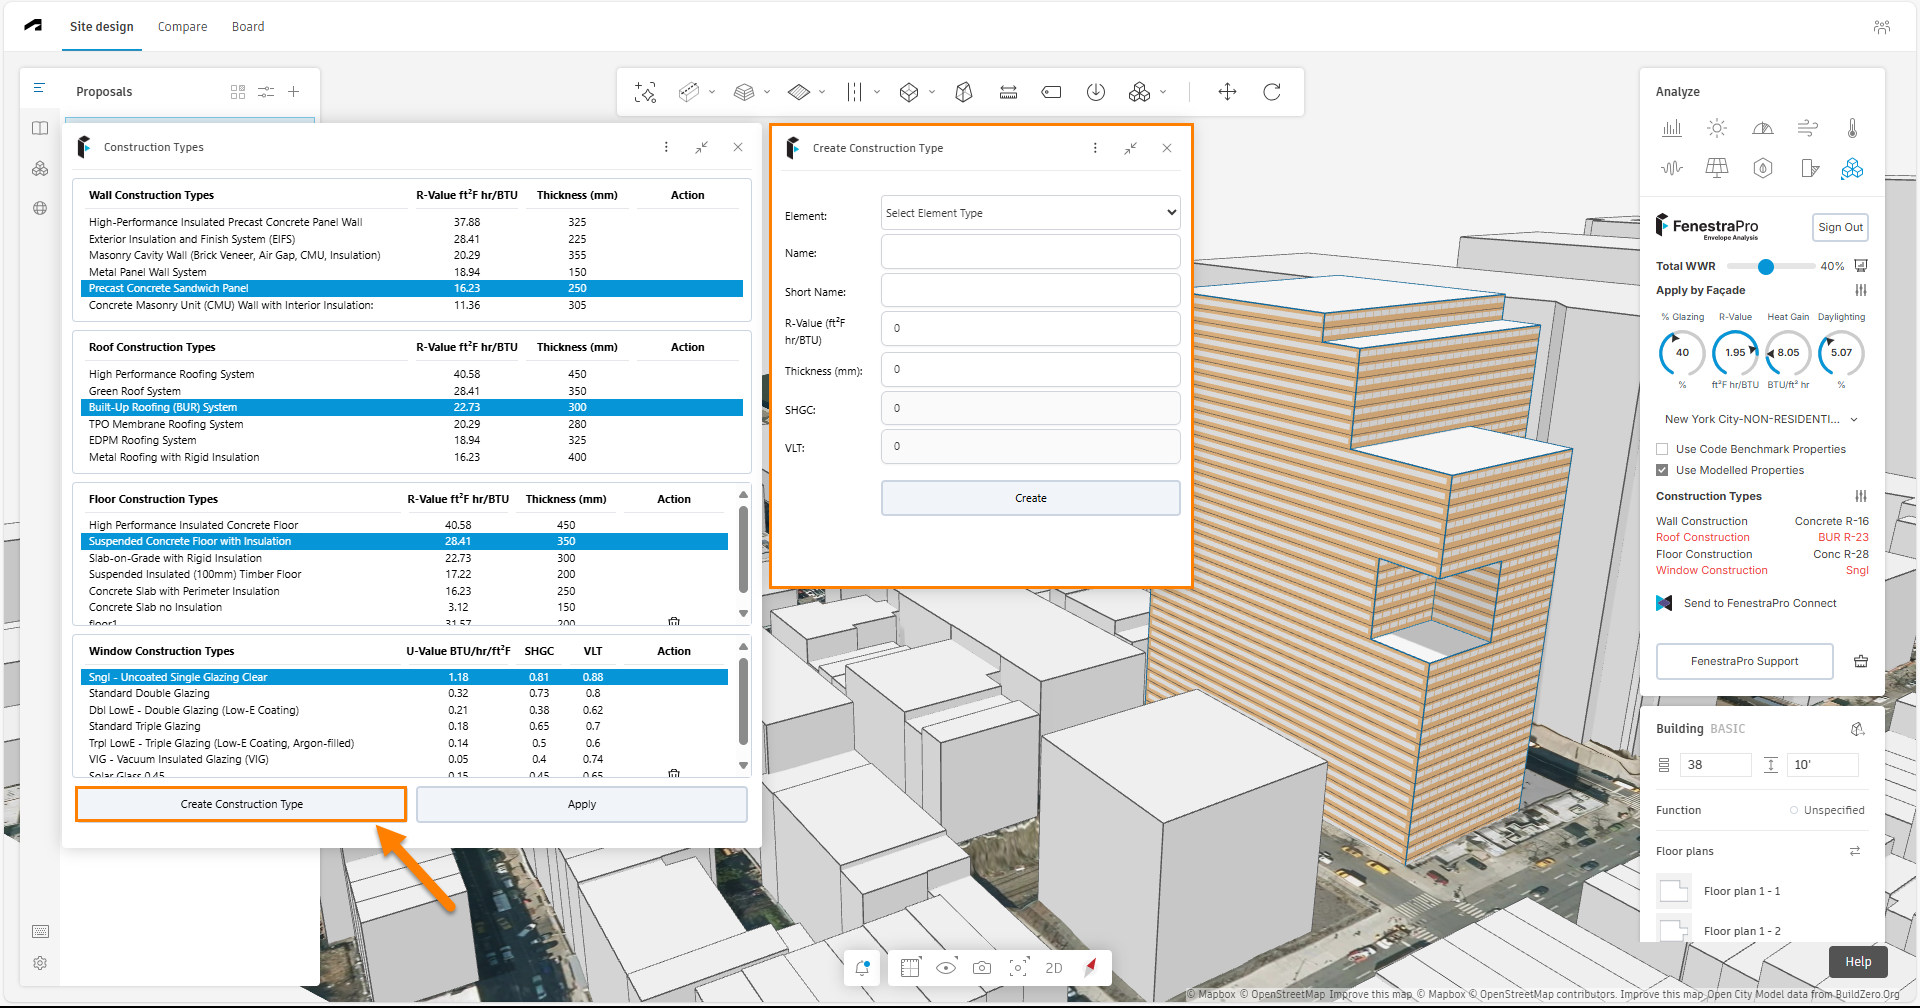
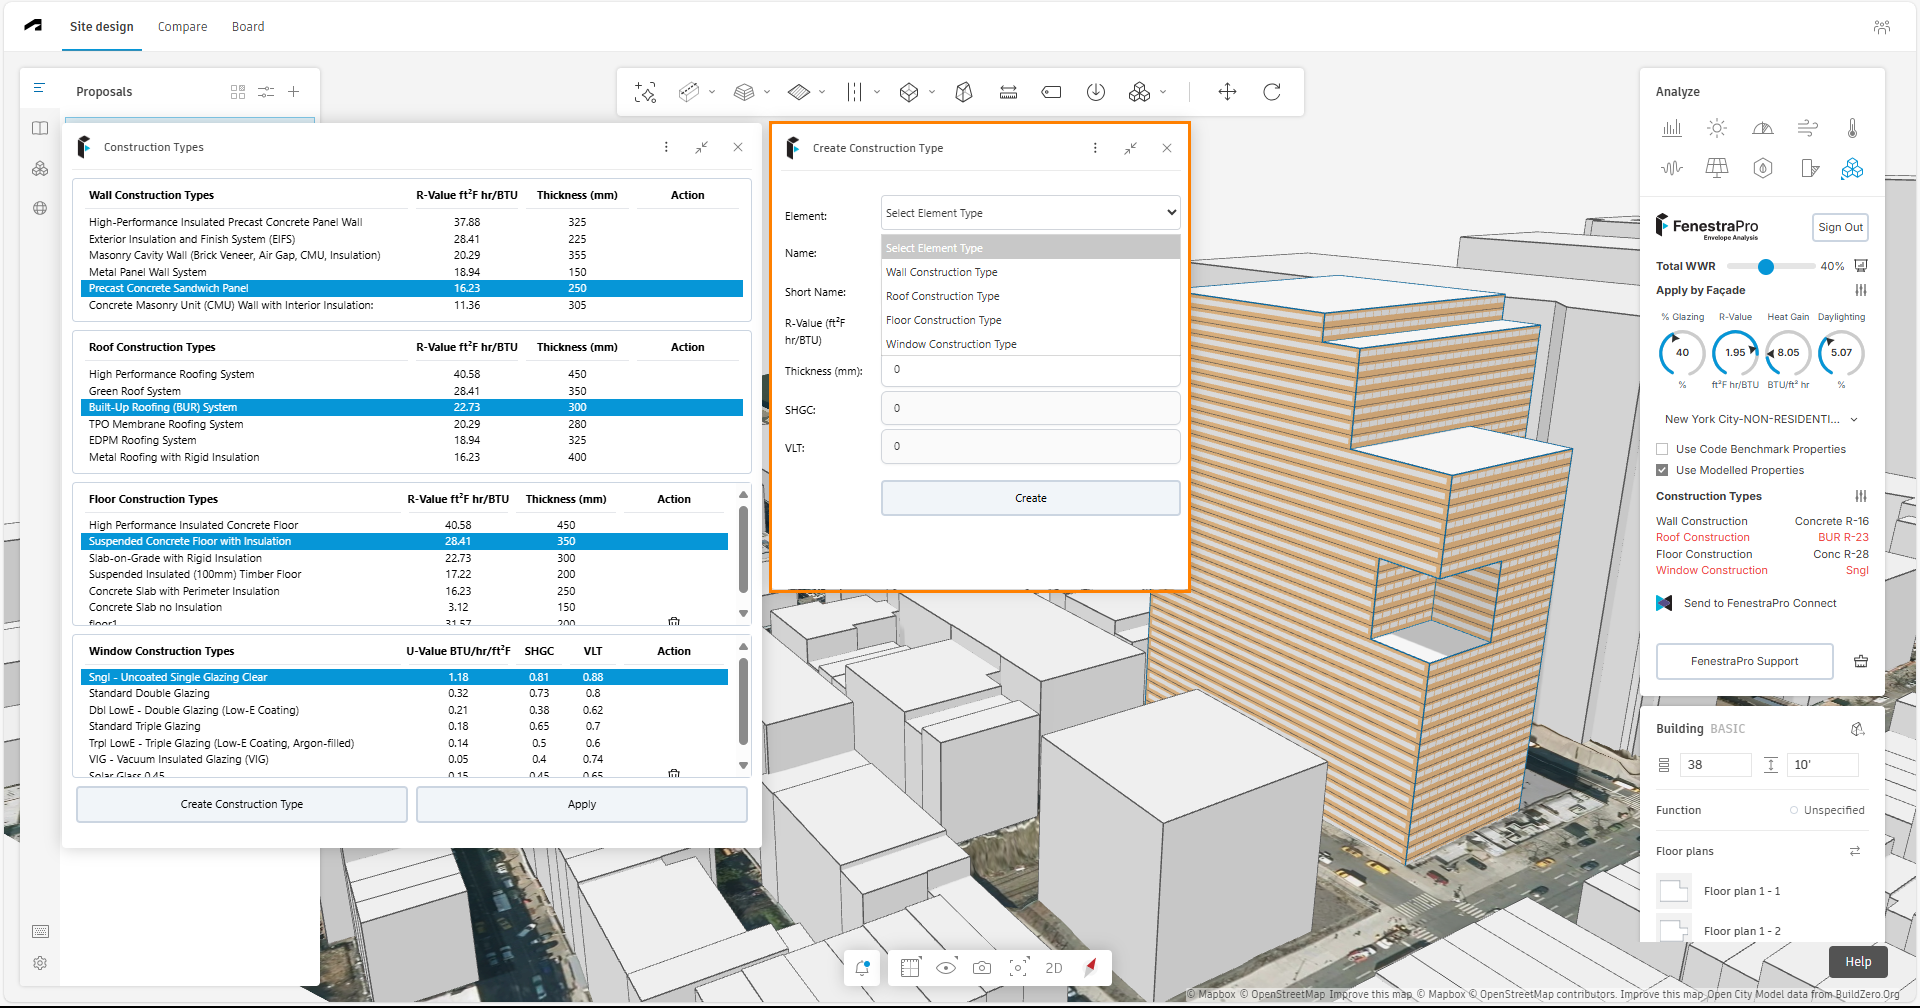
Then enter a U-value (for metric models) or an R-value (for imperial models). The Short Name will be displayed under the Construction Types in the right-hand panel, so it is a good idea to include the U-value or R-value here also. For solid elements (walls, roofs, floors), you should also enter an overall thickness for the assembly. Thicknesses currently use mm for both metric and imperial models. There are conversion calculators online to assist. Note: Thicknesses are for recording descriptions only and will not affect calculations. The application will not calculate an assembly U-value/R-value based on your inputs, this input is the known value of the construction that is input. Therefore, you may wish to use a third party application to calculate the performance of a wall etc based on the layers and thicknesses used in the element assembly.
For glazed types, you may enter a U-value and values for SHGC (solar heat gain coefficient) and VLT (visual light transmission).
For metric models, all element units use metric U-values.
For imperial models, solid element units use R-values (for walls, roofs and floors). Glazing uses imperial U-value.

Once the construction type is created, the creation panel will close and the new entry will appear in the main panel ((1) in the image below). You must select this custom type and use the ‘Apply‘ button ((2) in the image below) if you wish to use it for calculations. You make create multiple new types before recalculating the results. Note: if you close the main Construction Types panel, the Create Construction Types panel will also close.
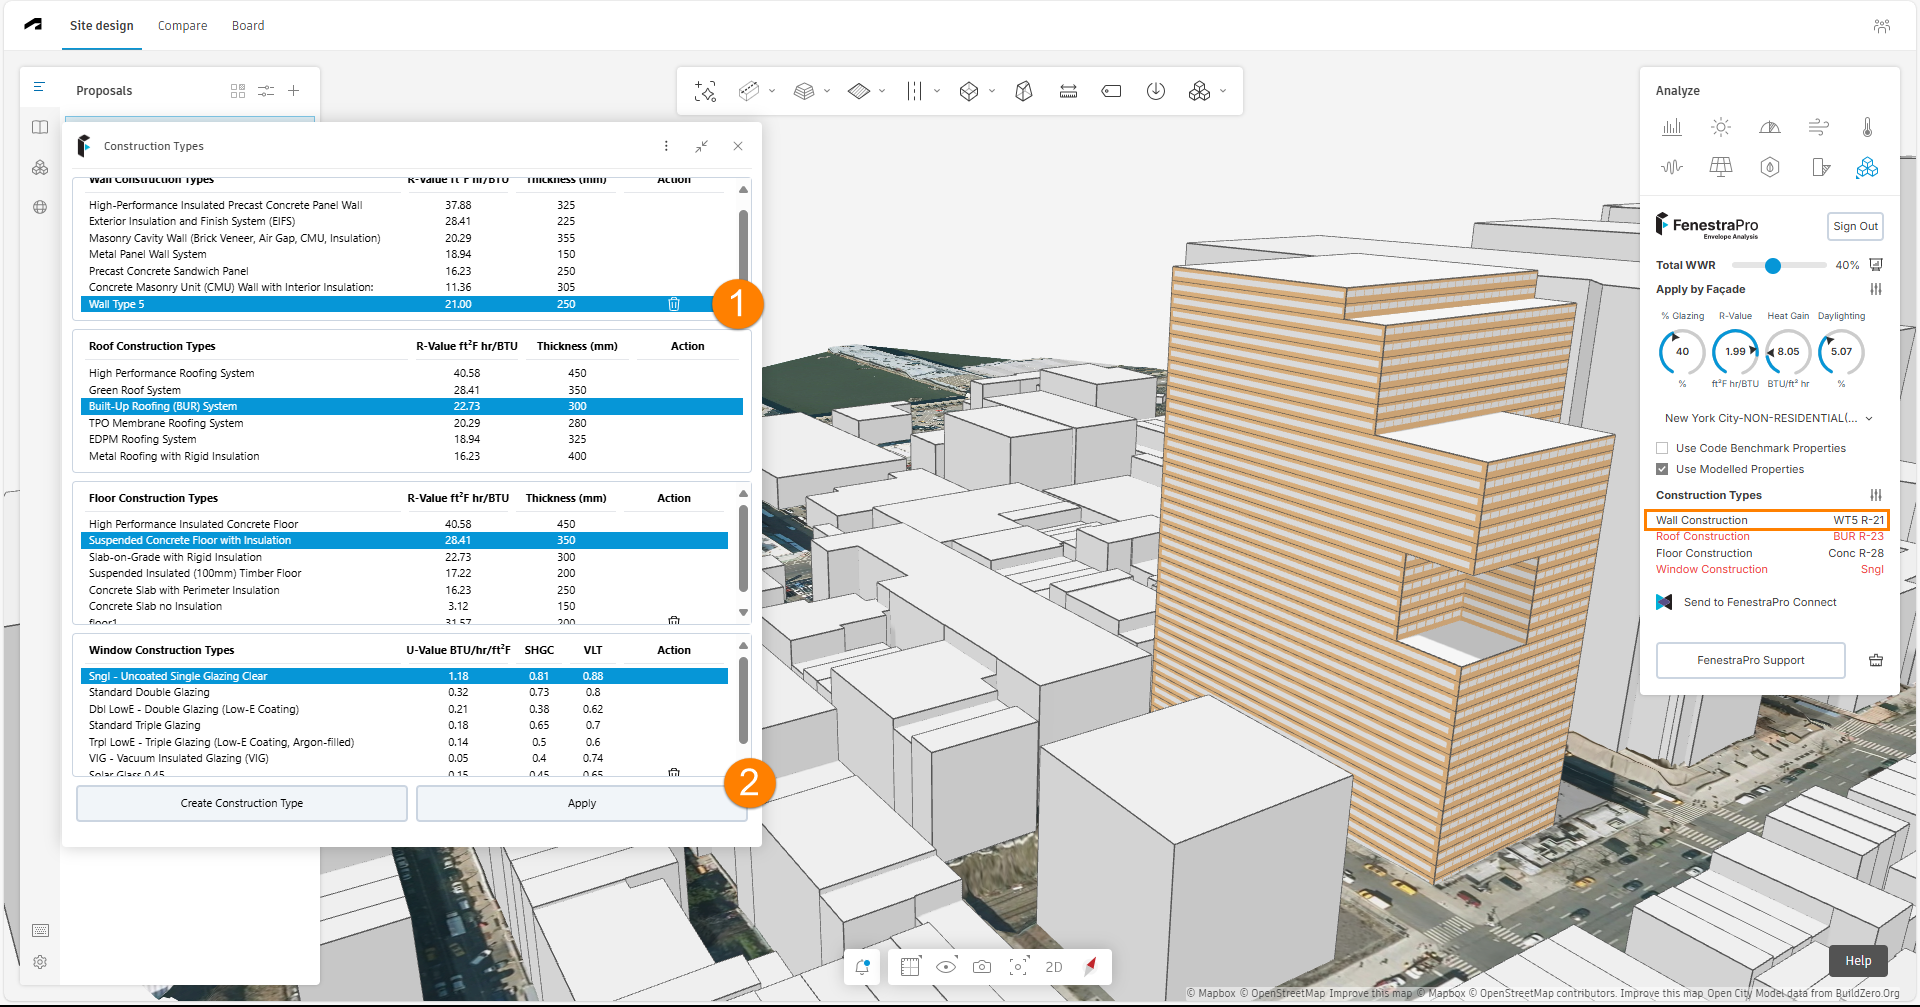
Changing the wall construction will affect the U-value or R-value results in the dials. Changing the Glazing type will affect the U-value or R-value and the Heat Gain results in the dials. If the properties of the active construction types are not significantly different from the previous type used, there may not be noticeable differences in the results. To update the Charts (after changing Construction Types), use the Refresh button after recalculations have completed.
Changing the roof or floor types will indicate compliance with the Energy Code or Building Regulation selected but will not currently affect the results in the dials.
When all data for the new construction type is completed, you may click on the ‘Create’ button. Note: if some data is missing, you may not be able to create the new entry (in this case complete all fields required for the new entry (SHGC and VLT are only required for glazing types)).
Once a Construction Type is created or deleted, a confirmation message will display to confirm. You may use the custom entries that you create in either metric or imperial models since they are saved to your login account (values will be converted automatically).
Deleting a custom construction
If a custom construction type that is in use (has been selected) is deleted, another type should be selected to replace it. If another type is not selected but the Apply button is clicked, one of the default types will be used to replace the deleted entry (this is to prevent issues with the application attempting to recalculate without a reference value). Note: the default type will not immediately highlight but will do so if the panel is closed and reopened.
Note: It is currently not possible to modify data for an existing custom type that has been created. You may delete it and create a new entry if required.

