
This Section will cover some of issues that Users may come across when using the application and helpful guidance on understanding these issues and resolving them.
| FenestraPro will arrange the model into Facades based on orientations, internal divisions and planes. There may be several South facing Facades for instance if they are on different planes and internal spaces are divided. If a level is open plan without internal divisions, surfaces on different planes may be included under one Facade. Within these Facades are Surfaces, defined by Floor Levels and Internal Walls. Each time there is an internal wall, a new Surface will be assigned for that Space/Room. Facades and Surfaces are based on the Energy Model surfaces generated in Revit. |
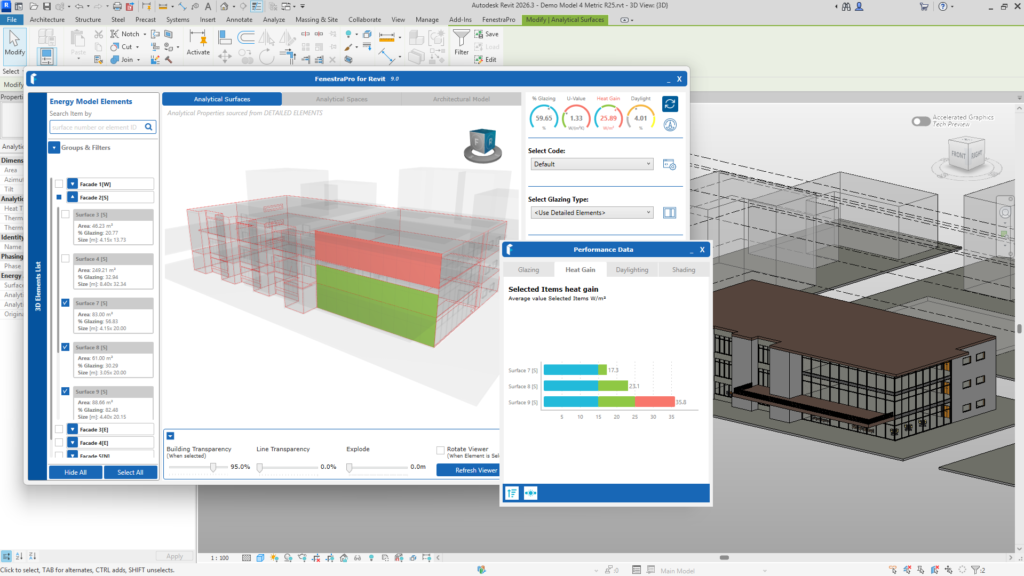
FenestraPro will indicate values with colors to indicate Cool, Optimum or Overheated Spaces. Surfaces that FenestraPro highlights on the model relate to the Rooms/Spaces internally associated to these glazed Surfaces and the results refer to these floor areas. The ranges used for Heat Gain in the Revit Addin are also listed on this page

Colours are indicated in the Facades List, in the Charts and on the Dashboard.
Red will indicate areas for attention (above 25W/m sq / 7.9 BTU/ft sq/hr). These may require a higher performance Glass Type, Shading Devices or fritting applications etc
Blue will indicate Cool Surfaces which may over-restrict Solar Heat Gain (less than 15 W/m sq / 4.75 BTU/ft sq/hr). In this case, a lower performance glass may be required, fritting removed or shading devices made less deep or removed etc.
Green Surfaces have values within acceptable ranges eg. 15 - 25 W/m sq (4.75 - 7.9 BTU/ft sq /hr).
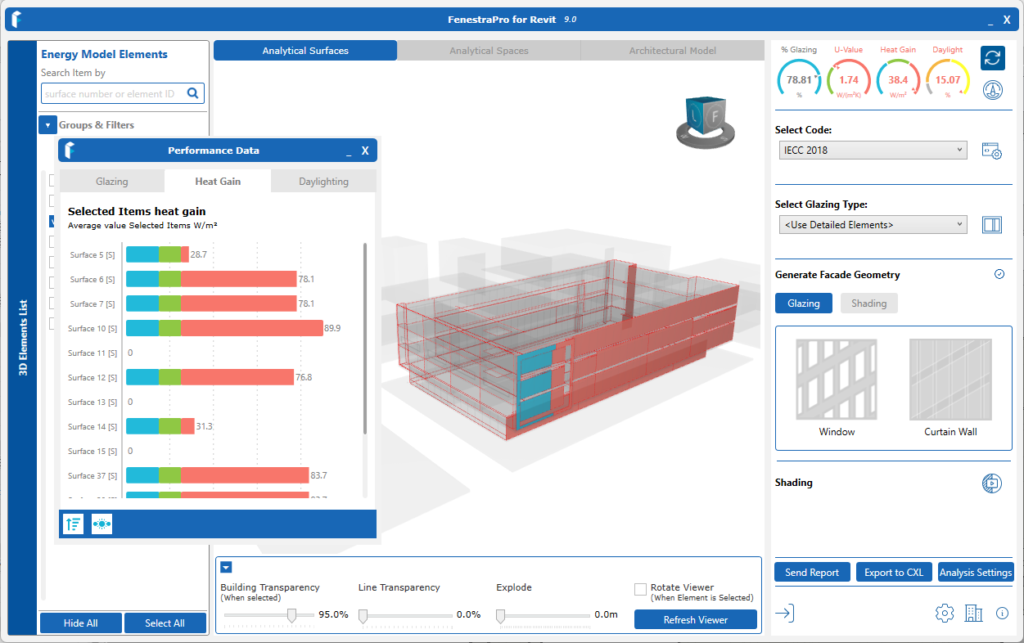
In our Forma Extension - Envelope Analyis, users can define the thresholds for optimum ranges and associated colours using the Settings option. The default ranges for our Forma application are currently 0 - 15 Wm2 (0 - 4.75 BTU ft2 hr) (cool), 15-30W/m2 (4.75 - 9.5 BTU ft2 hr)( optimum) and 30+ W/m2 (9.5 BTU ft2 hr) (overheating). There is more information here.
Daylight colours vary from grey to yellow indicating values. An optimum range for Daylight factor is 2 - 5%.
Assuming that your model generates a successful Energy Model in Revit, you may start analysis with FenestraPro. If you are not getting a successful Energy Model or warnings appear in Revit, check the Model Preparation article for guidance on how to resolve issues.
Detailed Tool
This is covered in detail under this Section.
When first starting to analyze a new project:
- Open the FenestraPro menu in Revit and launch a tool from the options displayed.
- The EAM Check tool is recommended when starting to analyze a new project to diagnose any issues and ensure all analytical spaces and surfaces are present.
- Then open the Detailed Design tool to perform various functions (Change glass types, generate glazing, produce reports, review shading etc).
- If this the first install of the application (or an update to a new version), you may need to restart Revit one-time to update the Glass Types in Revit (the FenestraPro Glass Database is added to Revit's default list). This should be done before changing glass types using the application.

- Site Location in the Revit model should be set correctly in Revit.
- True North rotation will also affect the results and to obtain correct orientations.
- Project Name should also be input in Project Information (under the Manage Tab on the Revit Menu). Other inputs in Project Information are not critical.
- Analytical Properties for Revit elements (these may be thermal properties or glass transmission properties). Glazing elements in the model should have Analytical Properties assigned under Type Properties for each glazing type that is being used in the project (this is checking when you first load your model into the application and advise is provided.
- Room Bounding settings. Model elements generally need to be set as Room Bounding to be included in calculations (structural columns and some elements may be intentionally set to Non-Room Bounding). Element functions for Detailed model need to be correct ('Exterior' or 'Interior' elements) and major gaps in the Building Enclosure should also be avoided.
- A complete Energy Model. Assuming that the model integrity is good and Revit's Energy Model generates successfully, then you may launch FenestraPro. If the Energy Model is not successful or there are warnings in Revit, please see this Section for guidance. There is also guidance in Section on Model Preparation. A successful Energy Model is important for the application to get correct data and use this to produce results. Typical issues can prevent a successful Energy Model, gaps in the enclosure, room bounding settings, element functions (interior/exterior), element properties, Revit settings etc.
FenestraPro will ask Revit to generate a current Energy Model when it launches and will use this information to create Surfaces and organize the model into separate zones related to the internal spaces.
The application also provides a model checking tool to advise on issues and thermal properties. This is called the EAM Check tool (Energy Analytical Model) and is designed to help diagnose model issues and advise on getting a complete energy model (indicating spaces and associated surfaces)
Please see this Section for more details on Getting Started.
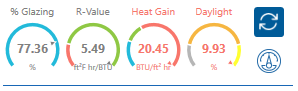
The Dashboard will display a weighted average result for the selections made. Selections may be chosen from the Charts, from the Facades List (in the Facade Navigator) or by hovering over areas in the Model Viewer.
If one Surface is selected, the results displayed are for that Surface only (Charts may display monthly averages). Heat Gain and Daylight is shown for the space behind that Surface.
If multiple Surfaces are selected, the results are a weighted average for all the selected Surfaces (the area of each Surface is factored in to get the average).
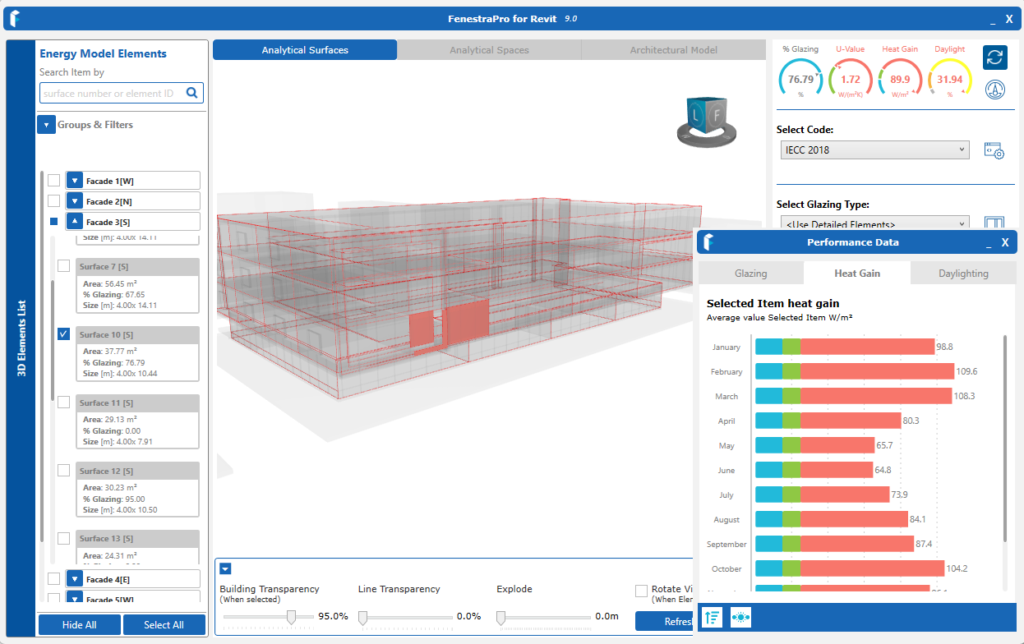
Heat Gain results for spaces internally the model associated to Surfaces through which the solar radiation is transmitted. This is displayed in Watts per Square Metre or British Thermal Units per Foot Squared per Hour. This vale can be afectd by various factors including the solar transmission property of the glass, the area of the glazing, external shading devices, shading from surrounding objects etc.
Daylight Factor for Model spaces is also displayed associated with Surfaces with glazing that transmit this through the project envelope. Daylight Factor is a percentage and is a ratio of external illuminance to internal illuminance at a working plane.
R-value or U-values for the selections made are also displayed. These represent the average value for the Surface(s) or Facade(s). U-value represents Heat Loss through the building fabric (a lower value is typically more desirable). R-value represents the Resistance of the fabric to Heat Loss (a higher value is typically more desirable).
R-value is shown as Foot Squared Fahrenheit per Hour / BTU. U-value is shown as Watts per Square Metre Kelvin.
Glazing Percentage on a Surface or Facade is also displayed.
Shading Results are output in the Charts, if this calculation has been included (most shaded Surfaces by percentage). There is an option when starting to include or exclude this calculation.
Yes, you can use Design Options where you have different versions of your model in the one file.
The iteration of the model to be analyzed just needs to be made the primary option and then restart the application to use this version of the model. This is covered in more detail under this Section.
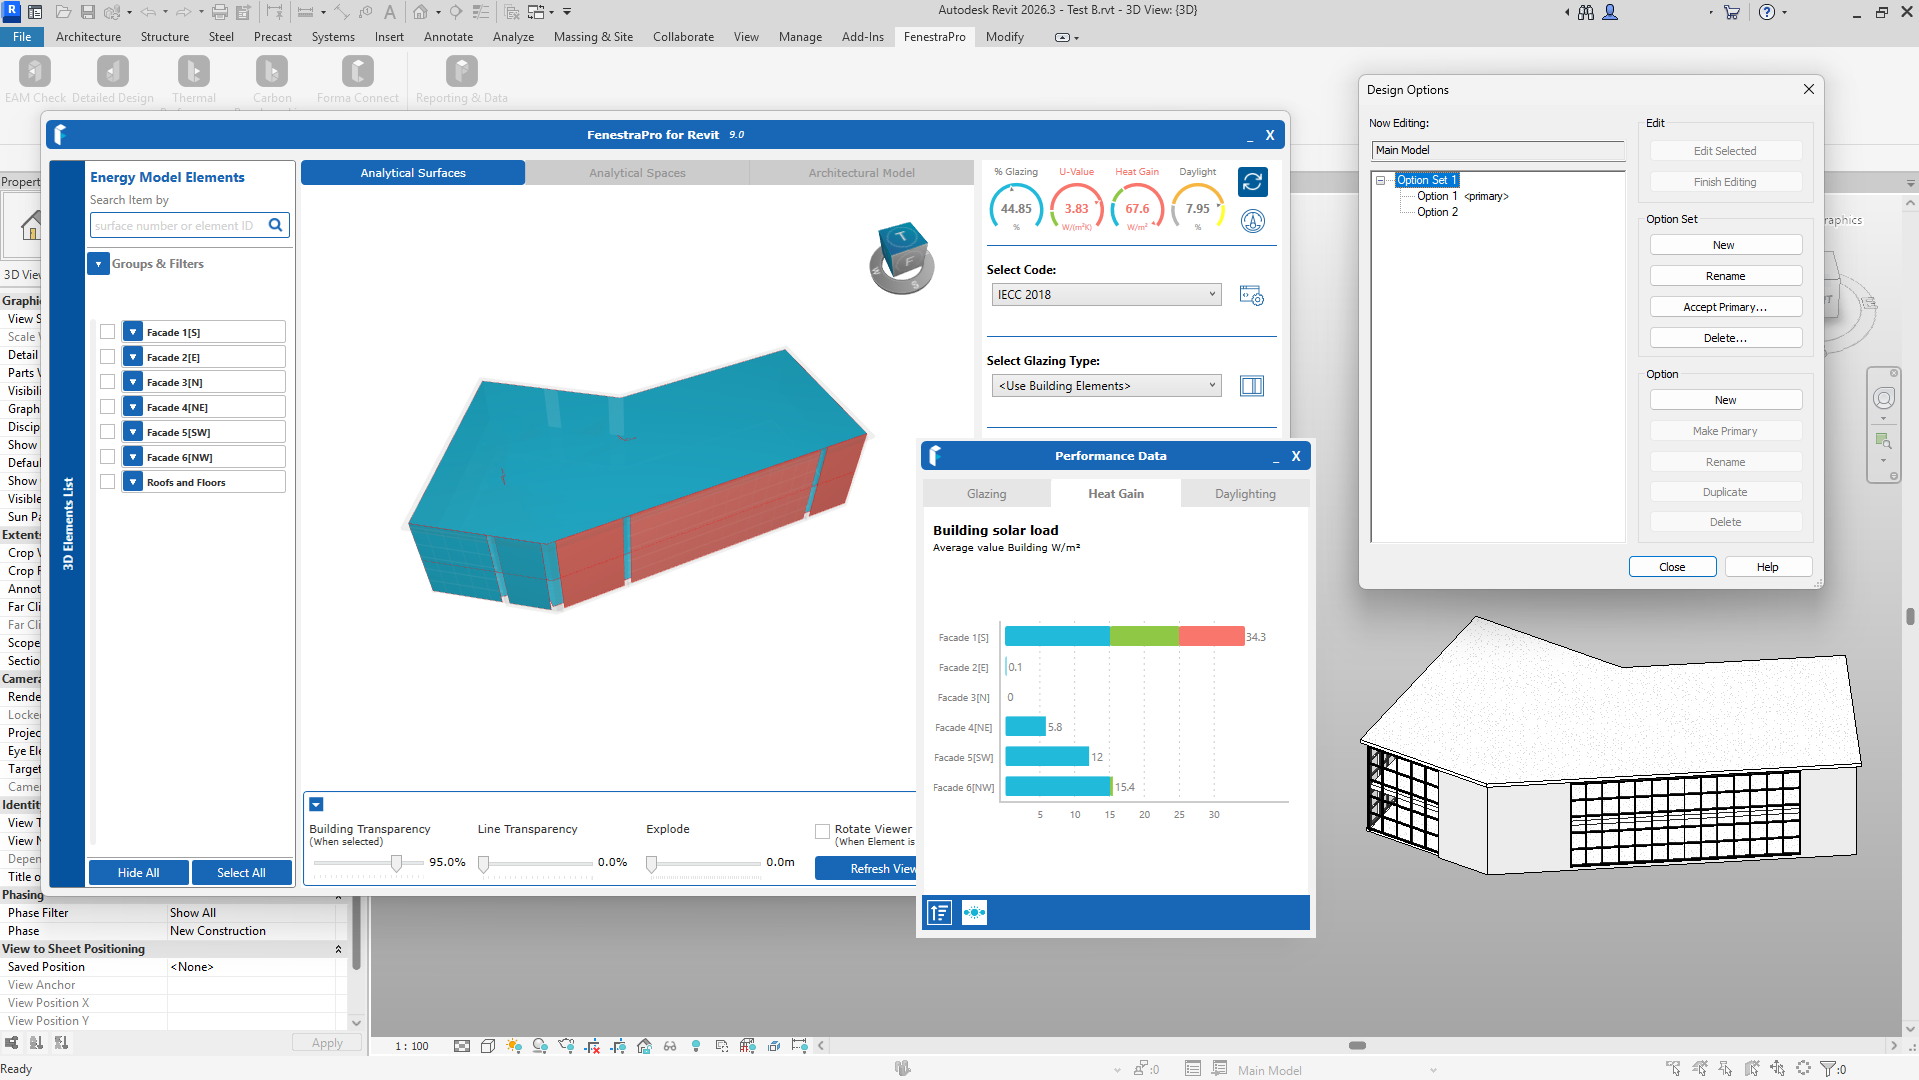
FenestraPro can factor in the shading effects from surrounding buildings (modelled as Masses for context).
Shading Devices that can be used are generic Revit families (canopies/fins), Canopies and Vertical Fins modeled as mass objects, overhanging Roofs and Floors, freestanding elements outside a model such as walls and self-shading from the model itself on other areas of the model. Other detailed buildings nearby will also create shading effects.
Imported geometry used as shading but not created in Revit, may not create any shading effect. You may review if shadows are created by objects in the Shading Animation tool. This will indicate if results will be affected. There are also Shading Settings here which may need to be adjusted to optimize the display.
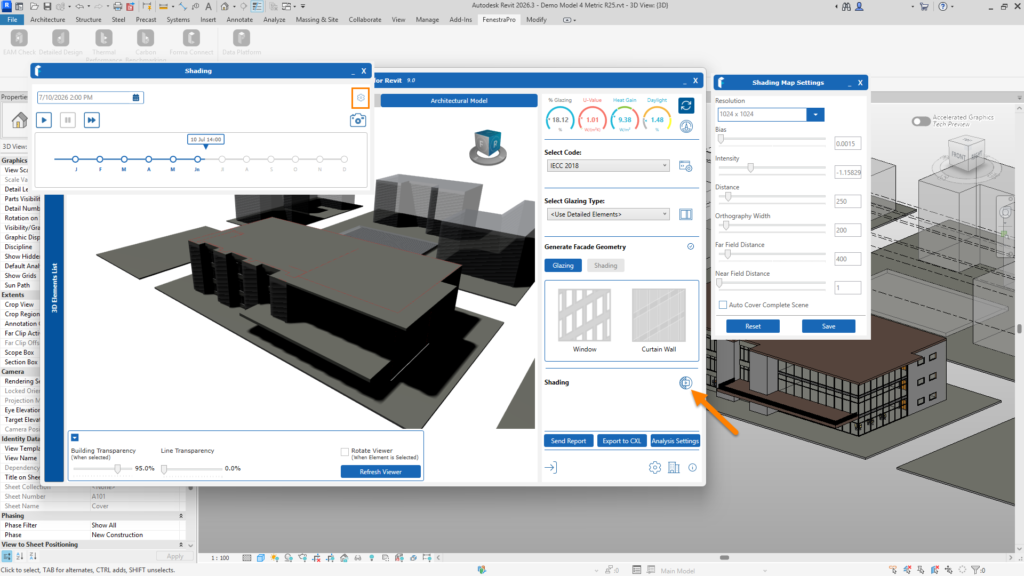
Note: Vertical Fins will currently not affect Daylight results only Heat Gain results.
Please see ths Section for more details on Shading Effects and Devices.
This is the workflow for changing Glass Types in your Revit model:
- Select a Surface on the model (which has glazed elements). Selections may be made from the Facade Navigator List, using the Charts or by hovering over areas in the Model Viewer.
- Once a selection has been made, you may review Glass Types in the Glass Database. These may be sorted into ascending or descending values by clicking on the headers (U-value/SHGC/VLT).
- The database may also be filtered by using the sliders to define a range for U-values, SHGC or VLT. You can also use the Region Filter to get selected glass types.
- Once a Glass Type/product has been selected in the list, it will highlight. This may then be 'Applied' to the selected Surface or model element by using the Apply button shown. A message will display to ask if you wish to change the existing glass to this new type, only the selected Surface or everywhere in the model that this family is located (universal change).
- If you wish to Apply only on this Surface, a new family will be created in Revit for you with the name of the new Glass Type. Please see this Section for more details on all these features.
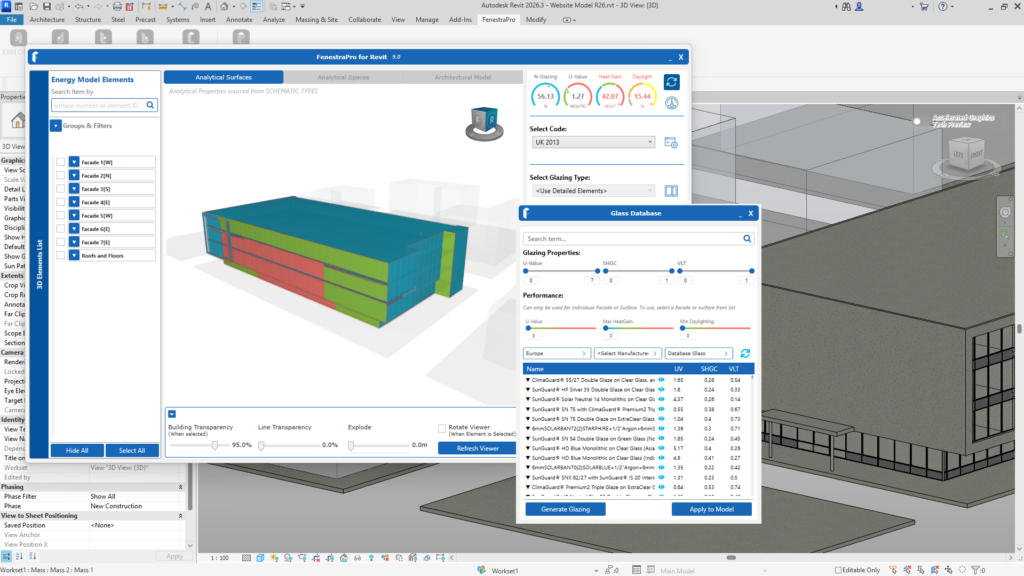
Note: If you have just installed the sotware, you will need to restart Revit one time to add the Glass Database to Revit before applying any entry to the model. This ensures that the new glass type will also update in Revit and provide the data required to update the results. If you wish to apply only a default Revit glass, you do not need to restart Revit and may do so at a later stage. Your Revit model shold always be saved before restarting Revit so that recent updates will be stored for the next session.
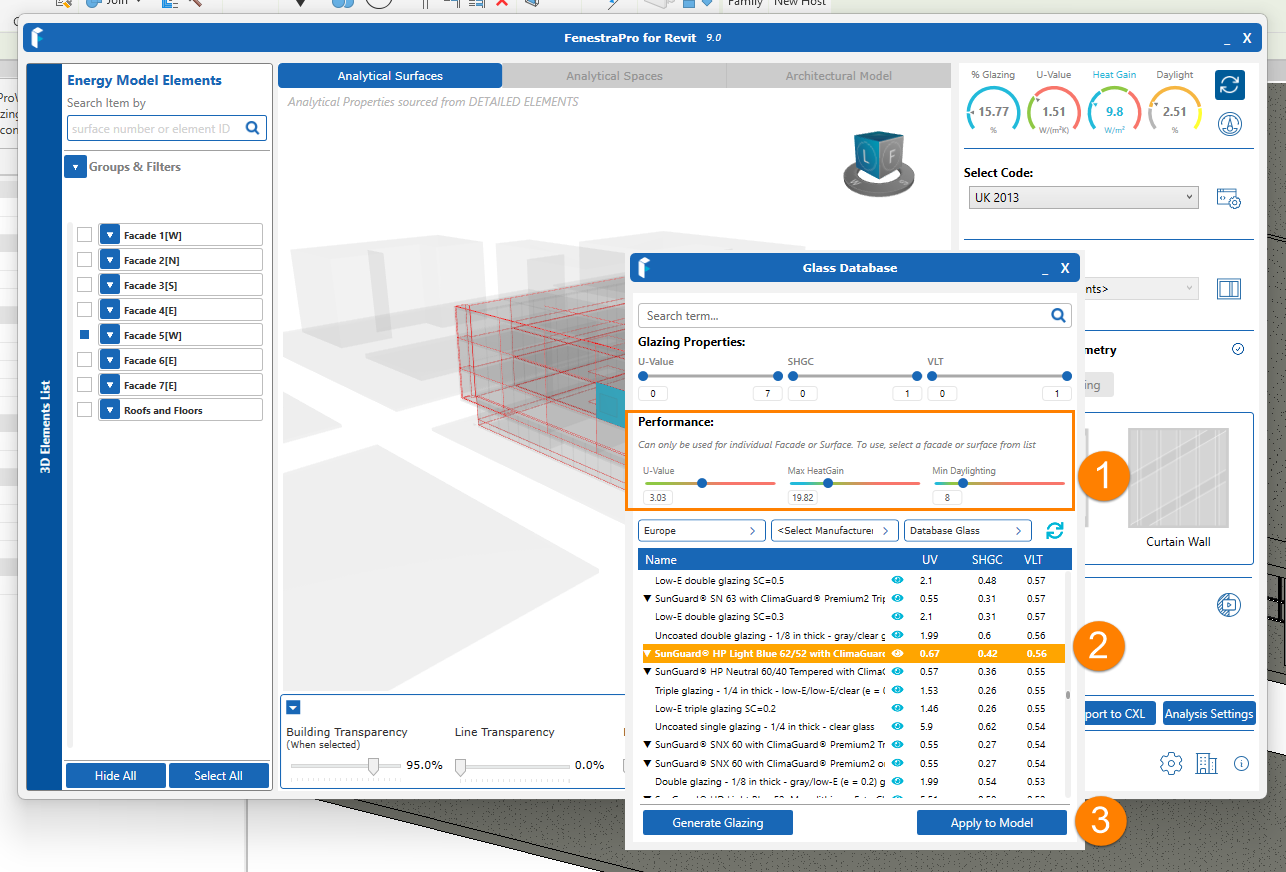
Yes, the Surface Performance function will allow you to define target Heat Gains, Daylight and U-values/ R-values for a Surface and glass products which have suitable properties to produce these defined targets will then be listed.
Select a Surface(s) on the model in the VIewer,
1. Set the sliders to the required values.
2. Select a glass from the shortlist
3. Apply this to the selected Surface(s).
Please see this Section for more details of this workflow.
Yes, the Glass Suppliers in the database have online Glazing Configurators to allow you to configure an assembly with various glass types. FenestraPro provides links to these websites in the application to direct you to the suppliers' web applications where this can be achieved. Current partnership agreements may determine which configurators are available for a current version.
In the Glass Database, click on Generate Glazing. This will open options or the currently available configurator. An online browser will open where you can configure a glazing assembly. From this window you can export this glass to FenestraPro. It will then be available for assignment to your project. There are more details of the workflow here.
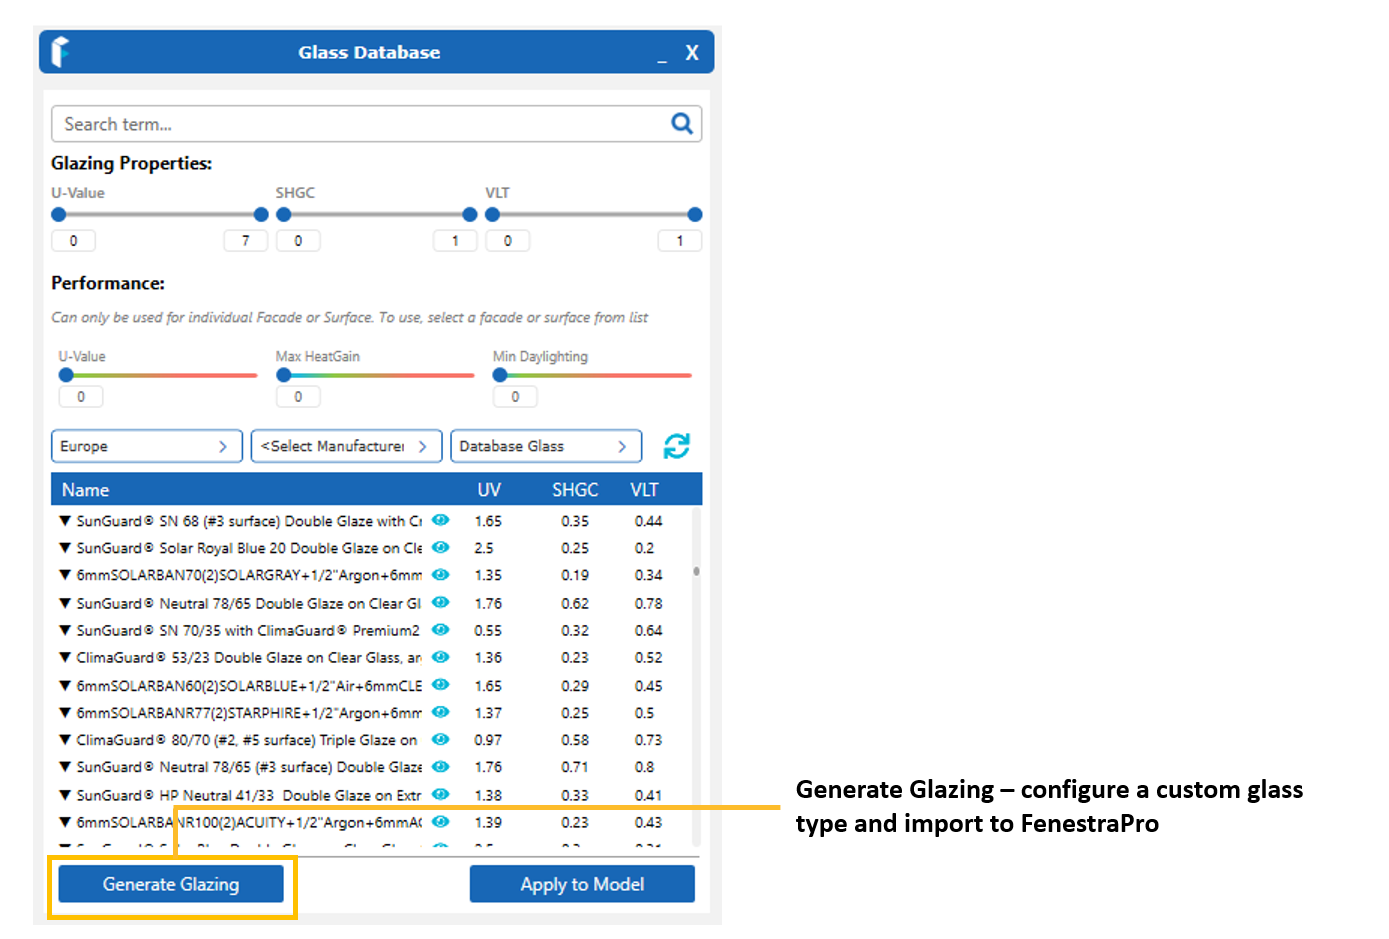
Once a Glass Makeup is configured, it may be imported back into your FenestraPro Account where it wil be added to your database. It will then become available in the Revit Addin also and may be used for projects in Revit.

Note: New Glass Types that Revit has not seen before may require a restart of Revit before they will appear in Type Properties and become information that can be used in calculations.
Yes, once this option is used, properties will be recognized and used for calculations instead of any Construction Type. This option is available in Revit for Glazed Elements only (it is not an option for Roofs, Floors or Walls). Please see this Section for more details.
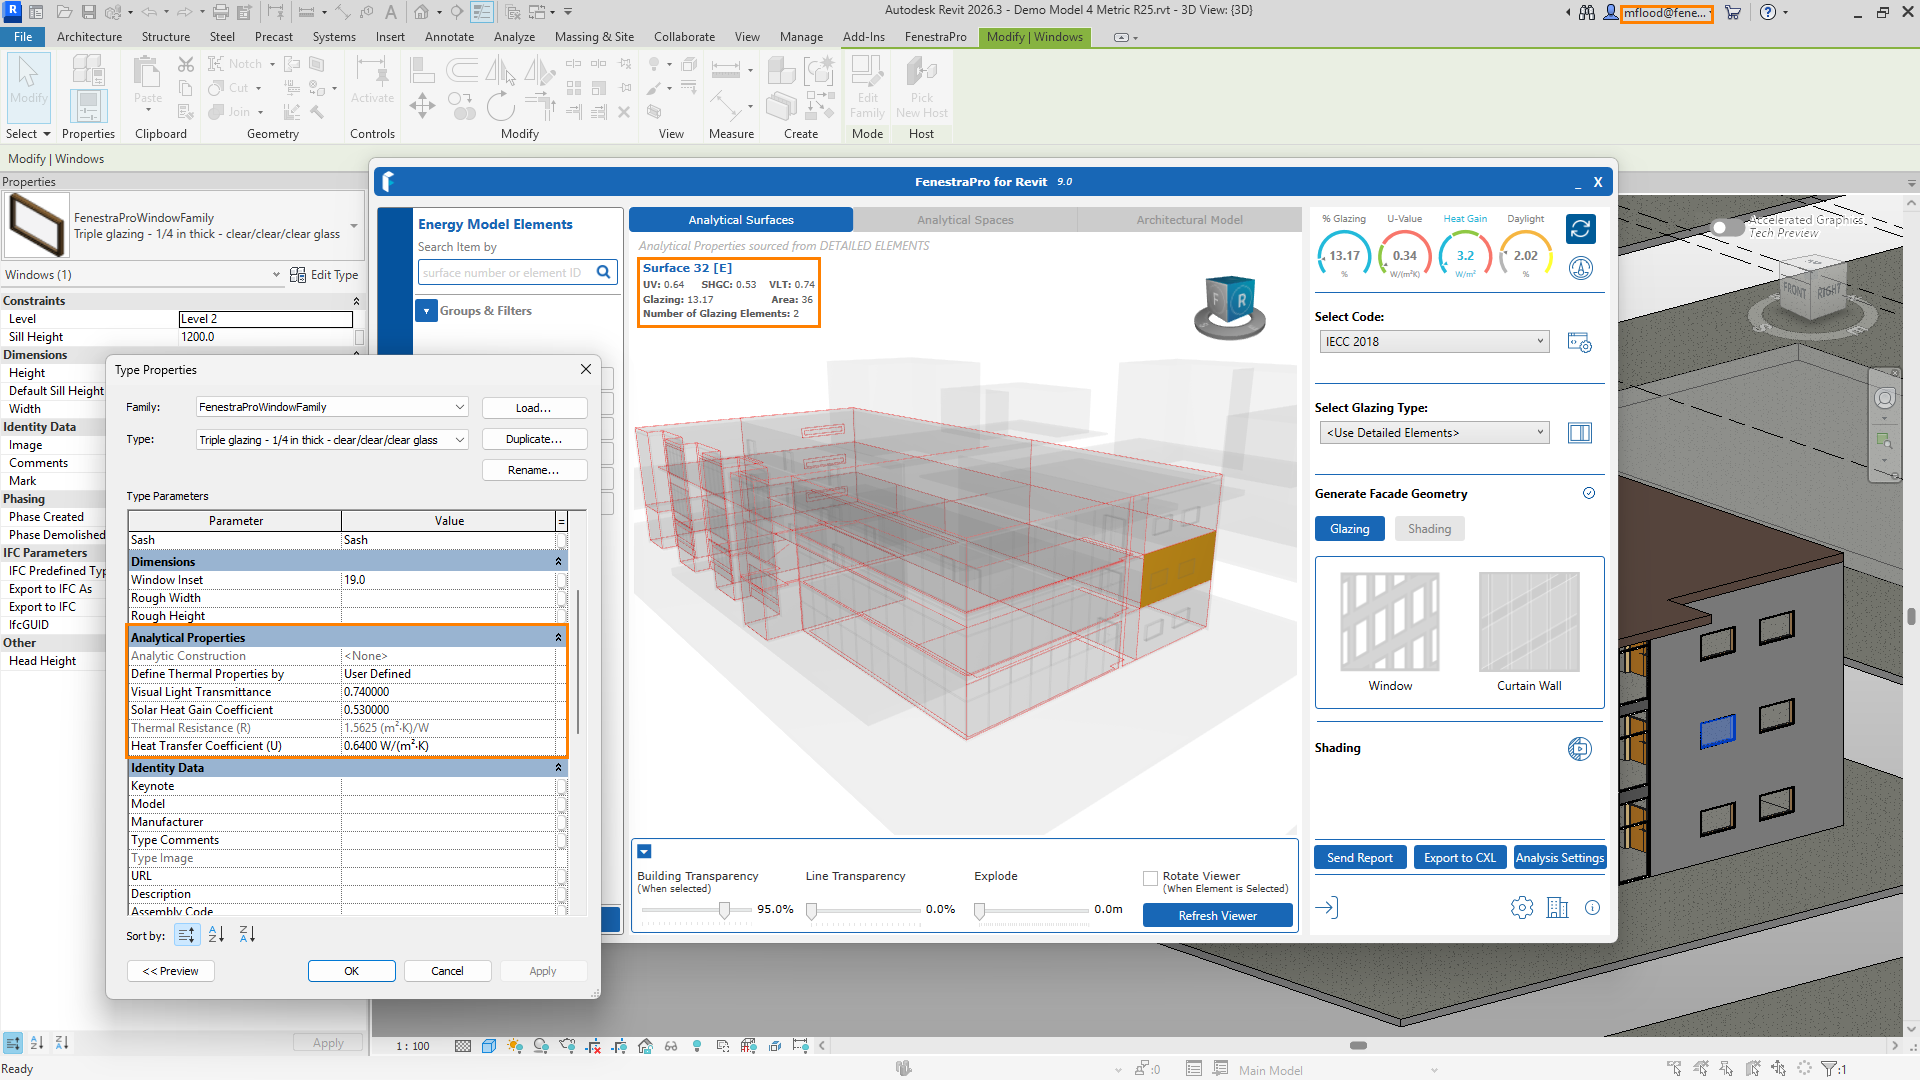
Thesemay appear in the EAM Check tool and are helpful indicators that elements do not have analytical properties. It may be that a door or window has no analytical property set. The warning indicator (icon) will appear beside an element family in the list. An ID will also be displayed. This is helpful to find that element in Revit as you may search by ID number. Thermal Properties may be set in Revit by using the Edit Type tool or you may choose to use schematic types as a backup temporarily and these can be used for calculations.
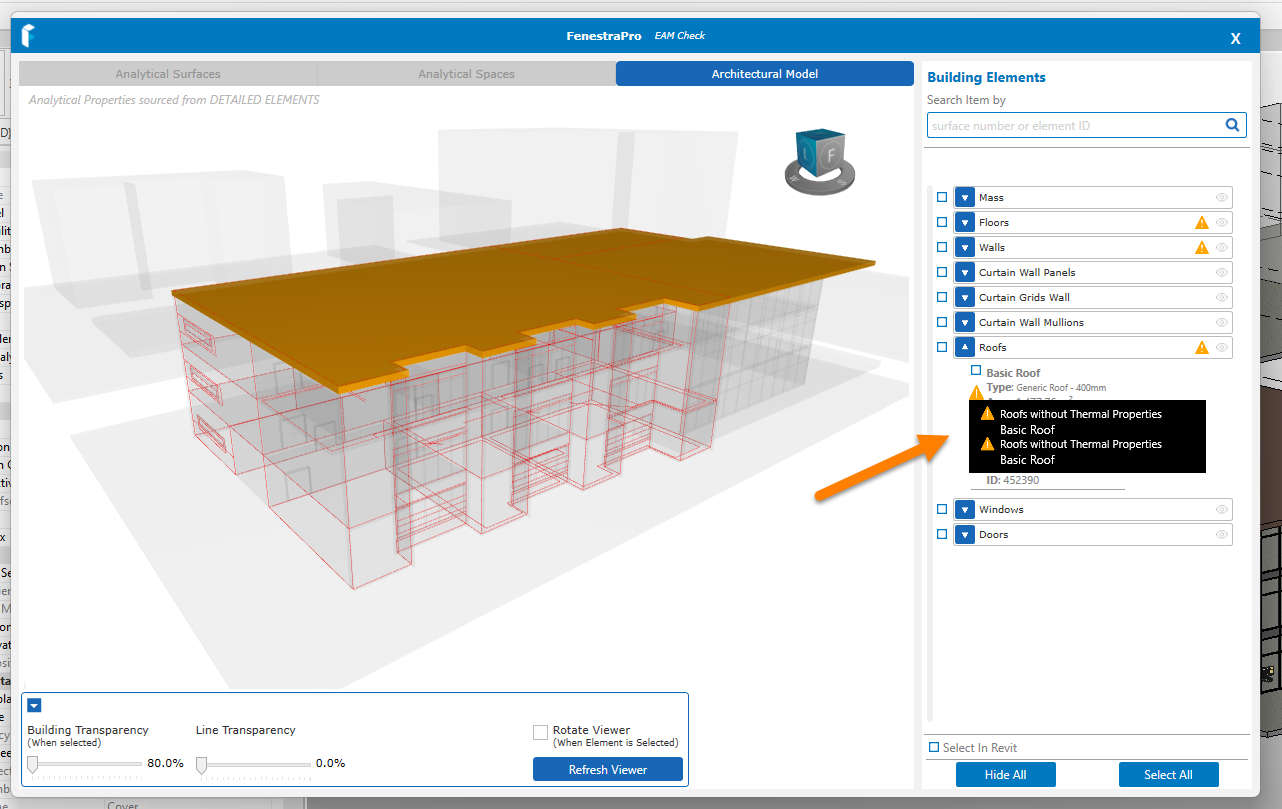
It is good practice to check that Revit’s Energy model is successful first and that there are no warnings in Revit. If there are warnings (under the Manage tab), try to resolve these first or make a note of these and look for these issues in FenestraPro where they may be options to resolve them (room bounding issues, missing properties etc) Glazing material, if assigned, should have the required transparency set in the materials browser, to be identified as glass.
Please refer to this Section above for information on typical modelling issues and recommended Energy Settings.
If you still experience issues, please contact us for support: support@fenestrapro.com
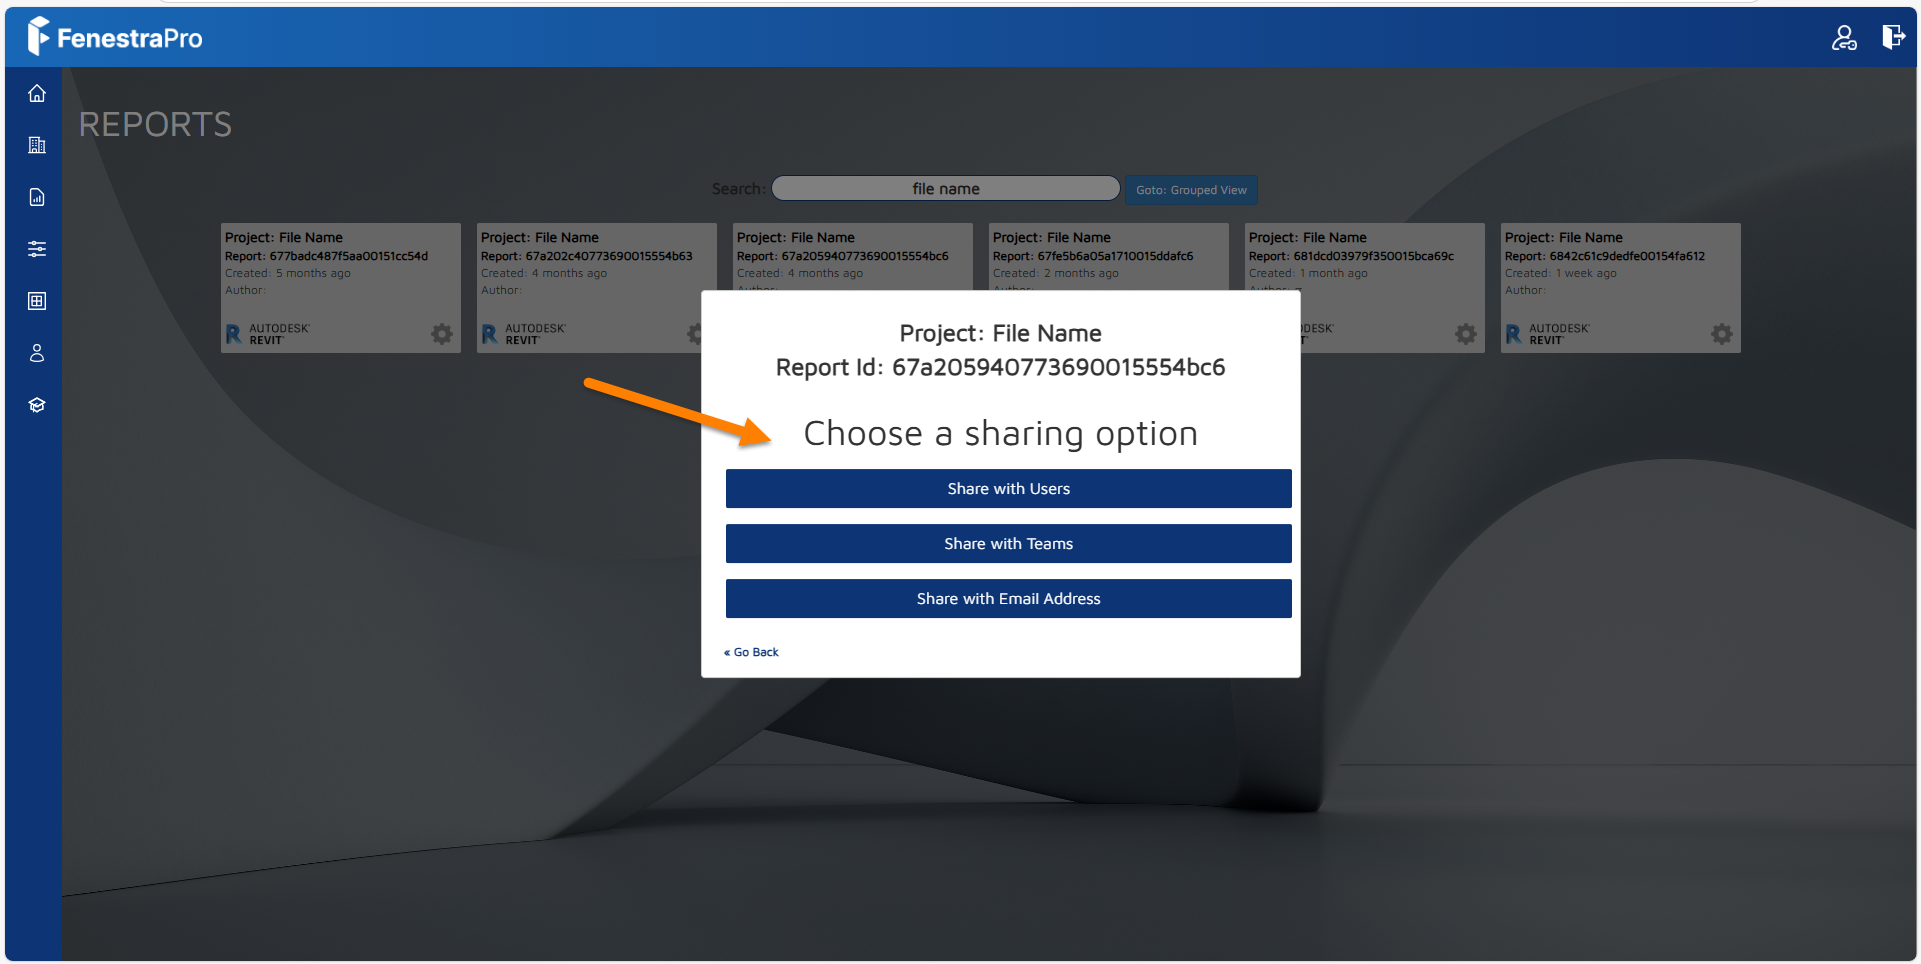
Yes, it is possible to share a Report with a colleague who also has FenestraPro (you may share the project Report with them from your online Account area.
Since changes to model conditions are written to the Revit model, once this is saved, it may be shared with a colleague and opened in FenestraPro (if they are included on your license and have a seat). They will then get the same results. If you have calculated Shading Effects, this will need to be repeated as application settings are set locally on each user's machine. The model should be saved in Revit (before sharing with a colleague) so that any changes are baked into the Revit file and model conditions should not then be modified (Site Location, True North, project settings etc) since this will alter any future results.
Changes saved to the Revit model include using glass types from the FenestraPro Glass Database, adding windows or curtain walls using the software. If you have created an Energy Code for the project, you may also share this with a colleague(s) from your online Account area. If you have imported a custom glass type from a manufacturer's glass configurator online, you will need to ensure that this has been added to Revit's glass types list by syncing the FenestraPro database to Revit. Any new glass types will be saved within the model even if your colleague does not have them in their version of Revit. It is also possible to share a custom imported glass type with a colleague from your online Account.
The HTML Report may also be viewed in a browser and shared with a colleague or this data may be downloaded as a PDF from your Account and shared with colleagues.
Yes, FenestraPro saves your custom Energy Codes in the online Account. You may share a Code with a colleague, a Team of which you are a member or another user who also has access to the application. The user will then get a notification by email that a Code has been sheared with them and will see it in their online Account. See this Section for more details on sharing reference Energy Codes. The process is identical whether you are using a Conceptual or Detailed model.

It is not possible currently to share Custom Groups but it is easy to replicate the settings here and advise a colleague of selected Surfaces. See this Section for more details.
FenestraPro can use various options to identify properties and use these values for calculations.
- Detailed Analytical Properties
- Schematic Properties (as a backup)
- User Defined Properties
Detailed Elements
Revit has a setting that will determine if detailed element properties are to be used. This is found in the Advanced Energy Settings under the Analyze tab.
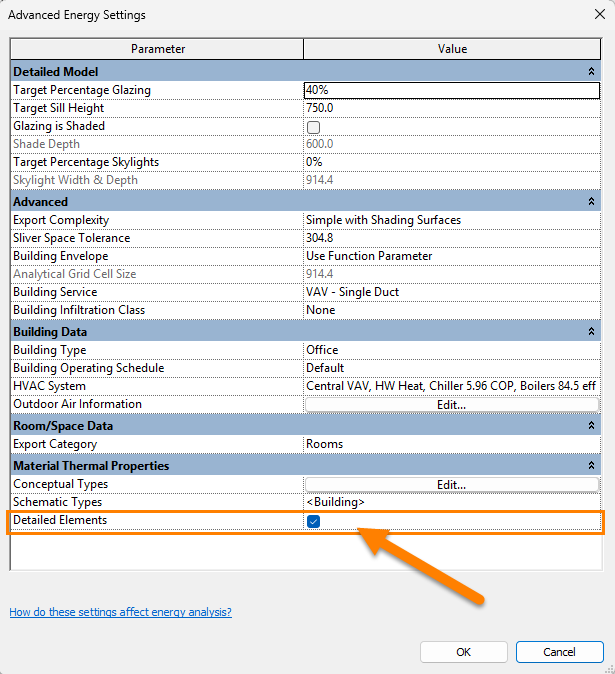
If this setting is turned on, Revit will use the analytical properties that have been defined for elements. If certain settings are used, Revit can use backup schematic values if no analytical properties are present.
Schematic Types
If no analytical properties have been set, Schematic Types may be used in Revit as a backup providing their override setting has been turned on. Schematic Types are the construction types in Revit. You may define the default entry to be used in the event of detailed properties not being present. You may also ignore analytical properties and only use schematic types if you wish.

Alternatively, you may also control the default schematic type using the application. A dropdown list is provided in the Detailed Design tool. Clicking into this list and selecting a type will define this as the default.
This is explained in more detail on this page here.
User Defined
If User Defined properties are defined in Revit, these can also be read by FenestraPro for glazing elements. This is useful if you do not know a specific glass type but have properties that you wish to use.
Yes, simple curved geometry is supported for Detailed Revit models.
Note: Currently, results and orientations are limited to overall outputs. Improved support for these conditions is in development.


Where geometry is more complex, all areas may not be analysed fully and Users are advised to exercise caution with these types of models. Curved geometry may not always be assigned Surfaces or produce results. It may be helpful to divide curves into faceted straight lines as an alternative.
FenestraPro was developed to work with models created in Autodesk Revit. Importing Rhino and Sketchup models to Revit gives limited information as they are often composed of polysurfaces or faces and may not be BIM objects that Revit can modify. Analytical Properties cannot be applied to these generic objects and as such the Revit Energy Model does not provide analytical surfaces. You may explore the use of third party software to translate models from other modelling platforms into formats that are readable in Revit may be successful. Imported models may also be used as footprints to trace around and create Revit geometry. Please contact us for more advice: support@fenestrapro.com


