The following Sections cover features of the application as they relate to Conceptual Mass models only.
Typical Workflow Summary (each of these is covered in more detail in the relevant articles):
- Launch the Conceptual Tool
- Select a Conceptual Mass to be analyzed in the Revit project
- Define settings in the Building Manager and Calculate Results
- Close the Building Manager and in the Performance Manager, define the Overall Percentage Glazing for the model
- Select an Energy Code if there is a dropdown list provided or Create a reference Code for your project
- Check Compliance with model ‘elements’ (Roofs/Floors/Walls and Glazing)
- In the Facade Manager, you may define settings for the overall project or for individual Facades (collection of Surfaces) or for single or multiple Surfaces. You may define settings for Glazing Specification, Glazing Percentage, Shading Canopies, Fritting simulation etc
- Charts and Results may be reviewed and Reports saved for each model condition or each design version

For Conceptual Mass models, the Facade Manager has controls for Surface modification. In the Performance Manager, values may be input to simulate thermal properties for notional elements. Updating of the Conceptual Tool soon is in development to provide a similar user interface to the Detailed model.
Creating a Mass model in Revit
With recent version of Revit using the combined mode in the Energy Settings (‘Use Conceptual Masses and Building Elements’), conceptual mass models in Revit no longer need to be created floor by floor (while in the Mass Editor) even if the Export Complexity setting is defined as ‘Simple’ . You may extrude a footprint from the Ground to the Roof level if the design is uniform on each floor. The Revit Energy Model will still produce Analytical Surfaces separately for each floor level. This will allow isolation of areas per level in FenestraPro and more control for changing glazing specifications, modifying glazing areas, adding shading canopies, simulating fritting etc. Creating the Mass floor by floor (or level by level), may be required where the design steps back or footprints change on different floor levels.
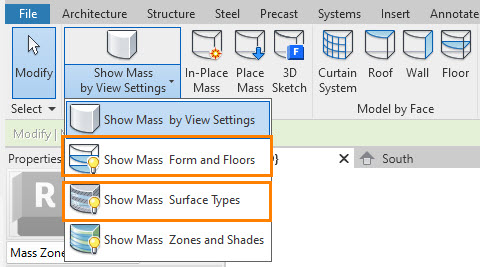
Note: To edit an existing mass, you may need to adjust the display settings on the Revit menu under the Conceptual Mass panel (Show Mass by View Settings / Show Mass Forms and Floors / Show Mass Surface Types / Show Mass Zones and Shades). Only the highlighted options will allow access to editing in Revit.
Adding Edges to Mass Surfaces in Revit
Surfaces may be further divided by adding Edges from the Revit Menu. As more edges are added, more Surfaces will then be assigned in the application. Close FenestraPro and select the Concept model in Revit. Click on the Mass Editor on the Revit menu and select a Surface using the Tab key and your mouse. The Add Edge tool will become available on the Revit menu in order to add vertical lines to that Surface. Click to add an edge and save this modification. These areas may then be assigned no glazing in the application when it is opened again and can remain solid areas. The video below explains how best to create a Conceptual model for use with FenestraPro.
Note: Creating a Conceptual model this way will produce an open plan arrangement and results are based on these larger spaces. It is also possible to create a conceptual model room by room if you need a more realistic building condition. The principle is the same (create the model level by level). Revit will recognize internal walls and they will not receive any glazing zones when applied.
There is also more information here in Section 13.1
