FenestraPro Forma Support (beta)
This is a proof-of-concept standalone desktop application and provided for testing and feedback purposes. More features and improvements are to be added soon. The purpose of this application is to take exported Autodesk Forma models, apply glazing and shading devices and get results.
If you would like to request an installer please fill out the form on this page: Request FenestraPro Forma
- When you receive a download link, install the application. Note: This application operates as a standalone desktop tool and is not connected to, or will not appear on the Autodesk Revit menu. Download the installer file to your machine. Double click on the installer file. Review and accept the agreement.
- A desktop icon will appear, from where you may launch the application.

- Double Click on the icon to launch the application. You may need to enter your license serial key which was emailed to you. Then click on the application again to get the login window. Here you can enter your email address and password that you used to create your account.
- Having previously created a model in Autodesk Forma and exported this to your machine, this file will have been downloaded to your computer as a zip file.
- You may drag a zip file (that was exported from Forma) onto the application window. Alternatively, you may browse to the file location for this zip file. If the zip file has been extracted, you may open the .obj file also using either method (drag and drop or browse). Note: This entire window may also be moved on your desktop or to another monitor by dragging on the header.

- You may also open a previously opened file from the recent saved files list (files previously opened). The project will then open in the application.
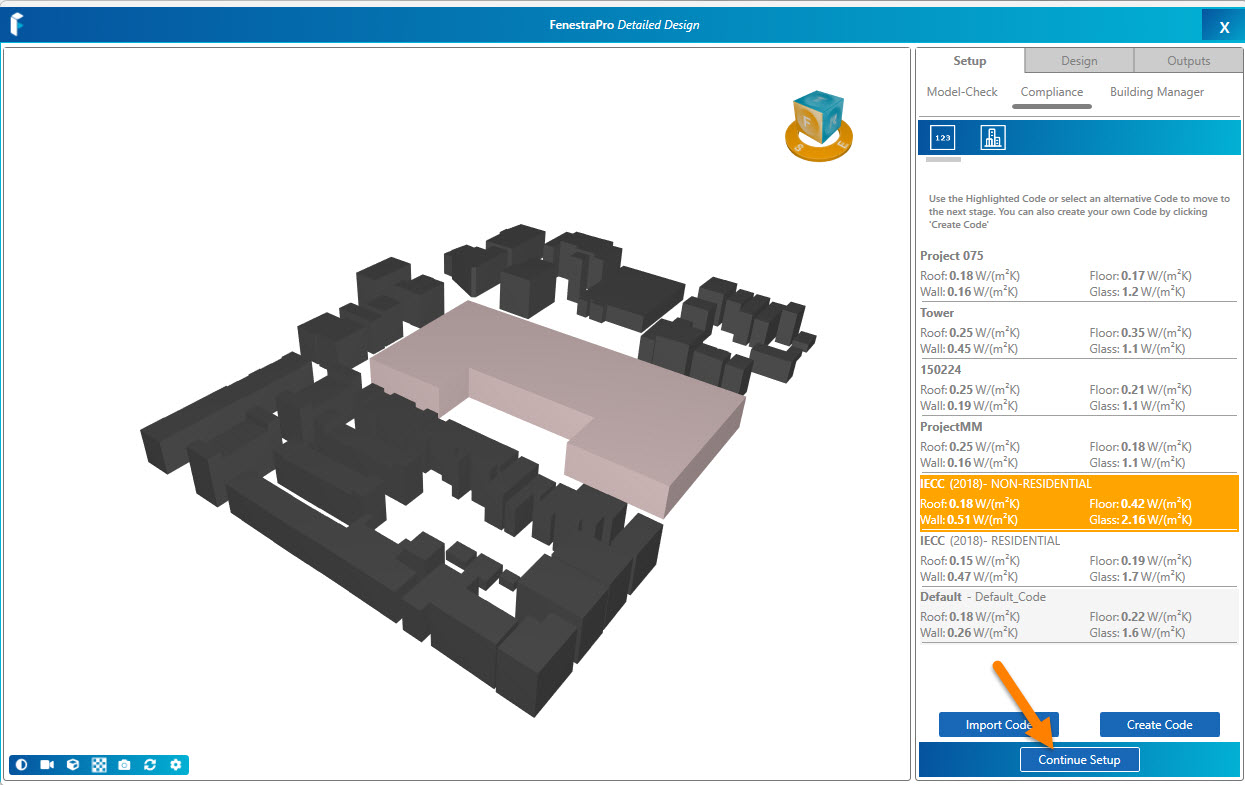
- In the first window (the Compliance area), select a Code from the list, or if you only see the default Code and it is already selected, press Continue Setup to advance the next stage (Thermal Properties). You may also create an Energy Code with reference values and import this here for the project. Note: the Model Check tab is disabled and is not functional for this application. Not all regions may be supported yet and you may not see a list of Energy Codes for your project region. This is to be improved in a future release.

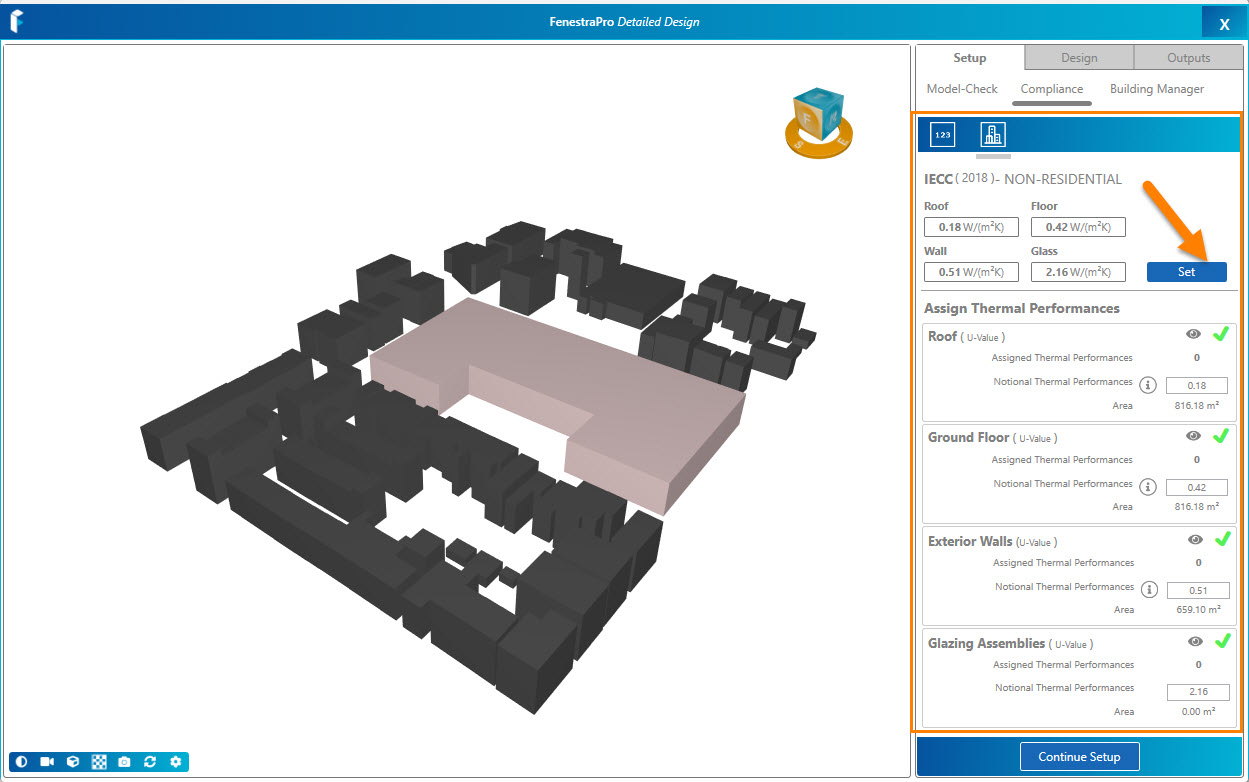
- In the Performance area, use the Set button to apply the Energy Code values to model element types so all will get a green checkmark. Then use the Continue Setup button to advance to the final set-up stage (the Building Manager) where you may get results for the project.

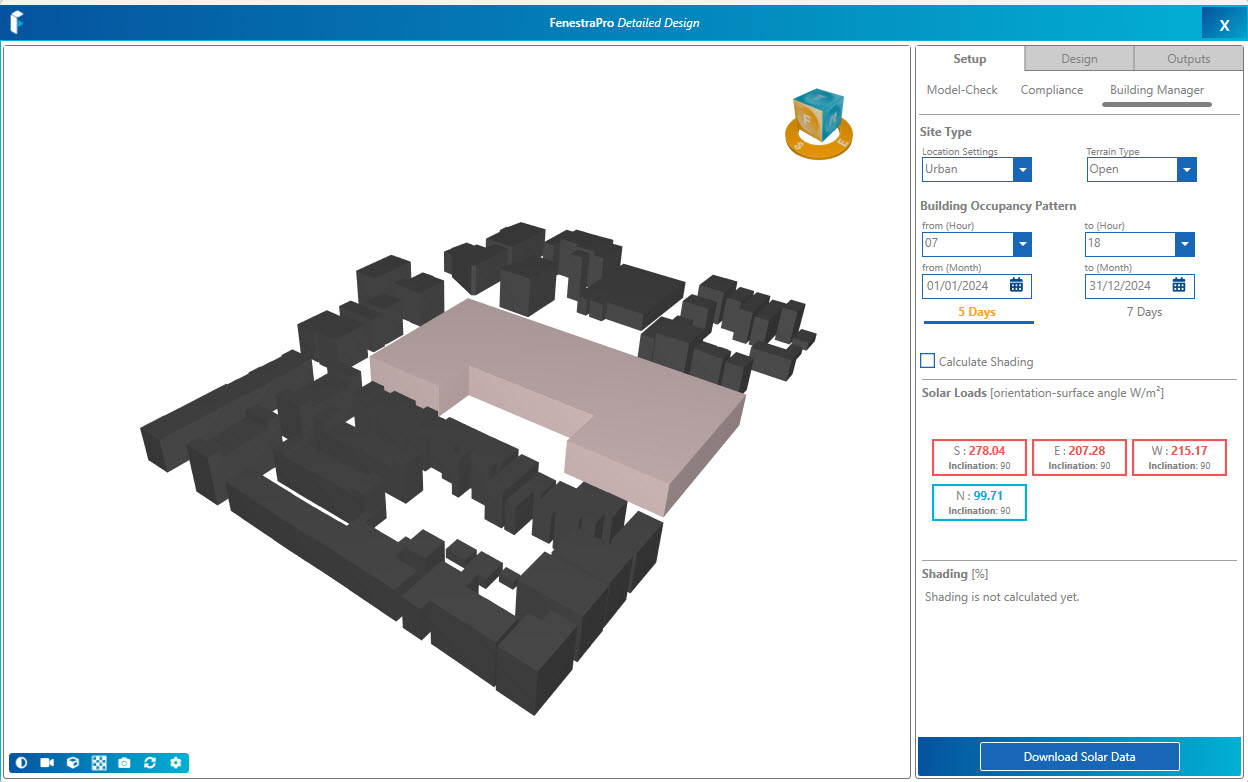
- In the final setup stage (Building Manager), there are project settings at the top but these may be ignored for now. If you require shading results, leave the Calculate Shading checkbox on, (otherwise uncheck this box). This Shading calculation will take longer to process than if results are requested without this setting as more detailed measurements are required.
- Press the Download Solar Data button to get results.
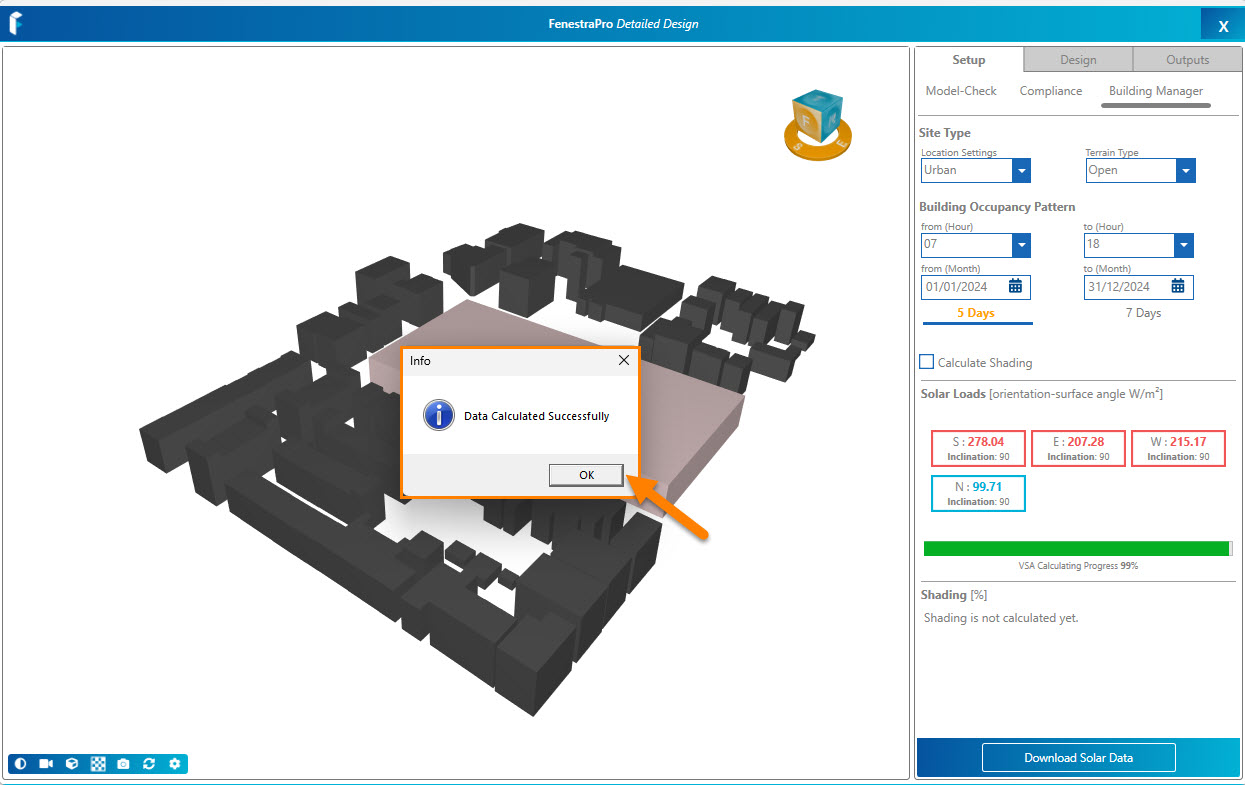
- Once complete, results will display for model orientations and a message will display to confirm ‘Data Calculated Successfully’. Click Ok to this message.
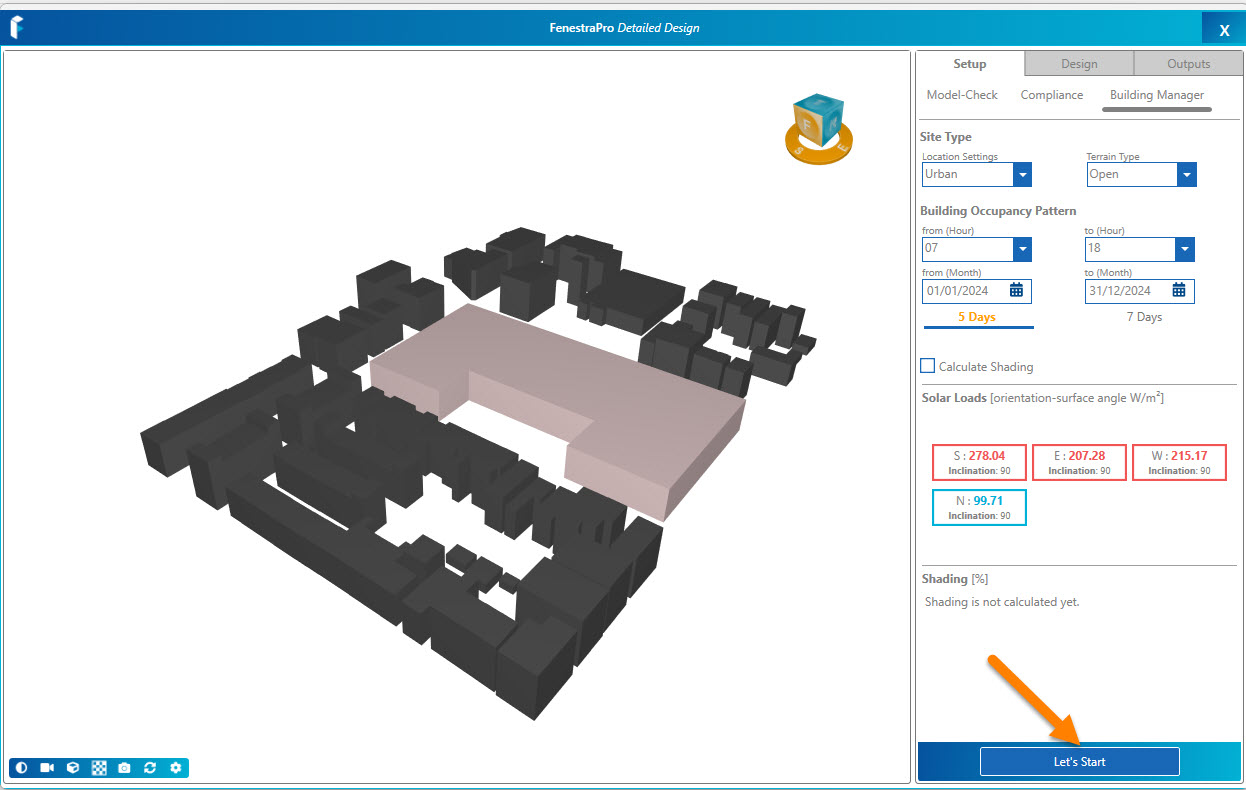
- Then click on the Let’s Start button to proceed. This will complete the set -up stage and advance you to the main window.

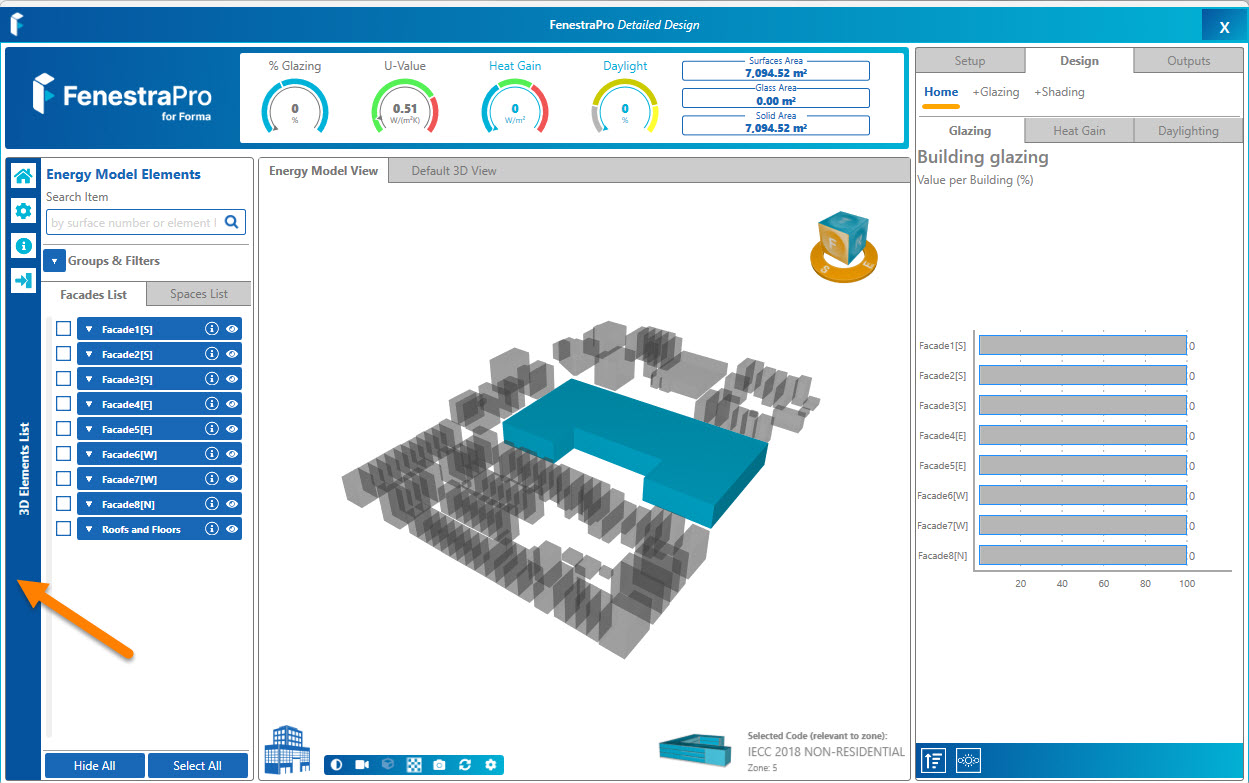
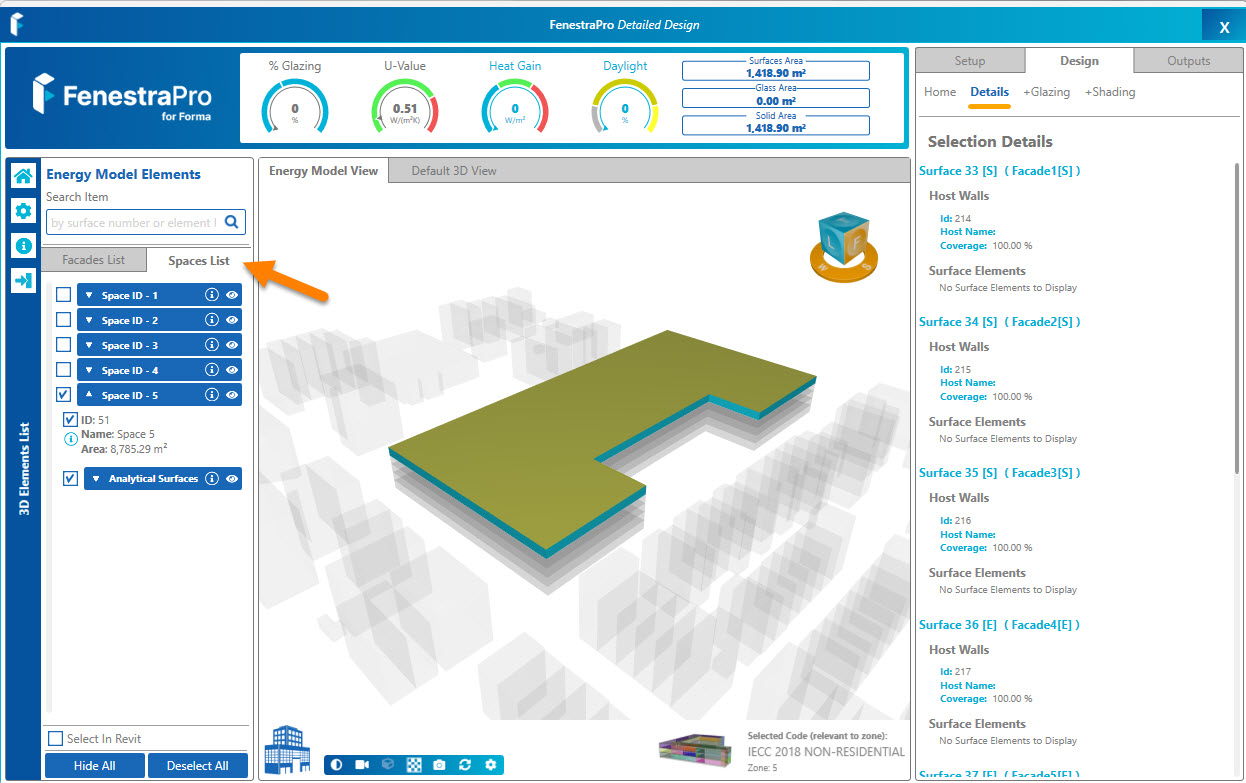
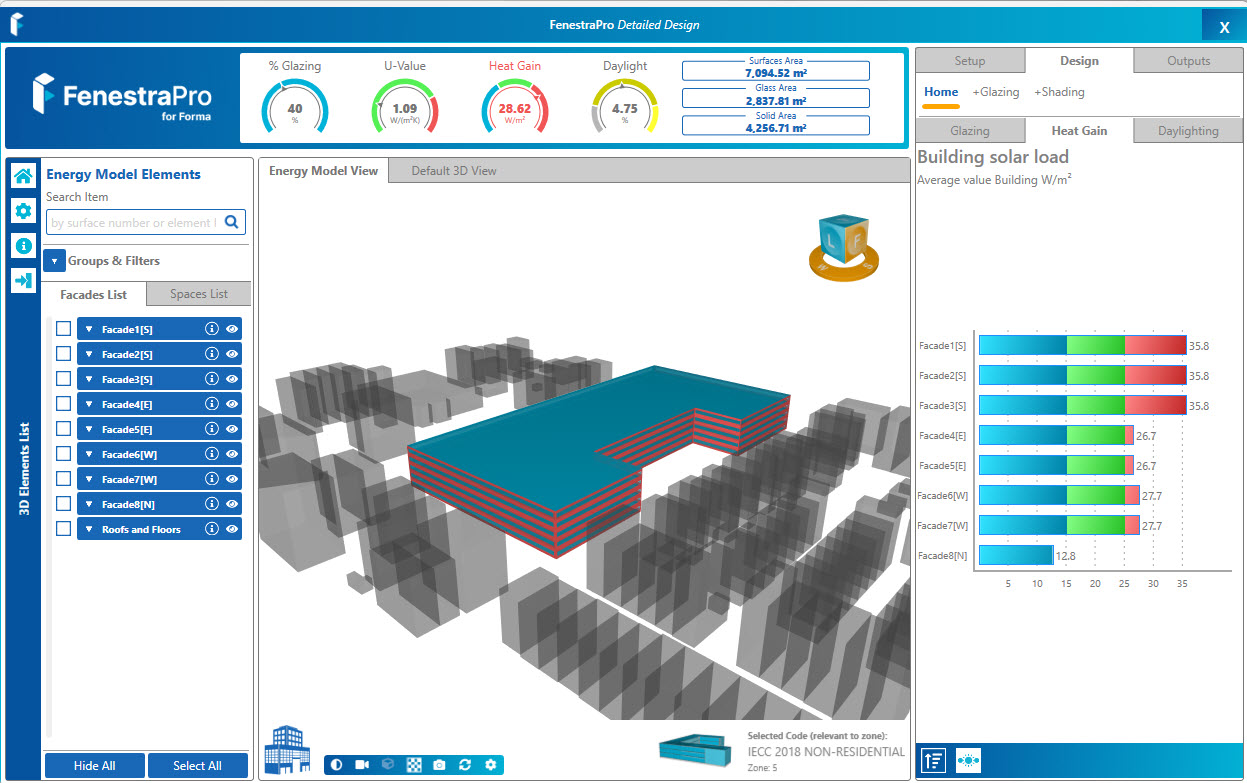
- In the main window, you may open the 3D Elements List on the left. This provides a list of Facades and Surfaces which may be selected using checkboxes.

- There will be no results on the Dashboard at this stage, since the model has no glazing yet. The u-value reports the simulated value selected in your Energy Code.
- In the Spaces tab, you may check for Energy Spaces, hovering over the model in the Viewer, will highlight areas or you may select from the list. Then return to the Facades List tab. We do not need to make selections yet but from this panel, Surfaces can be selected and highlighted on the model.

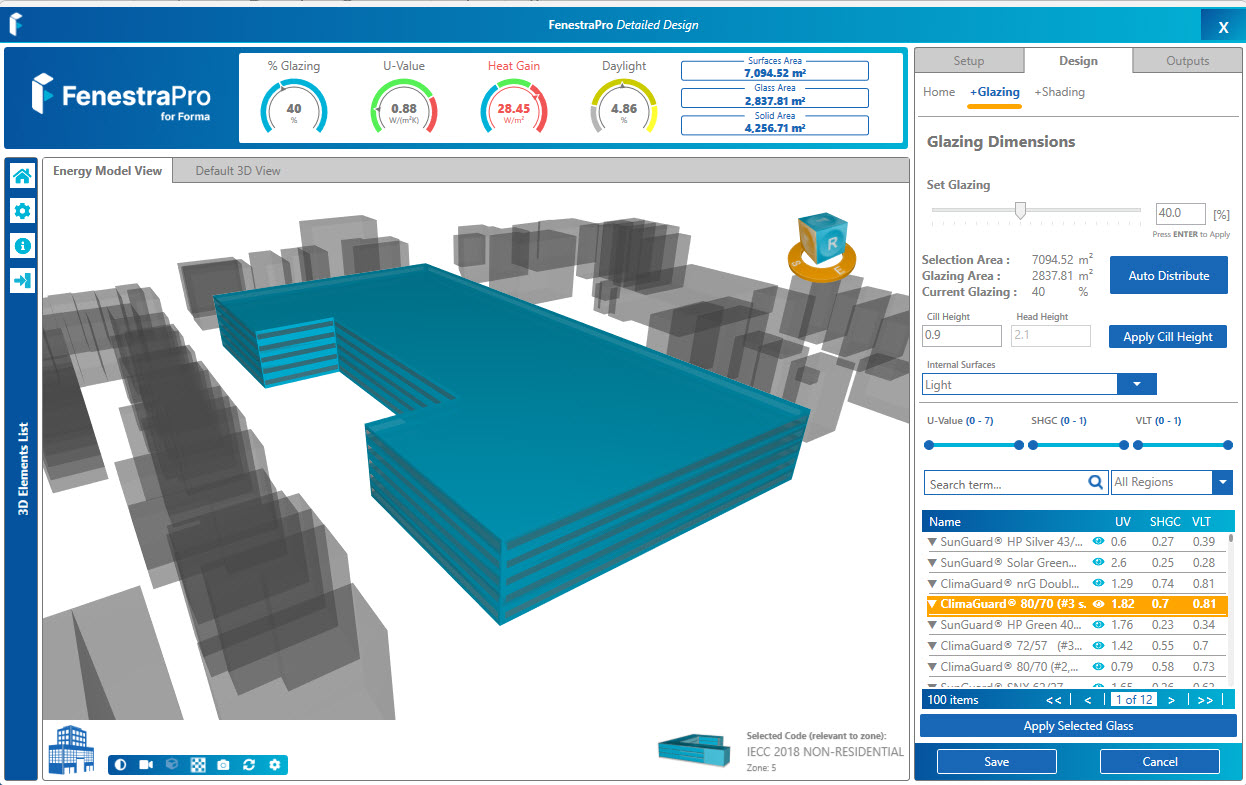
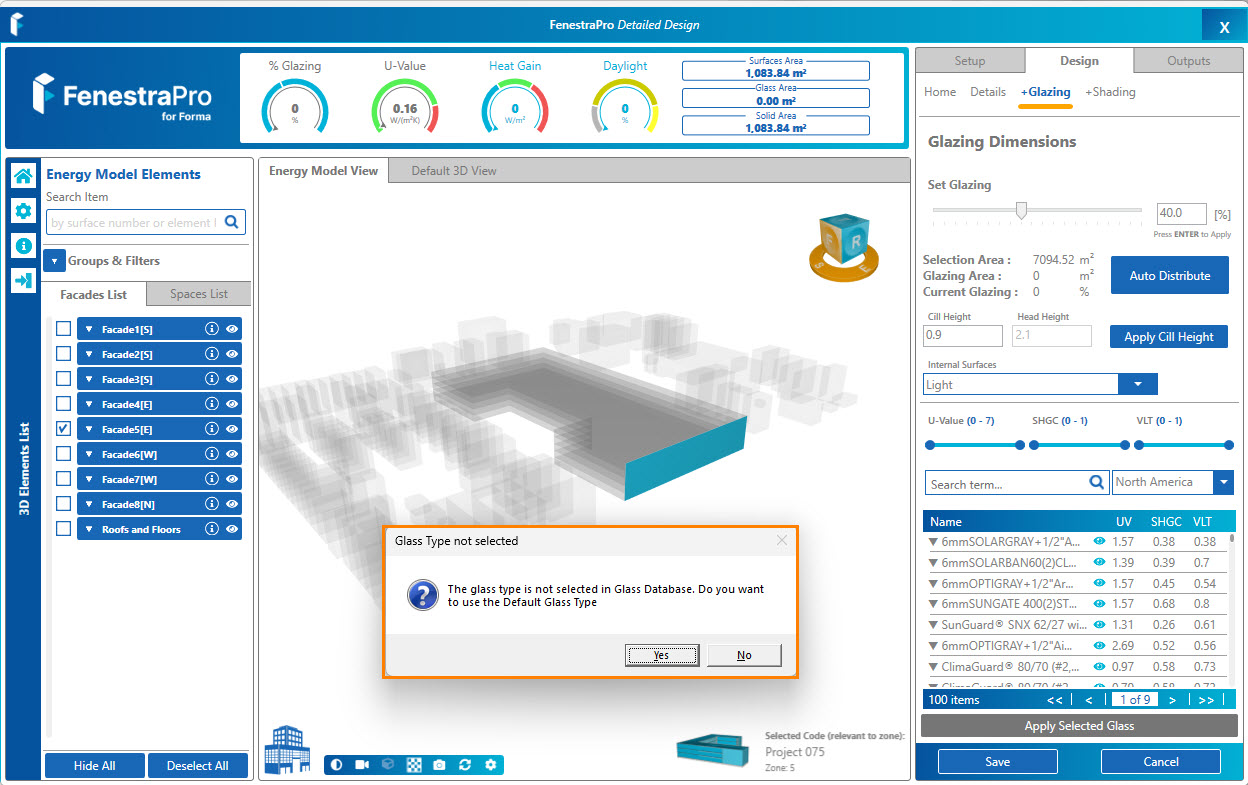
- Under the Design tab, click on the +Glazing tab, here you may assign glazing zones to model areas. First select a glass type to use in the list of glasses. Then input a value for overall percentage and press enter/return on your keyboard (making sure that your cursor is in the Set Glazing percentage box).
- If you do not select a glass type, a message will display to remind you and offer the option of using a default glass. Note: If you have selected one or multiple Surfaces, only these areas will get glazing so the overall glazing value on the Dashboard may be different (other areas on the model will have no glazing).
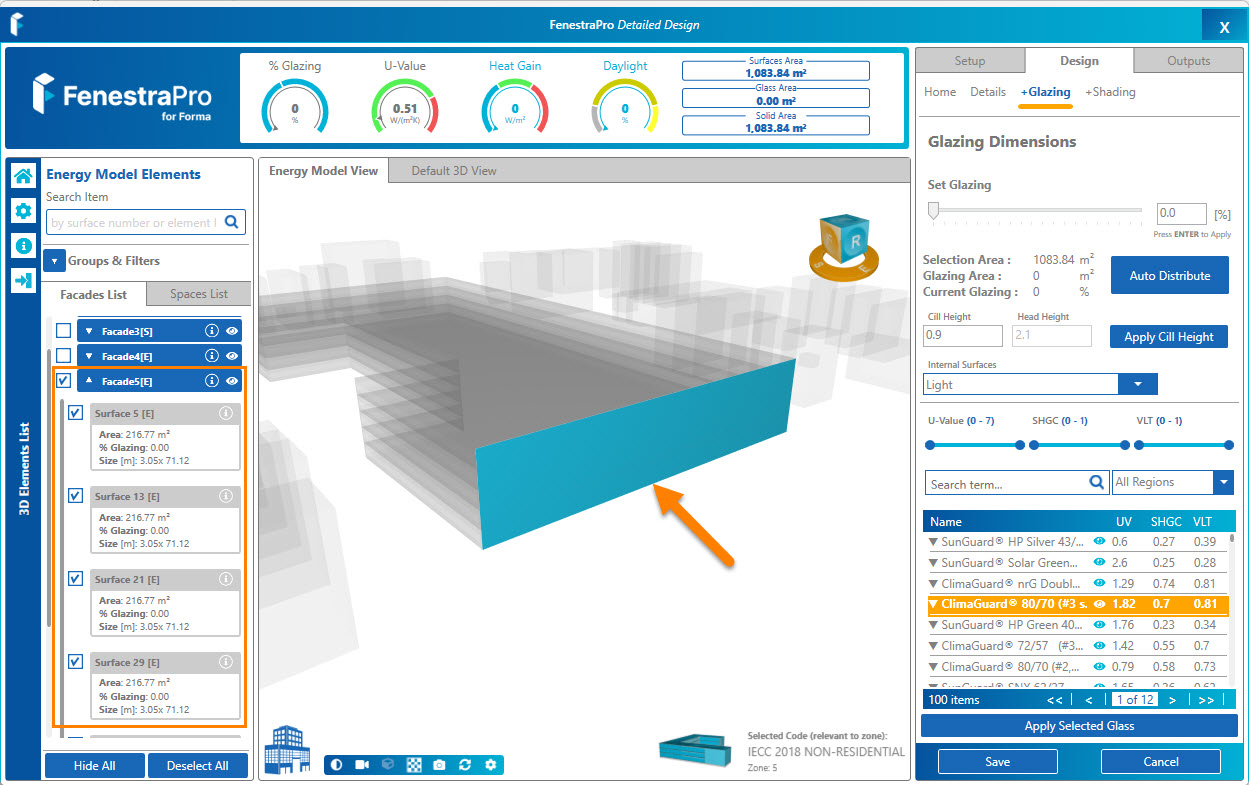
- You may then select Facades or Surfaces on the model. You can do this using the Facades List or by hovering over areas on the model in the Viewer and making selections. Once selections are made, you may define glazing percentage and glass type separately for these areas. Note: To use the Facades List, make sure you are in the Energy Model tab (not the Spaces List tab).
- You may also change the glass type for selected areas on the model and the results will update (due to the glass properties for solar and light transmission, as well as u-value). Use the Apply Selected Glass button below the Glazing database list to change the glass type on the model.
- Surfaces on the model are separated according to levels and internal walls. You may select Surfaces by hovering over areas on the model in the Viewer, by making selections in the Facades List or using the Charts.
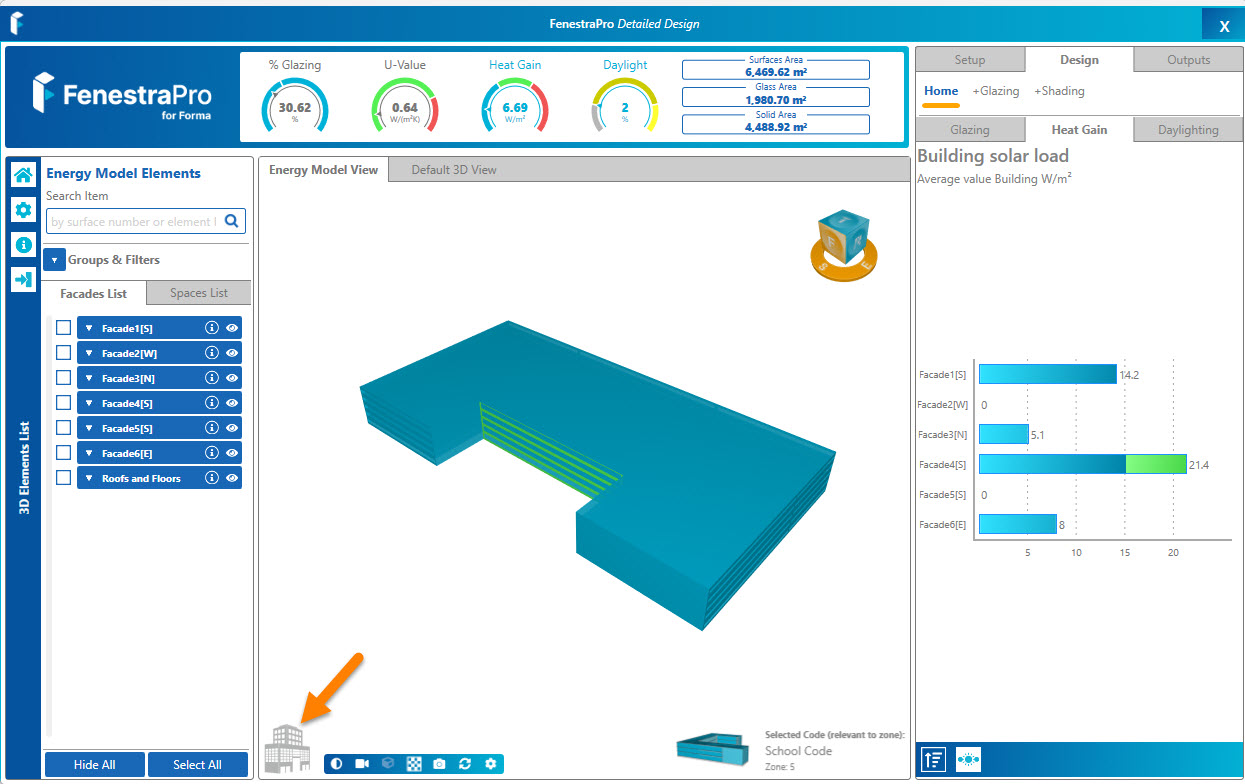
- The Dashboard will display results depending on the current selections made (results for the entire model or for the selected areas only).

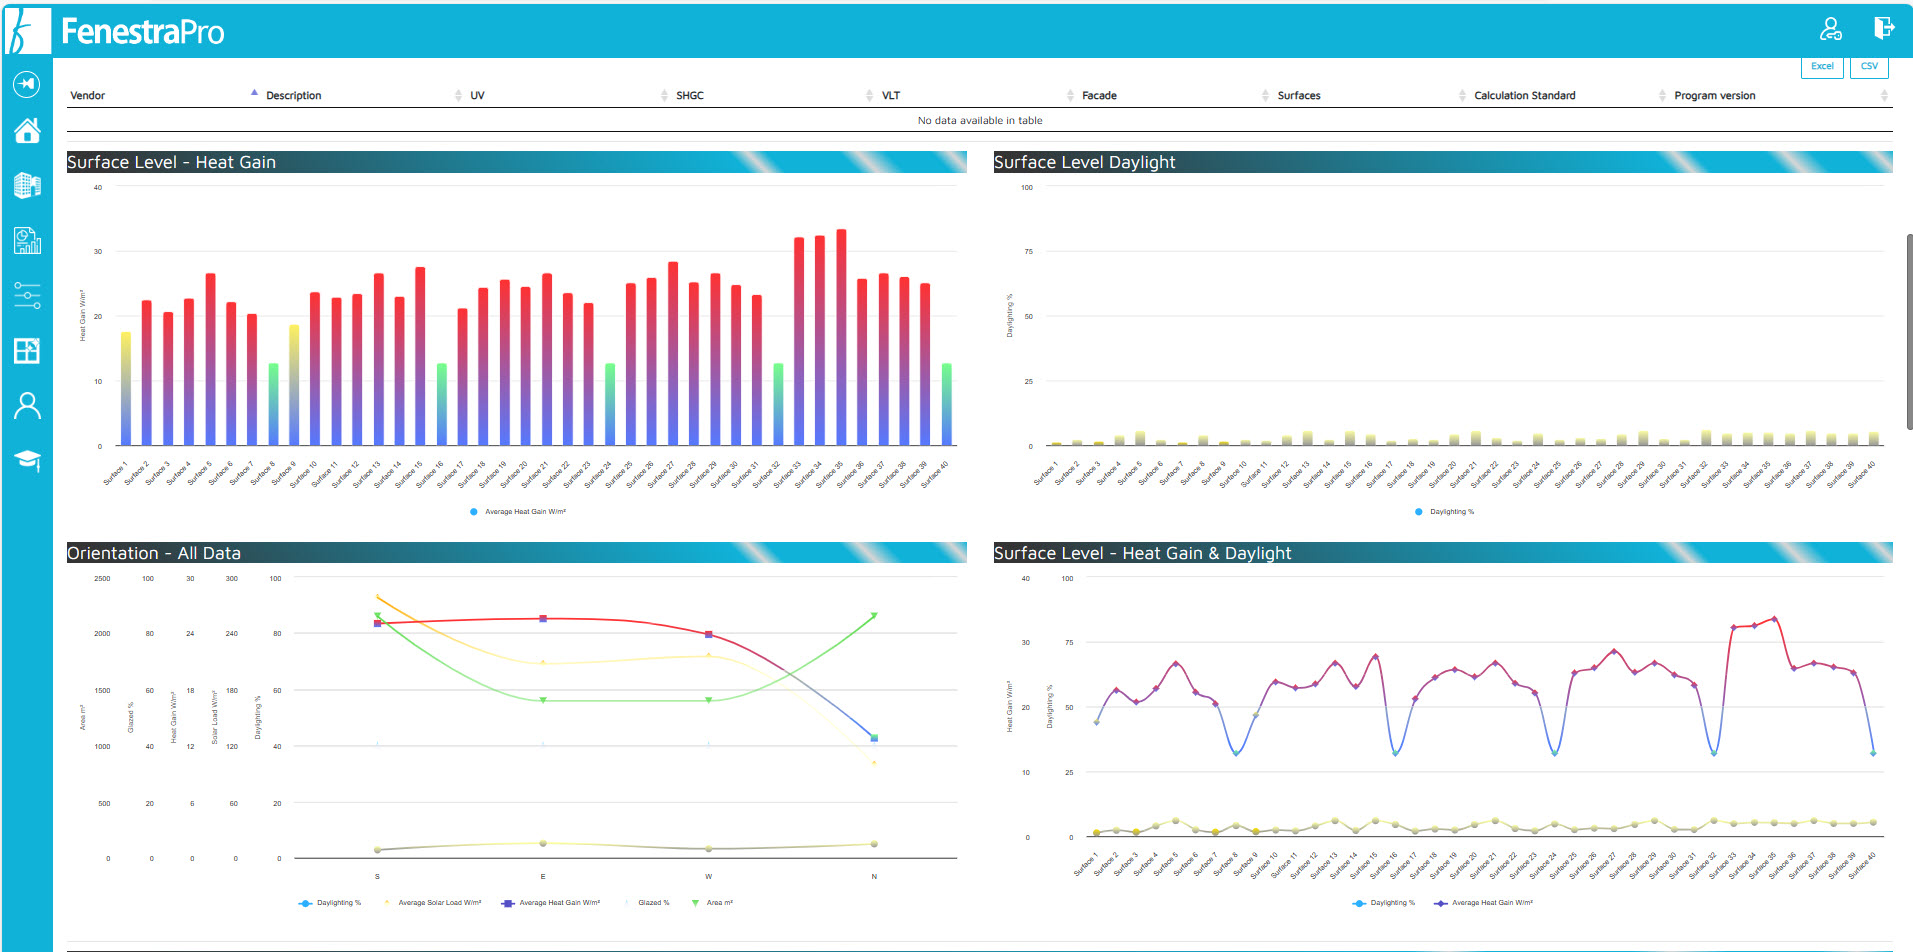
- Under the Home tab, you may review the Charts for Glazing, Heat Gain and Daylight. Colors will display on the model and for values depending on the Chart values (0 – 15 Blue, 15 – 25 Green, 25 + Red). These colors indicate a below optimum, recommended range and overheating ranges.
- The surroundings may be hidden by clicking the building icon in the lower left corner of the Viewer.
- Once selections are made, the Details tab will display. By clicking on the Details tab, you can review Surface details (such as glass types, properties and coverage). Each Surface will be listed separately.
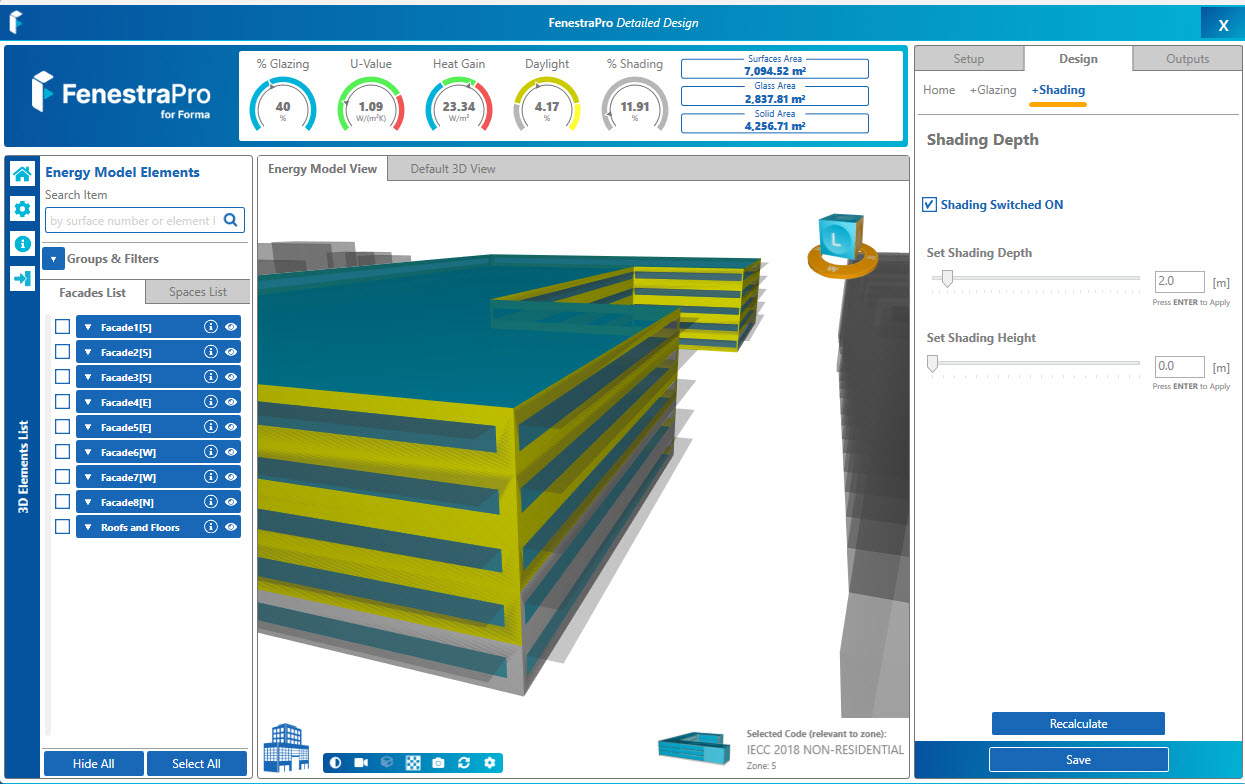
- Under the +Shading tab, you may add shading devices to the model by setting a depth. Note: the shading checkbox (Shading Switched On/Off’) must be turned on. If shading has not been calculated yet, this will be done and may take a few minutes. It is best to wait for this to complete fully rather than to leave this area or navigate to other tabs while the calculation is ongoing. The shade devices will also appear on the model in the Viewer and Shading Charts and results will be created. Note: All areas will currently get shade devices and you cannot yet apply only to selected areas. The Shading Height input will move the device up or down if there is enough space on the model.
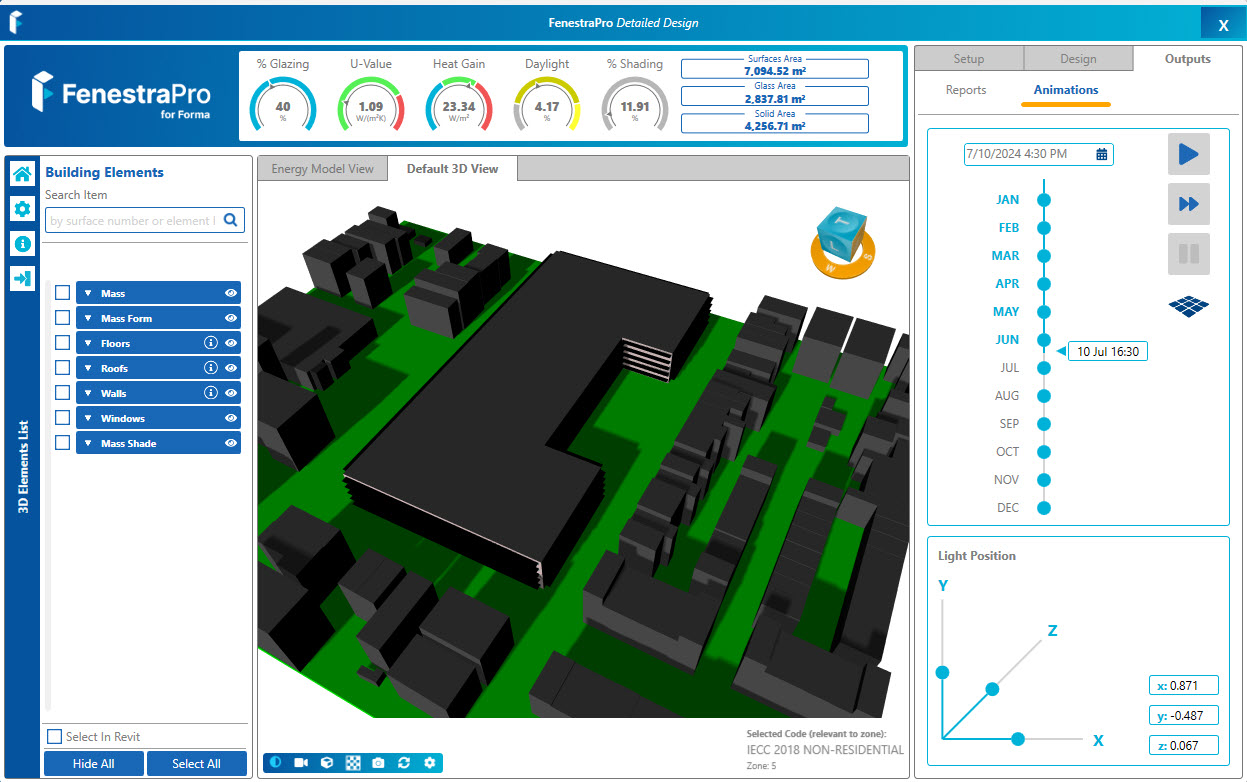
- Under Outputs – Animations you may review shading at different times of the year by running the animation. There is a button to turn on a Ground Plane if there is none in the view. You can also select a date from the dropdown list or drag the arrow in the timeline to a new location.
- The Reports function will send data to a HTML Report in your online Account area. This will report areas of solid and glazing zones, Facade and Surface numbers, thermal properties and Charts which may be customized (go to the top of the Reports window in your browser and click on Custom Reports) .


To navigate the model in the Viewer:
- Right mouse button held down allows orbiting (or use arrow keys on your keyboard)
- Hold mouse wheel down to pan (or use shift + arrows on your keyboard)
- Use your mouse wheel to zoom in and out (or hold down left mouse button)
![]()
Notes for this beta release:
It is better to keep only the immediate surrounds if possible in Forma (not to include large amounts of context buildings) so processing times for shading will be faster.
For this version, all results and measurements will be metric (even if you change the units in settings). This is to be addressed later.
Some regions may not see a full list of Energy Codes or Codes that you created. There is a default Code provided which may be selected for the moment for the moment.
Shade devices will currently be applied to all areas on the model (not just to a selected Facade/Surface). This is to be addressed in a future release.
The Save buttons in the +Glazing and +Shading tabs are to be enabled later so that the model with glazing and shading settings may be opened in FenestraPro. This is not yet available.
Known Issues:
If you have more than one building in the project, if a second building is in front of the first building, the first building may not get allocated a Facade here. In this case, all buildings that are part of the proposal in Forma are analyzed together in the FenestraPro standalone/desktop version. To analyze the buildings separately, you can model the second building as a surrounding (as part of the base surroundings in Forma). Note: in Autodesk Forma if you modify the base surroundings, all proposals for that project may be updated.
FenestraPro also has an extension for Forma which may be used in the Forma Browser window. Please see HERE

![]()
